GovBuilt Platform Release Notes
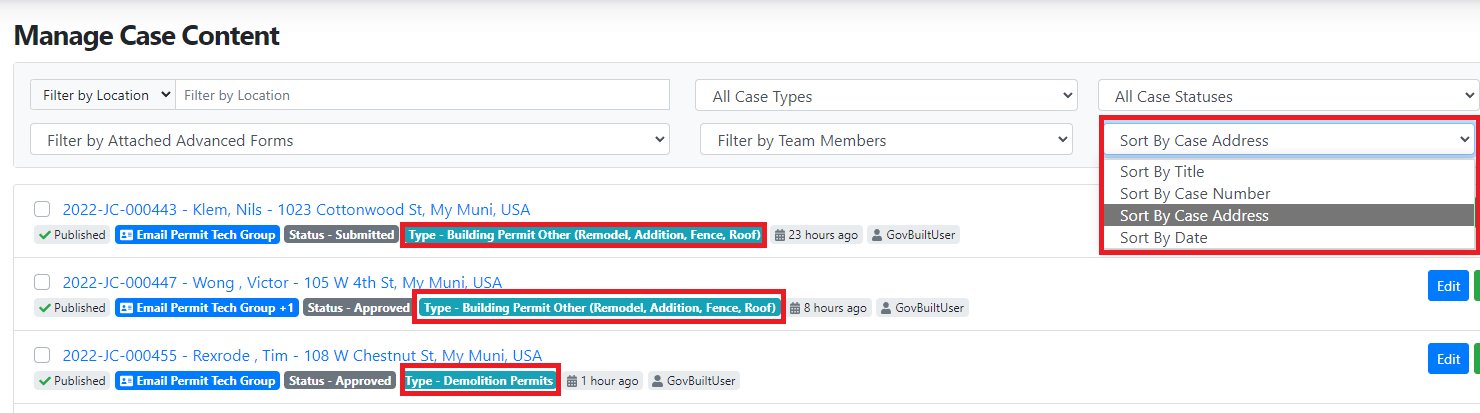
Case List Page Upgrade
By client request we added a few new features.
- Ability to order by Case Title, Case Number, Case Address, or Date Created
- Added a Type tag to the list item to make it easier to see what type of case when searching all cases
If you have a client request. we would love to hear it. Use our Support Page to request any new features.
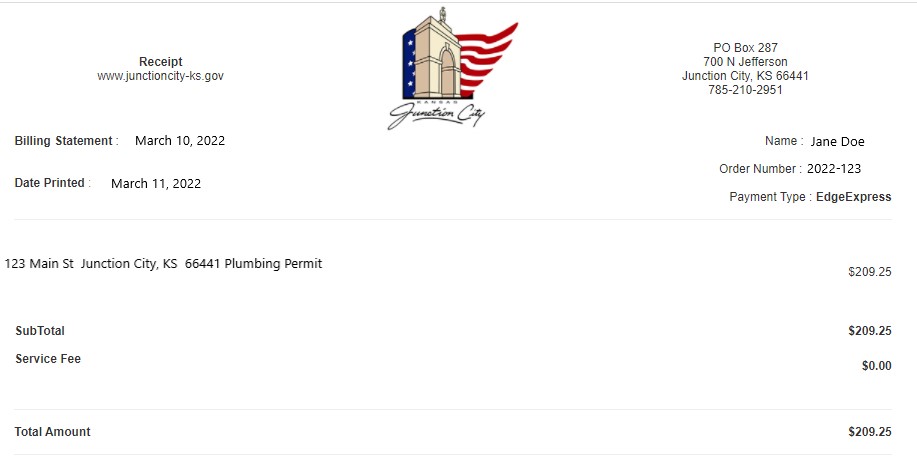
Accounting Details
- Added ability to edit Accounting Details on the Case Accounting Details Tab
- Added Case/License Type on receipt
Welcome to version 4.0! We're so glad that you have made it with us on our journey together. We appreciate you because if it wasn't for you, we wouldn't be here! Thank YOU for being GovBuilt customers!
Enough love let's get to business!
New Features
Automatic PDF Conversion
This is so cool! When you upload documents into the Media Library or you upload a permit/license "template", you can upload them in Word format, but when someone on the Front End downloads the document, we will automatically convert the document to PDF. As you well know, PDF documents aren't edited as easily as Word documents. Plus, not everyone has Microsoft Office on their computers, and PDF documents can be viewed on almost any device.
On the administrative side, when you go to the Attached Documents tab for a case, you will see a new icon. The download icon will download the original Word document, while the PDF icon will give you...well...a PDF.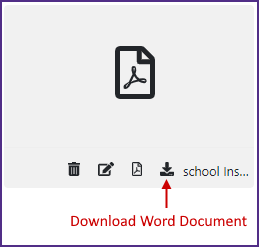
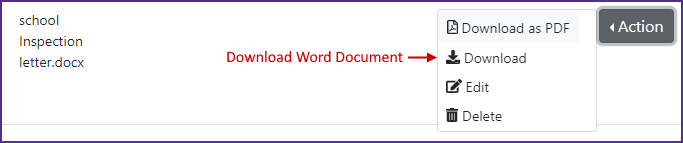
On the Front End, users will only be able to download a PDF document.
Automated Attachments to Links
We've noticed that file attachments are getting larger, and we also know that most email servers/programs have a 25 (or so) MB limit for email attachments. So how do we make sure your recipients are receiving the information they need? Easy! We will automatically combine everything into a ZIP file and link to it from the email.
That's right! You don't have to worry about a thing! Just send your emails with attached documents like normal...and if the total file size of the documents is more than 25 MB, we will put all of the attached documents into a ZIP file, and then send the link to the ZIP file in the email you sent! They get their documents one way or the other!
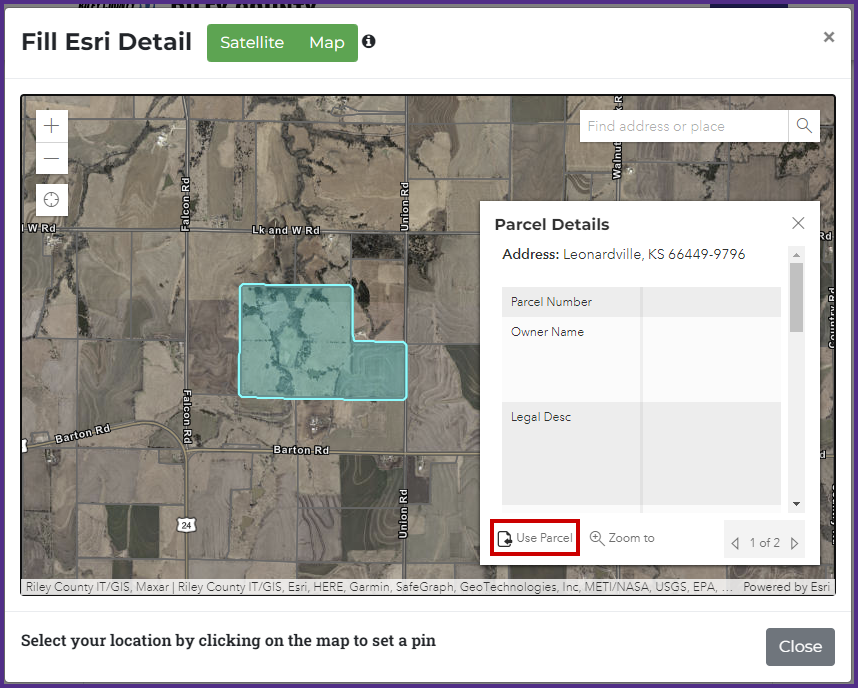
Esri Window Updates
On a form with an address field, the website visitor can type in an address or use an Esri window to find the right parcel. When you open up an Esri window to select a parcel or address (drop a pin on a map), you would select the parcel and then click the Cancel button to close the window. It's an extra "click" to get to where you need to be! So, after you select the parcel/address for the form, you click "Use Parcel" to use that address, and then the Esri window will now automatically close! We even changed the Cancel button name to Close!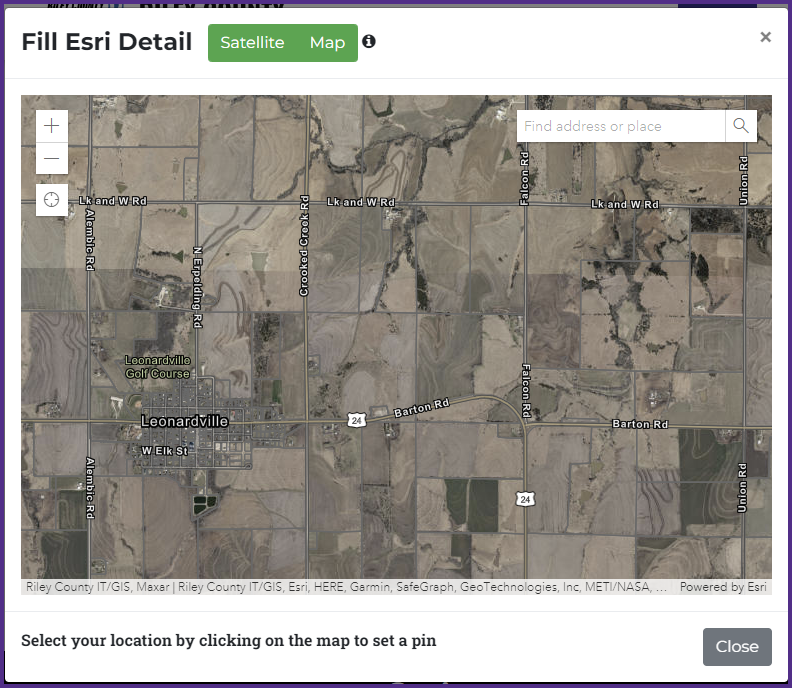
Facility Calendar Events Showing Up
Last one for this week: Another very useful addition to the Facility module! Now you can add facility calendars to your home or department landing pages!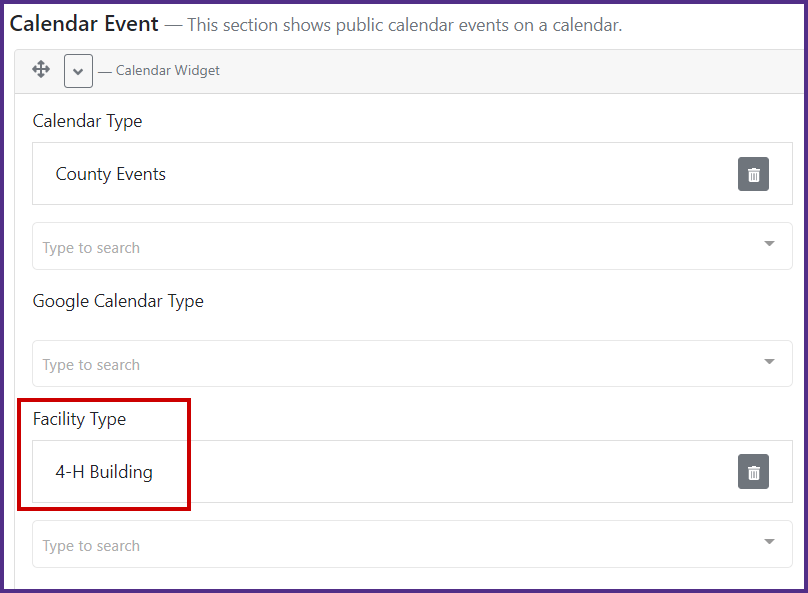
That's it for this week! If you have any questions or want to know more about the Facility Module or anything else we have mentioned, please contact our new Client Success department at or from the chat on the admin side!

|
e-PlanSoft Integration Updates |
- Added ability to Download the Full Corrections Packet along with the Correction Report
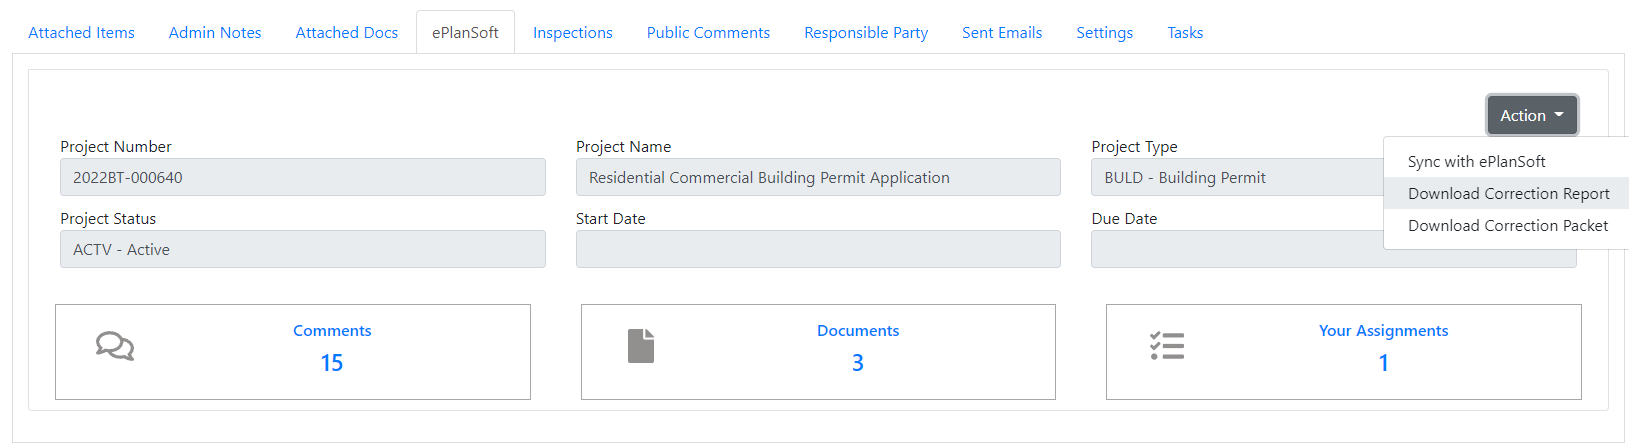
- Added ability to Sync any new Assignments added in e-PlanSoft to GovBuilt Tasks


|
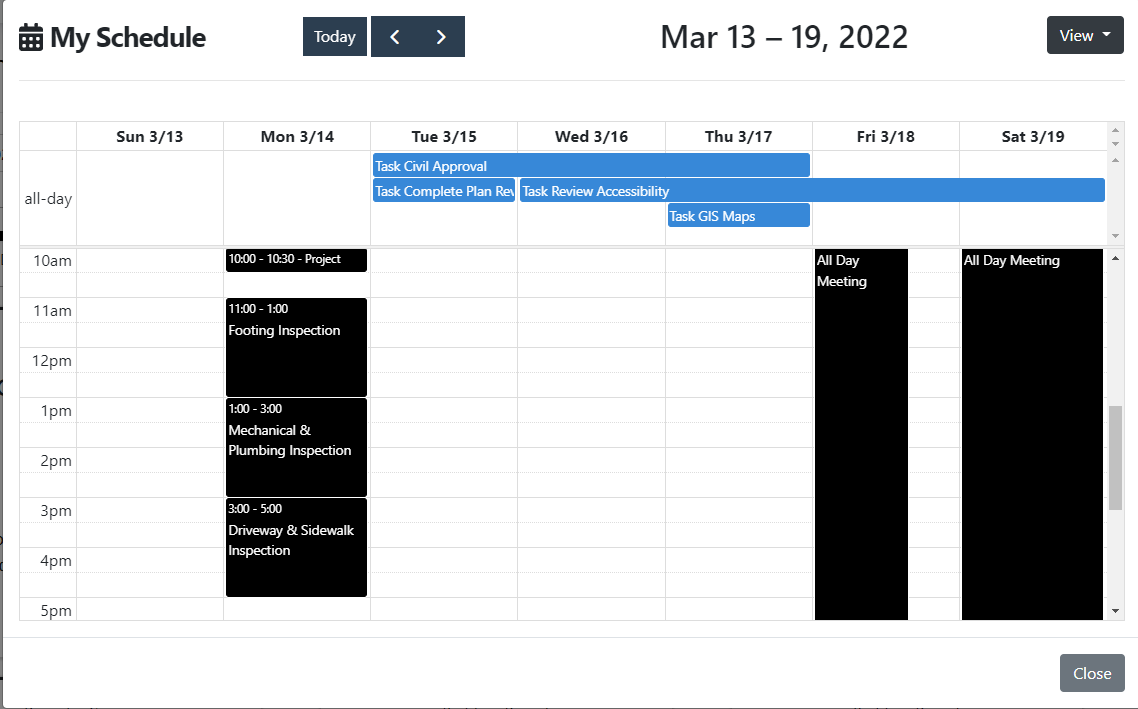
Team Member Calendar/Schedule |
- Integration with Office 365 Outlook for Users Calendar
- Addition of My Schedule Button to Show All Inspections, Appointment Requests, and Tasks on the team member schedule while syncing with their Outlook Calendar

Accounting Details Upgrades on Cases and Licenses
- Added bulk actions of unpaid records to Delete, Copy Payment Link For Single or Multiple GL Keys, or Send an Email to the Applicant the Link

- Added ability to auto total your records with the total cost using the calculator icon to save you time
- Added ability to edit an unpaid record

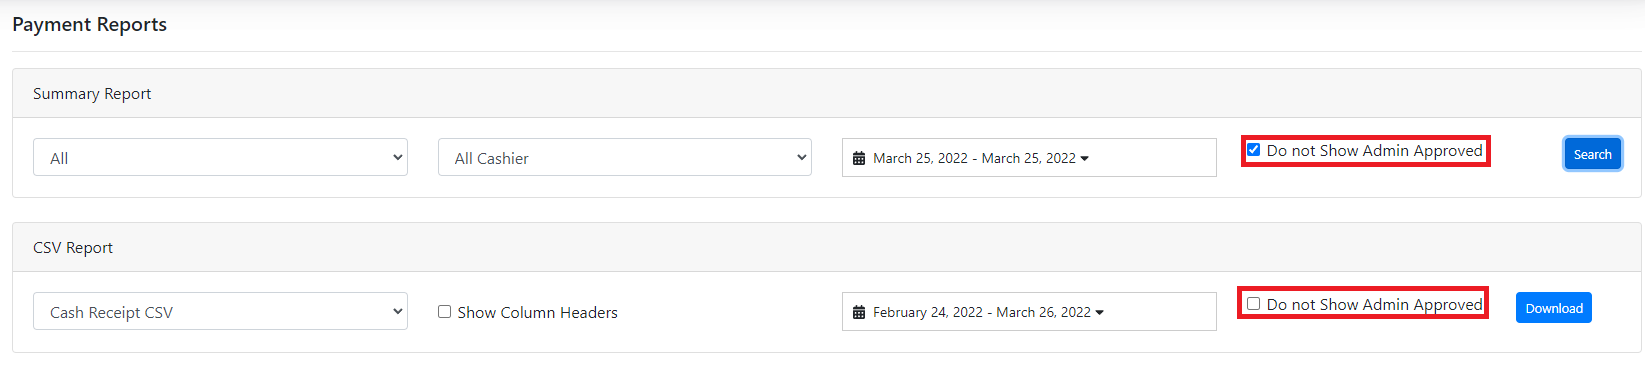
Payment Report Features
- Added ability to remove the Admin Approved Payments from both the Payment CSV Import Files and the Payment Summary (Reconciliation) Report
Report Builder Features
- Add Currency option to the Simple and Advanced Report Builder. When selected if the item is a number it will turn it into the format "$9.99"
We at GovBuilt want to thank the service men and women who have fought and continue to fight for our independence in the United States. Thank you for your service!
Now that everything has settled...We've done it again! More NEW features and updates that you are going to find so useful, you will wonder where they have been all your life! Let's get started!
Updated and NEW Features
We're starting off with a BANG! this time! You can now control the default settings for your Esri or Google maps on both the public side AND for your internal Team Members! - For the administrative side of the website, you can set the default Zoom level, Base Map, and Location, while for the public side, you can also add the ability to set up which layer is the default view!
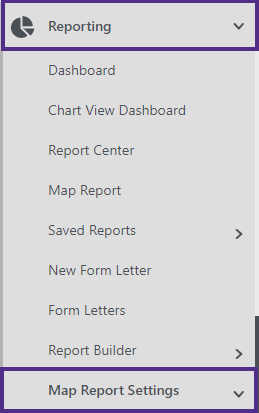
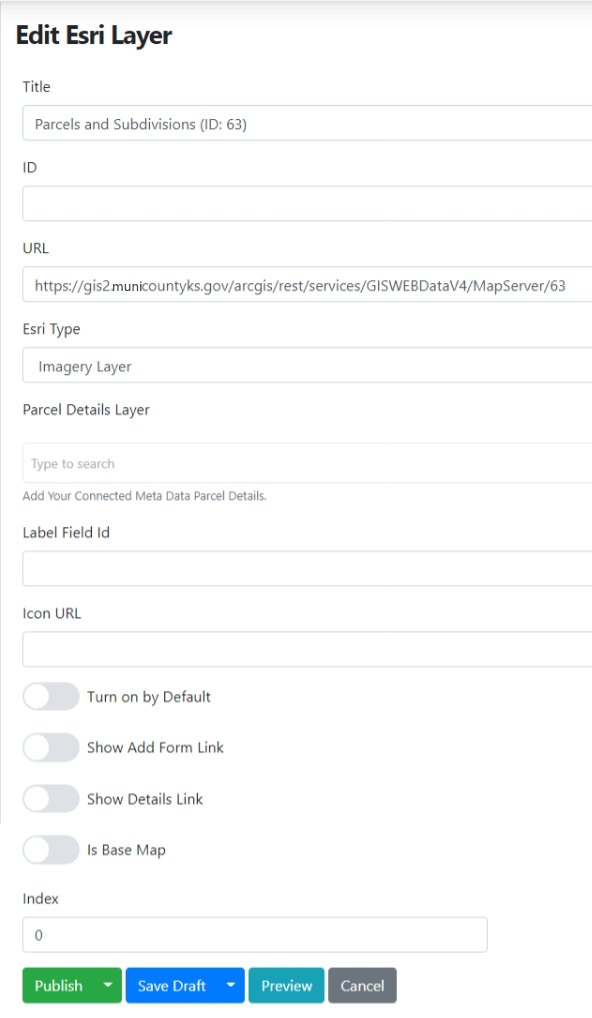
Map Report Settings
The new Map Report Settings group is found in Reporting > Map Report Settings.
To see what has already been set up for you, go to Esri Layers
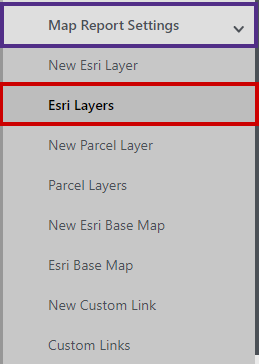
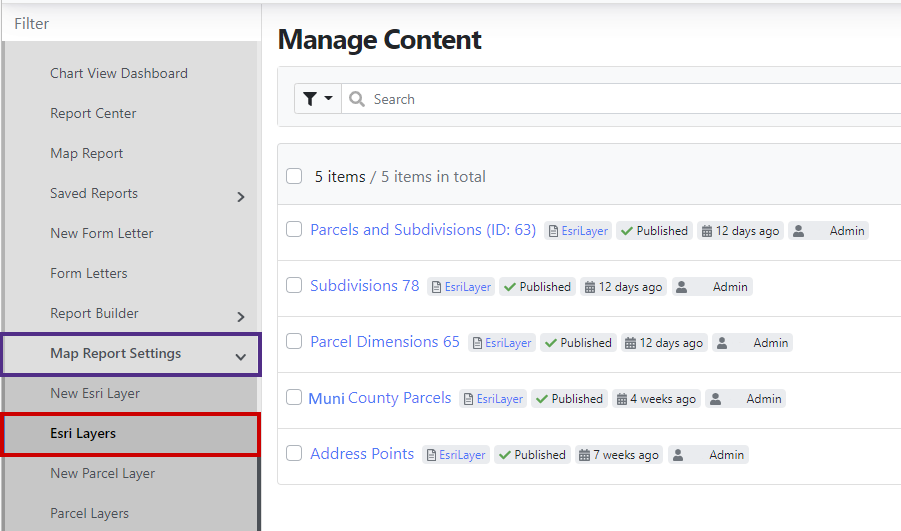
You can have/add multiple layers for your maps, set it as default, make it a Base Map...
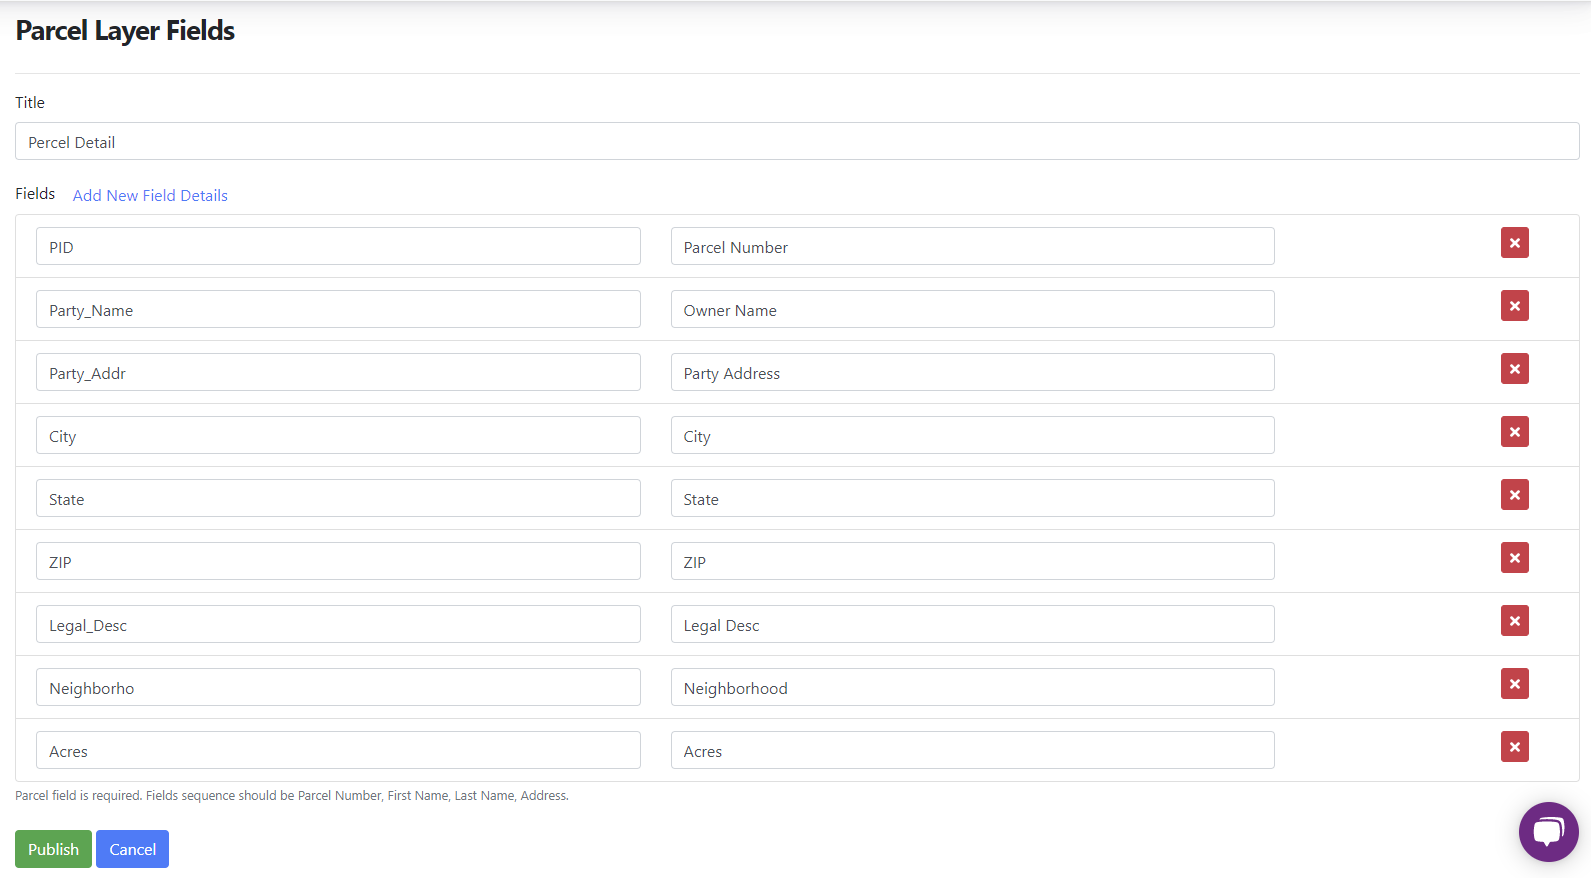
Parcel Layers is where you can "map" your fields and set up how you want to name/label them.
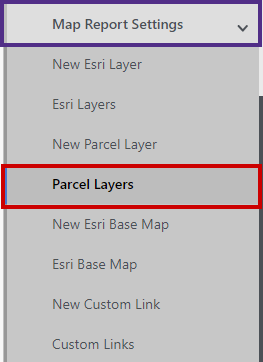
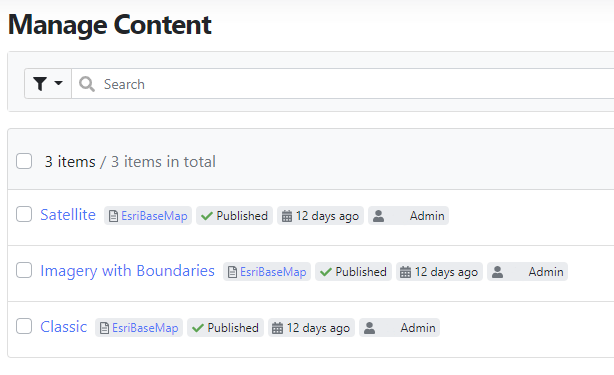
If you have multiple Base Maps, you can set them up here.
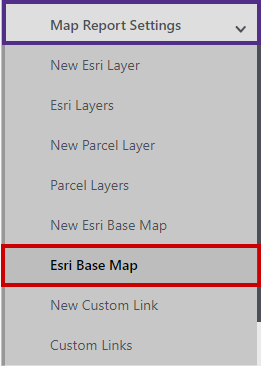
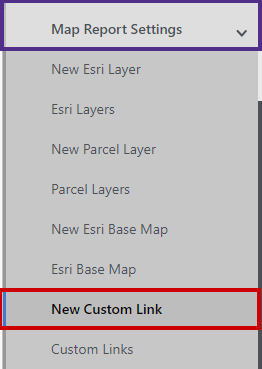
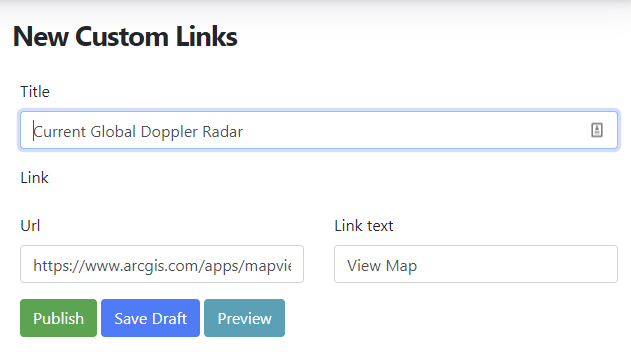
With Custom Links, you can also add additional links to other maps, documents, websites, etc.
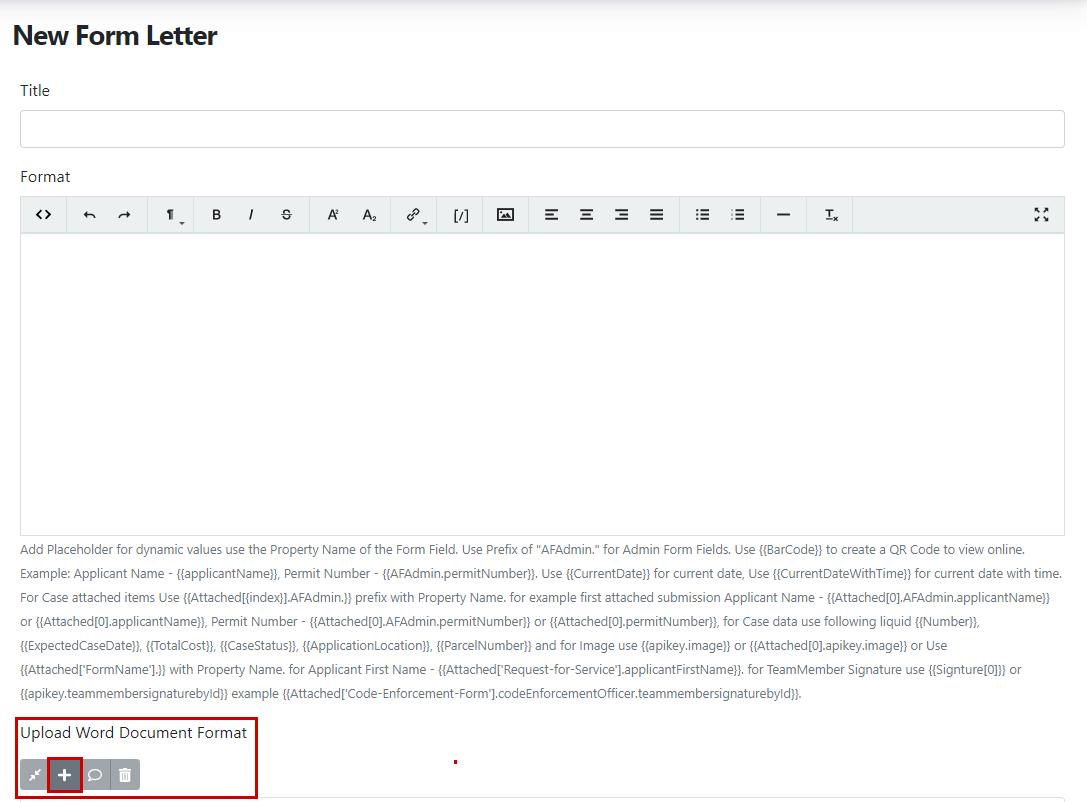
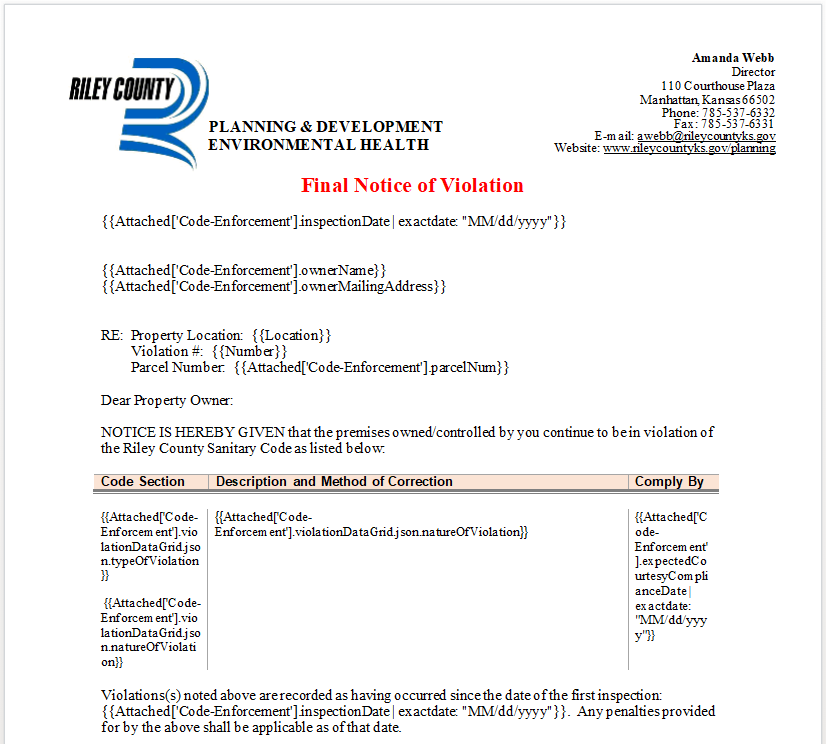
You are going to LOVE this! You can now use a Word document as a template for your Permit Types, Form Letters, and License Formats! You will need to be sure you get the liquid code "{{Attached[0].AFAdmin.applicantName}}" from your fields into the document, but the images and layout will be the same!
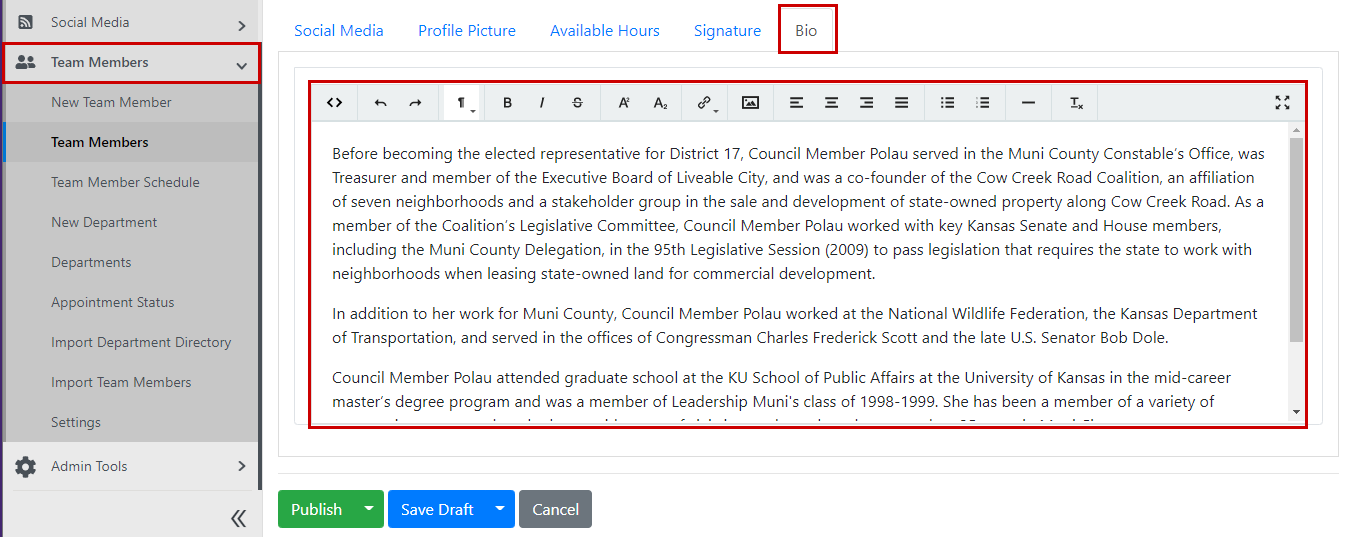
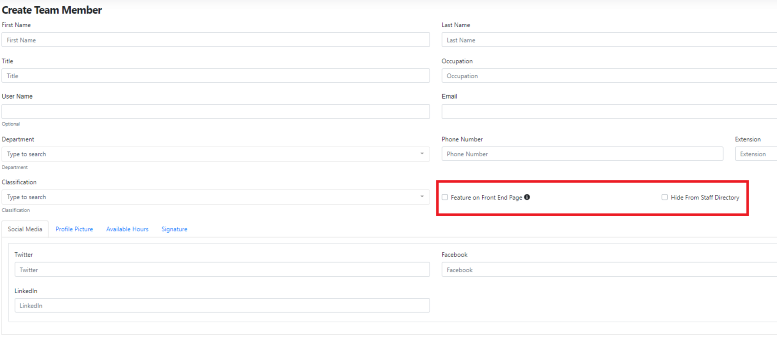
Team Members and the public Staff Directory have a few new options to take advantage of if you need to display members in a team with a photo. The members (examples might be Administrative Staff, Board, or Committee Members, etc.) can now have a Bio link on the public Staff Directory to the right of their Social Media icons. When you add or edit the Bio, you're using the same Online Editor, so you know you can add text, links, or add images to their content.
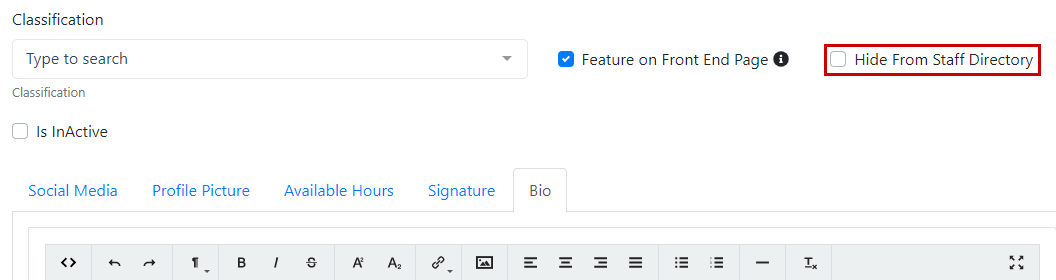
For your team members that do not need their email address "out there;" (Trust me, they get their contact info in other ways!), they can now "Hide Email on Staff Directory" or "Hide Email on Staff Directory Widget;" and their email address won't show up in the Staff Directory anywhere! Boom! (Sorry! Leftover fireworks.)
For Inspections, we added the ability to add a Scheduling Name instead of the inspector's real name because safety is important to all of your staff out in the field. Some of you know what I'm talking about.
You can also assign more than one inspector when scheduling an inspection on the front end. This way, they can work with each other at trading stops without having to change anything in the schedule.
Issues/Bugs Fixes
We had a couple of "strange ones" show up in time for the 4th of July. Some workflows started creating form letters and attaching them instead of filling in the form letter on the case. Yeah, we didn't know what the workflows were thinking either ...and we had a little confusion when you would edit a team member. It used to say "Create Team Member" and not "Edit Team Member." It now correctly states that you are editing and not creating a new one.
Please let us know if you have any questions about this or any other Release.
Enhancements
Tile View
- Added Tile View on Case Types and License Types

- Check out these tutorials Setting Default Case Type Tile View and Setting Default License Type Tile View to change your default view
- Check out these tutorials Modifying Case Type Icons and Modifying License Type Icons to customize Tile Icons
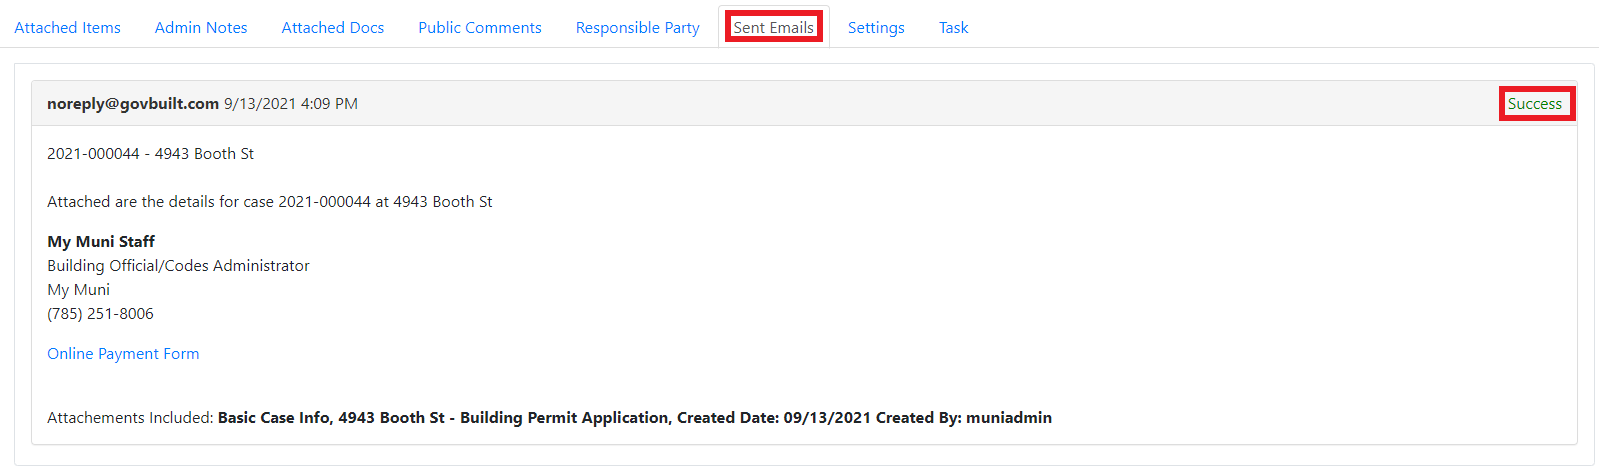
Sent Emails
- Added ability to search sent emails by date range or by keyword
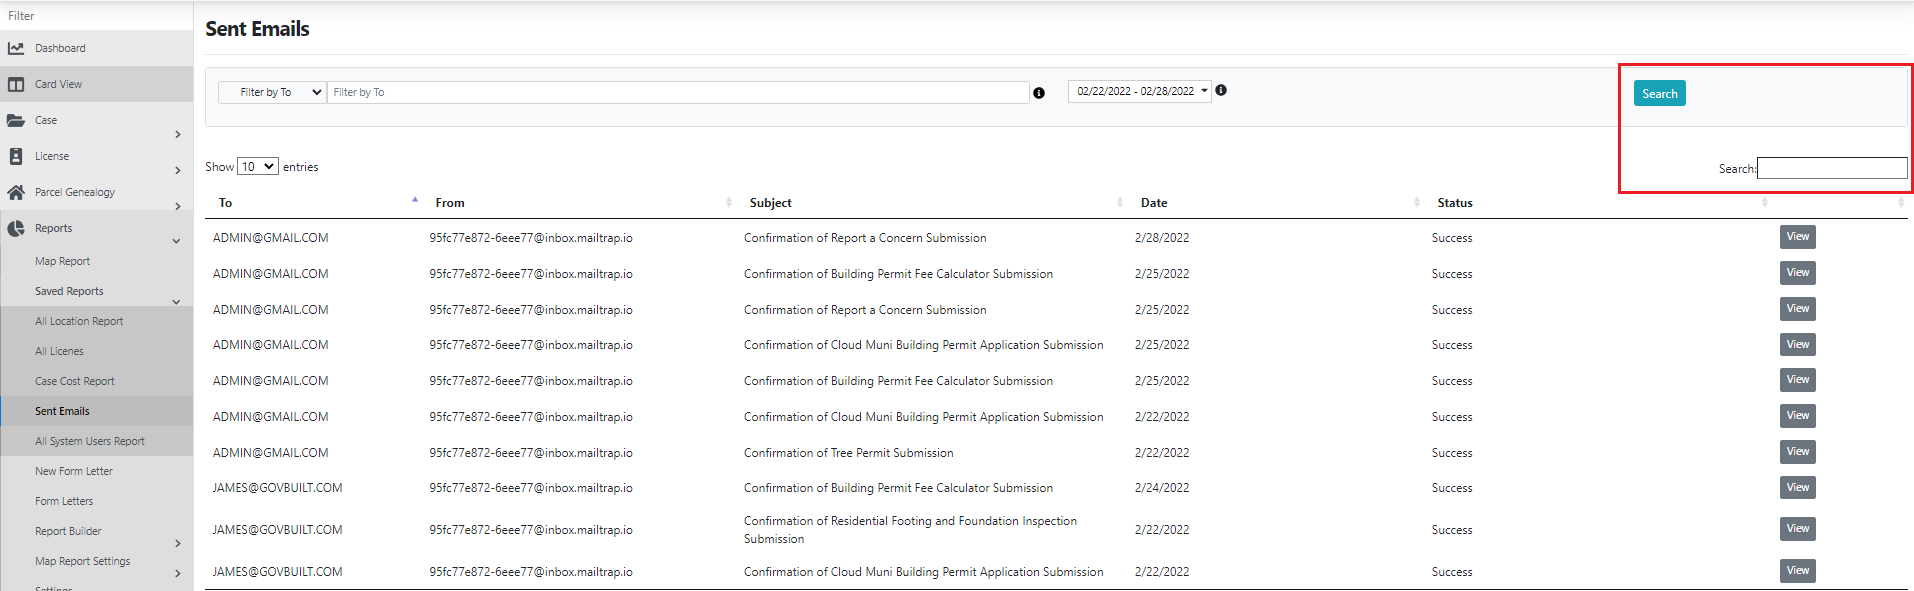
- Check out this tutorial Searching Sent Emails for a how-to walkthrough
- Added ability to resend or forward a sent email
- Check out this tutorial Resend or Forward a Sent Email for a how-to walkthrough
Comment Enhancements
- Added ability to Shut Off Comments on an Advanced Form. When form is in a case or license this will hide the comment tabs on viewing a form that is attached to a case or license.
- Check out this tutorial Shutting Off Comments on an Advanced Form for a how-to walkthrough
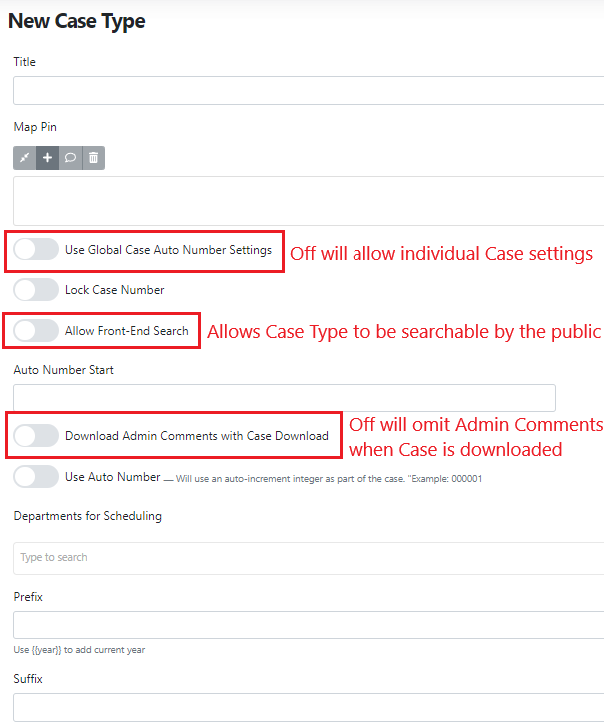
Case Type Enhancements
- Added ability to turn off or on Global Case Auto Number Settings
- Added ability to choose if you want a Case Type to be searchable to the public
- Added ability to turn on or off Download Admin Comments with Case Download
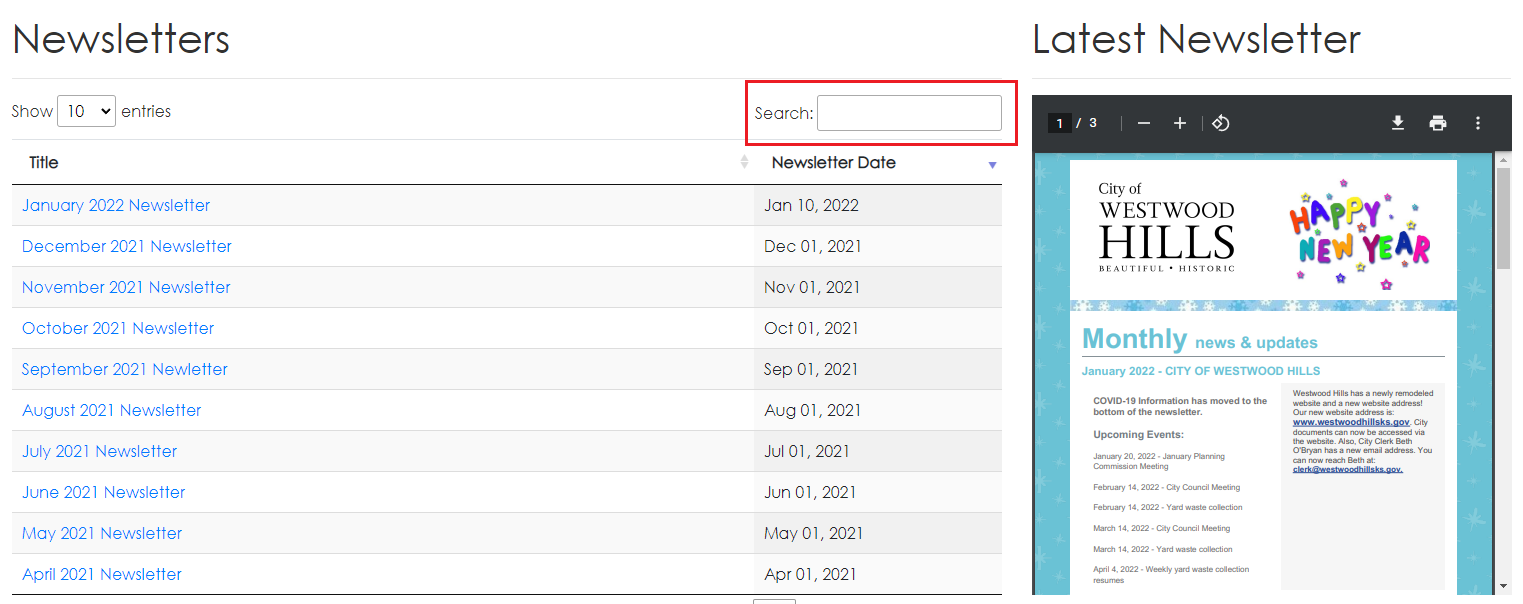
Newsletters Module Enhancement
- Added ability to search Newsletters
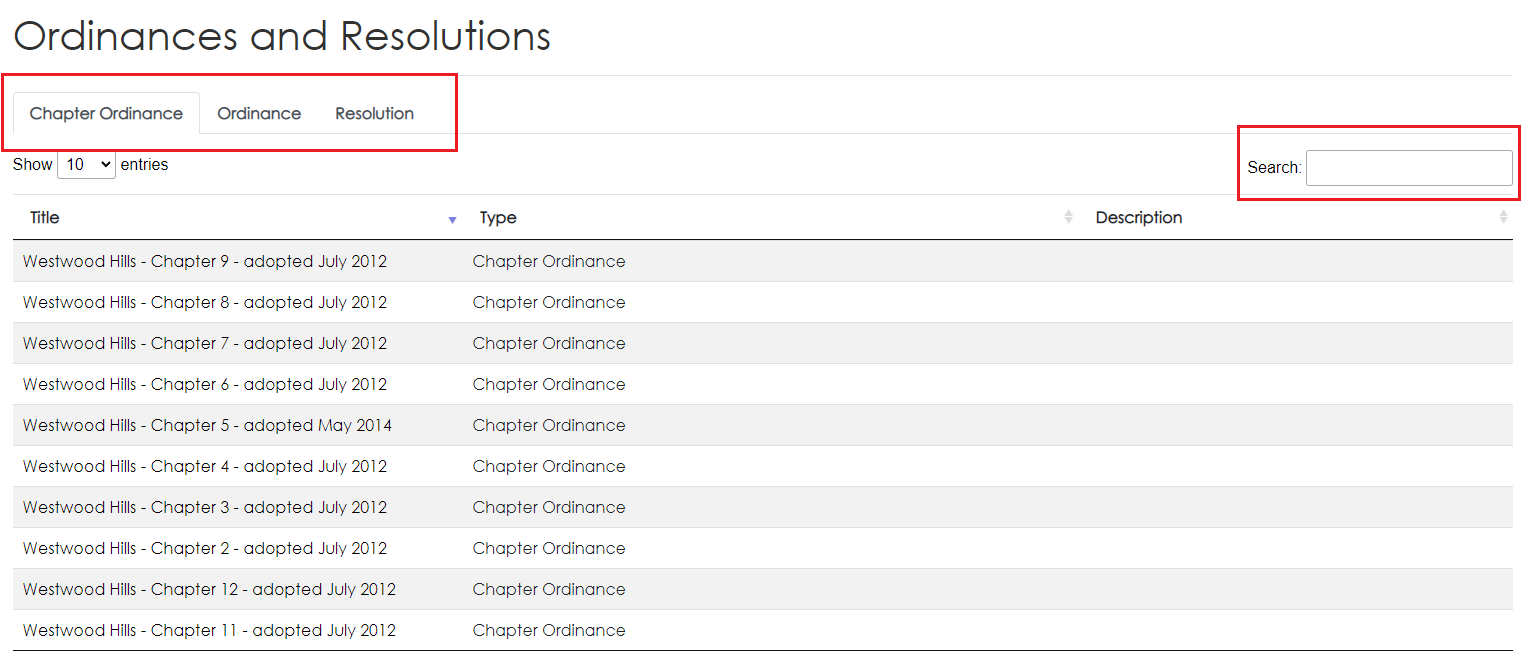
Ordinances and Resolutions Module Enhancement
- Added ability to split out Ordinances and Resolutions into 3 different categories
- Added ability to search Ordinances and Resolutions
Enhancements
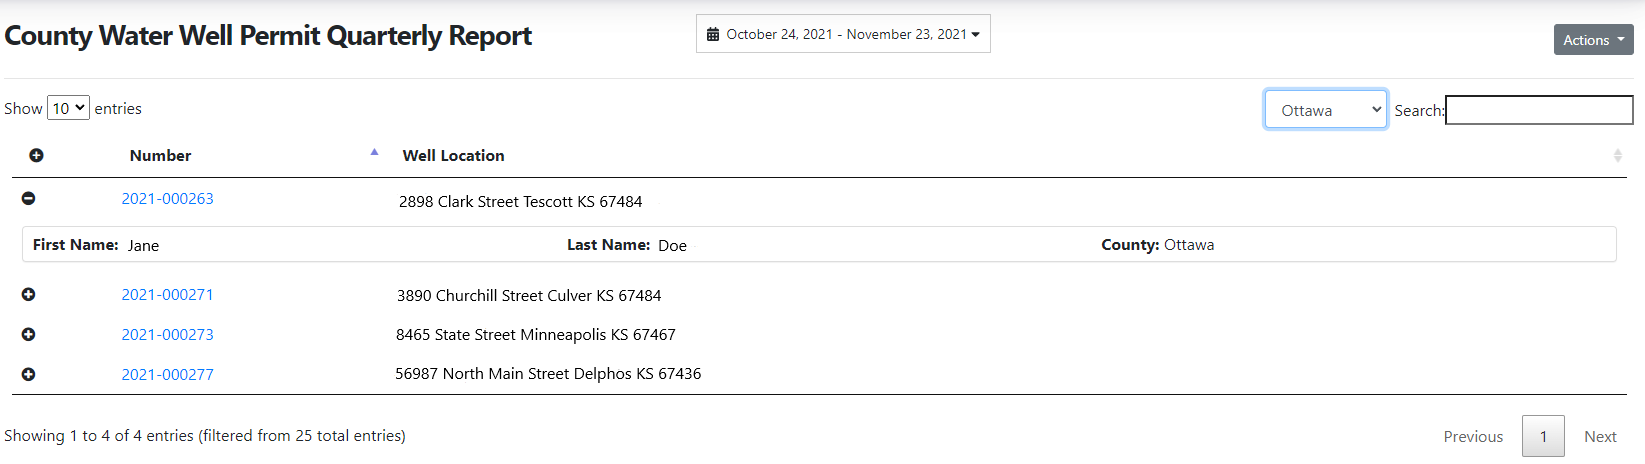
Report Upgrade
Added ability to filter the report by a field on the report. The example below shows County Water Well Permits filtered by the county.
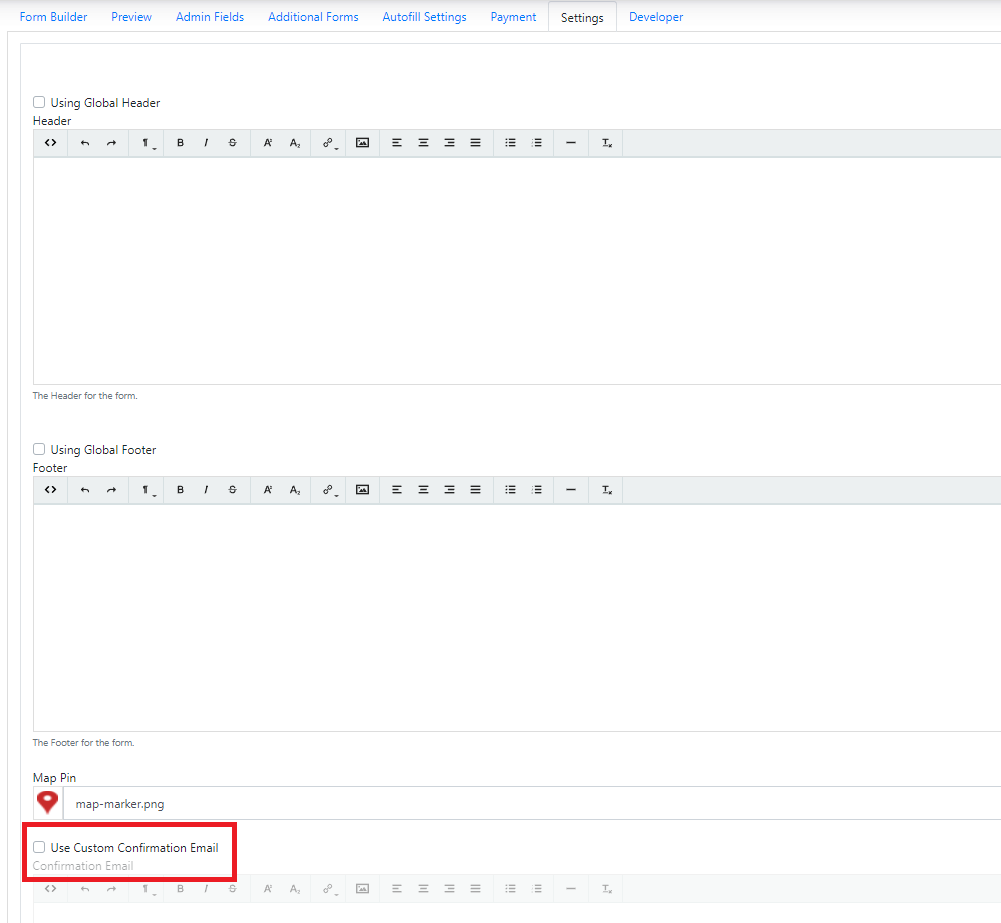
Confirmation Email Upgrade
Added ability to create and use a custom confirmation email. This enhancement allows the ability to customize the email by adding inspections needed, rules, codes, etc.
Parcel Genealogy
Added a View All Submissions button on the form submission.
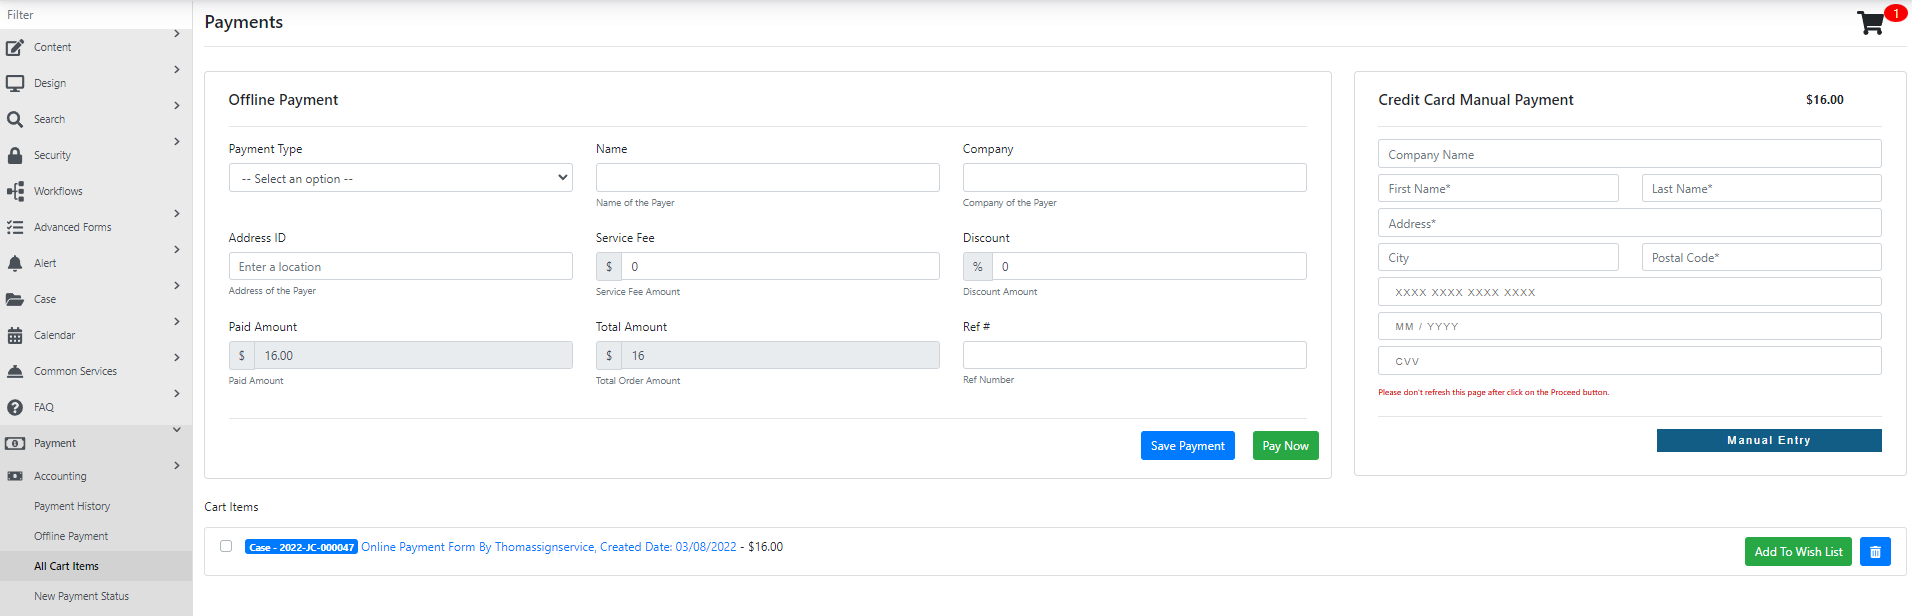
New Payment History Features
- Added ability to search payment history by Order Number, Address, Name, Company, Last 4 of Credit Card, Total Cost, and Transaction Number
- Added new items on Payment History View: Last 4 of Credit Card, Transaction Number, Address, and Total Cost
- Now shows Case Number, Permit Number, or License Number to cart item details
- Added Business Name (if applicable)
- Updated Accounting Details with Payment Date instead of Submission Date
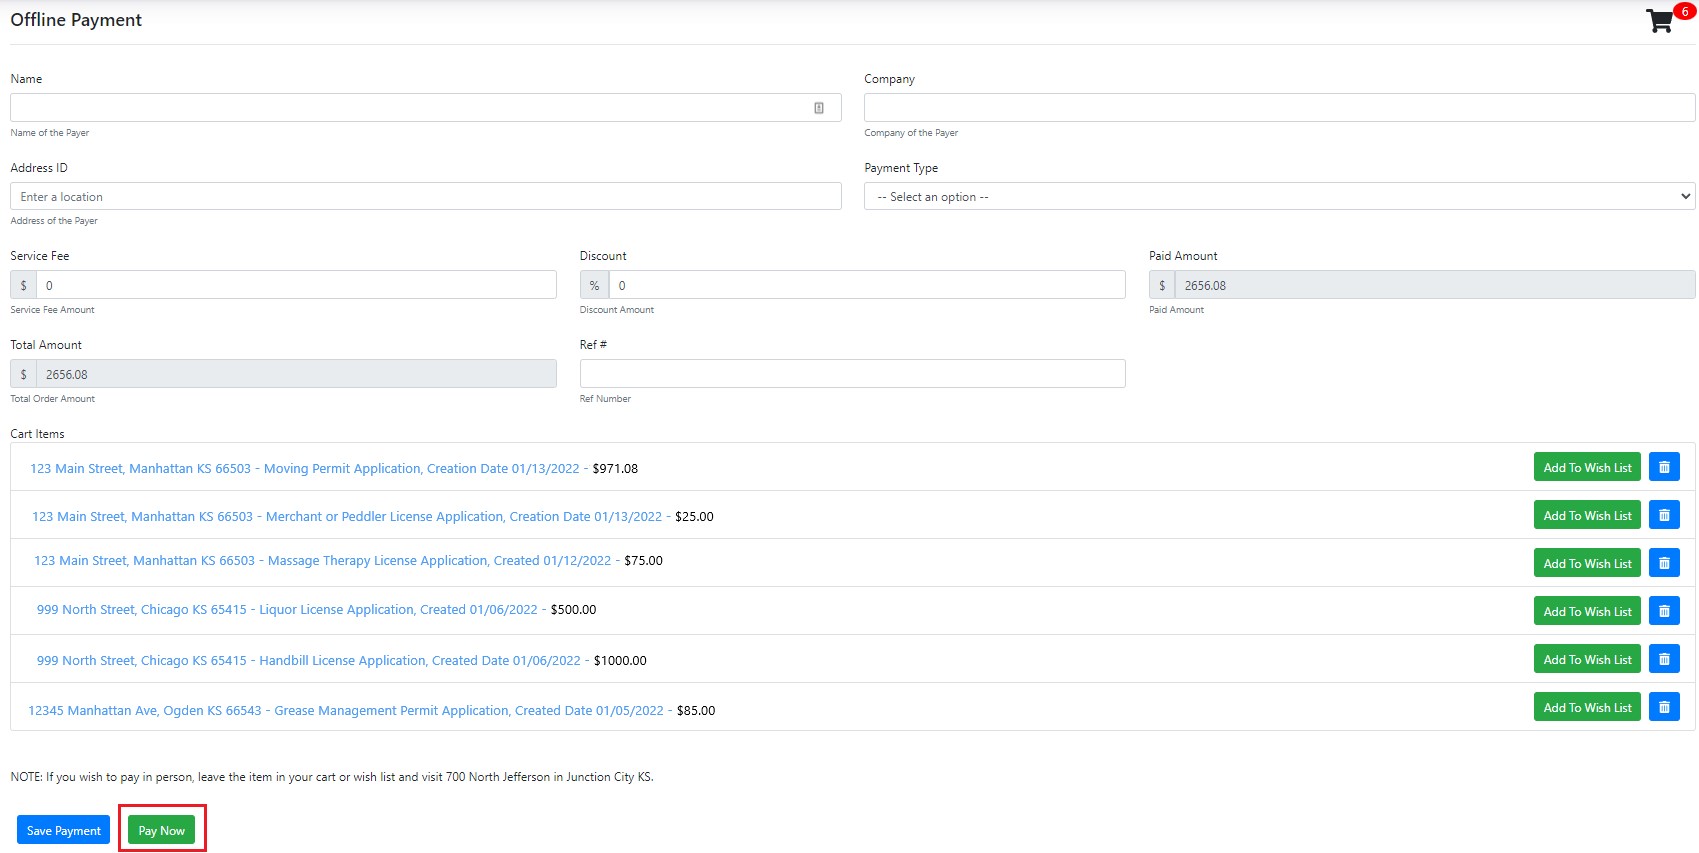
Offline Payments and All Cart Items
- Added ability to record an offline payment for accounting reporting
- Added ability to add multiple items into cart to make one payment
- Added Credit Card Manual Payment to manually type credit card details and send to the payment vendor
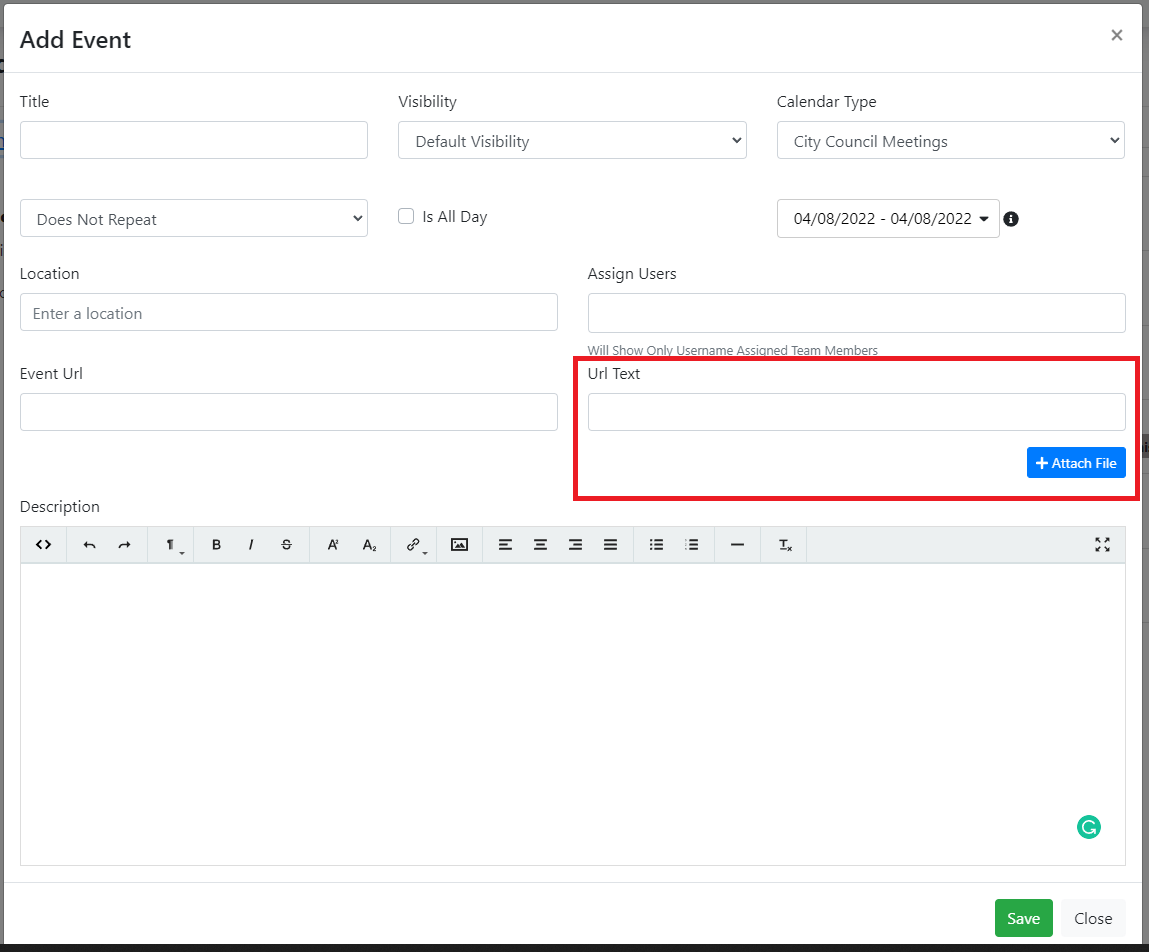
Calendar Event Upgrades
- Added an option to add a URL to an event
- Added ability to upload a file to an event
Payment Report Upgrade
- Added the ability to only show items that have been reported as settled with the bank according to OpenEdge

Offline Payment Upgrades
- Added the ability to select multiple cases and licenses and add them to the cart
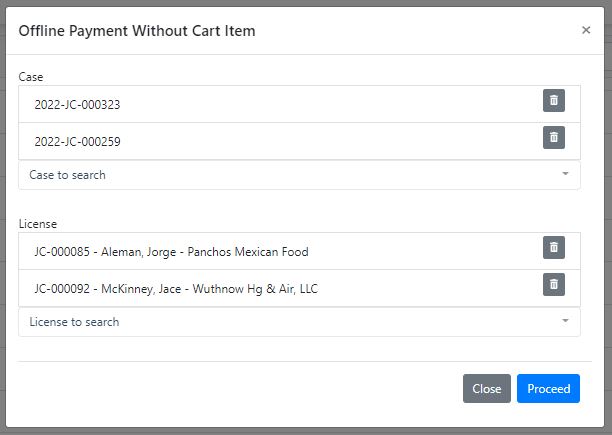
- Added the ability to select a refund from an item in the payment history

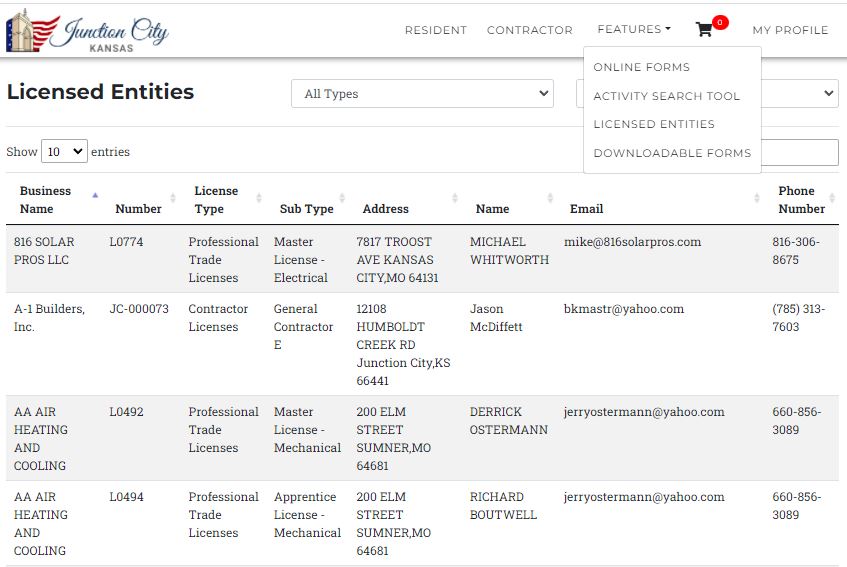
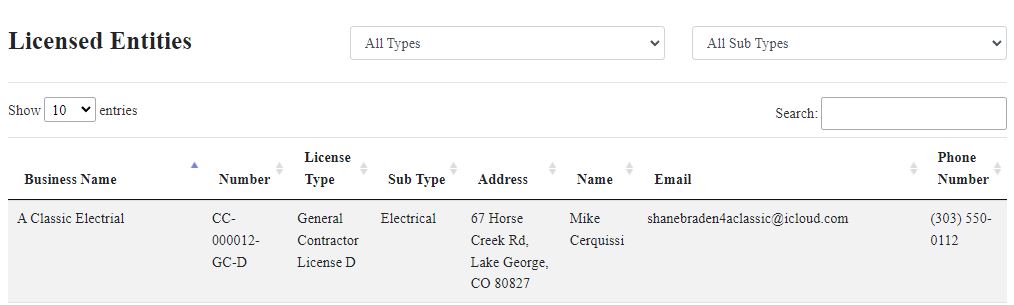
Licensed Entities Search
- Added the ability to search for licensed entities within your site
- Filter by license type and subtype
- Search by keyword
- Results will only show who is up-to-date and not expired
- You can choose which licenses you want to appear in the search
- THIS FEATURE NEEDS TO BE TURNED ON. Please contact your site admin or GovBuilt Support via Online Form or via email: support@govbuilt.com
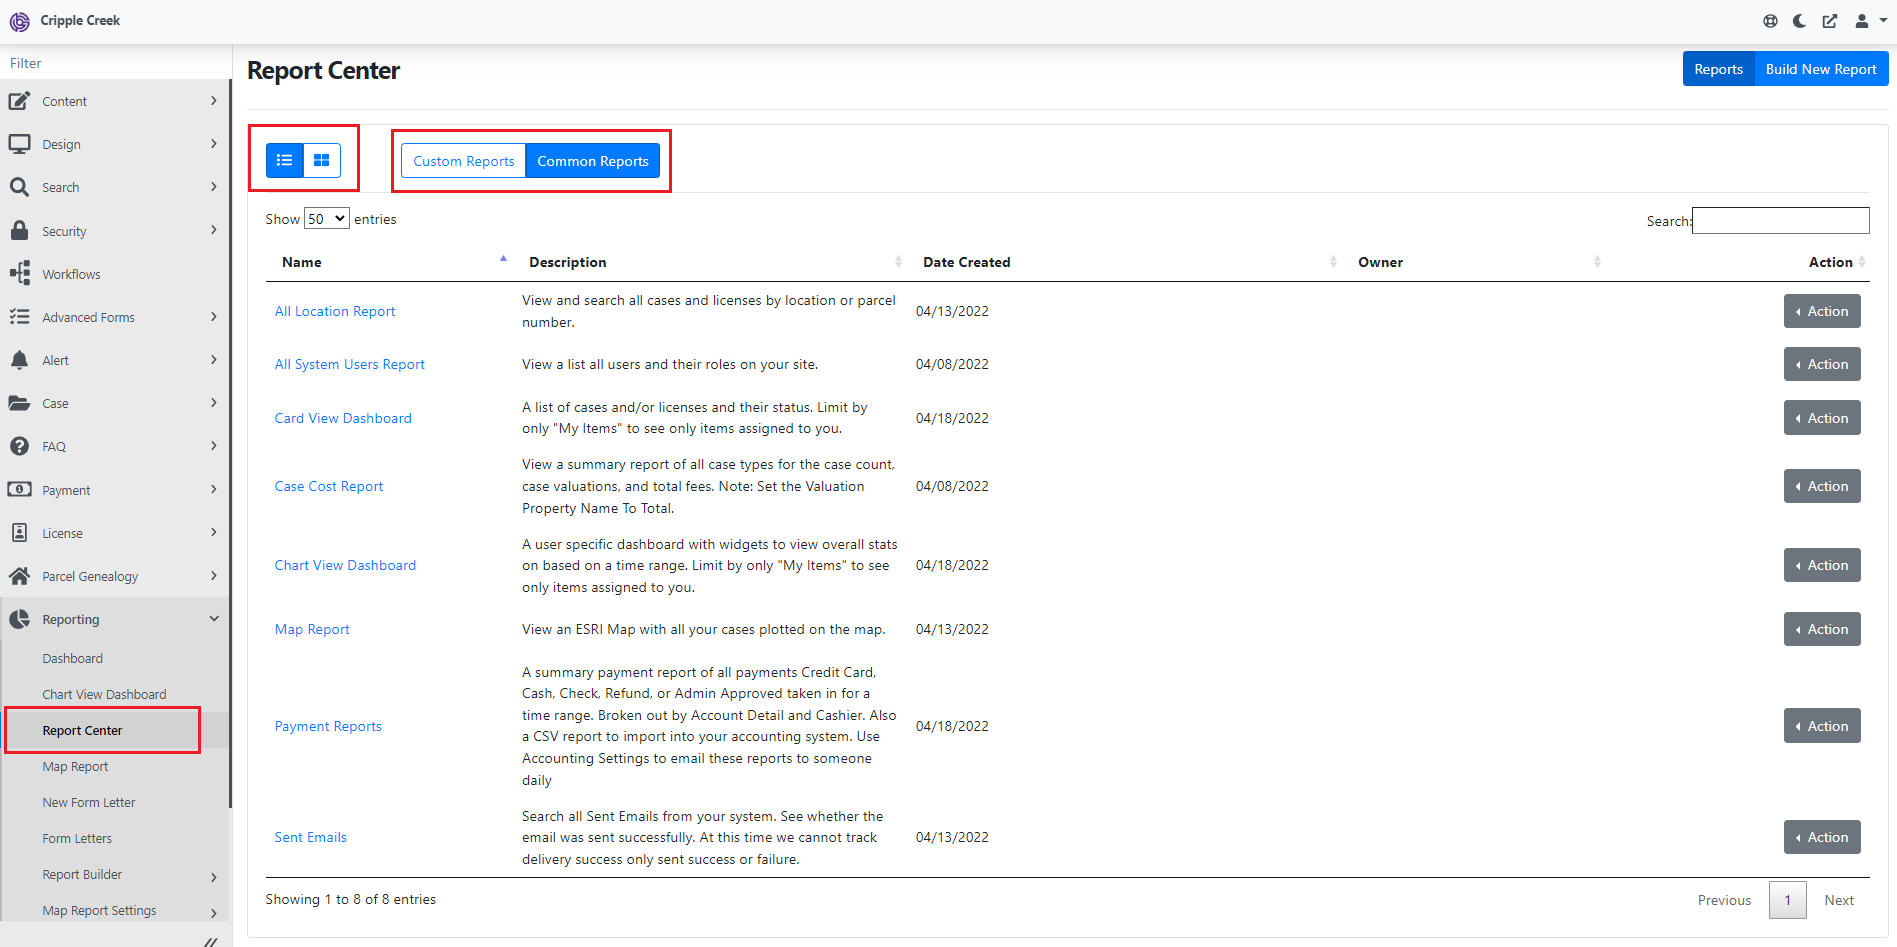
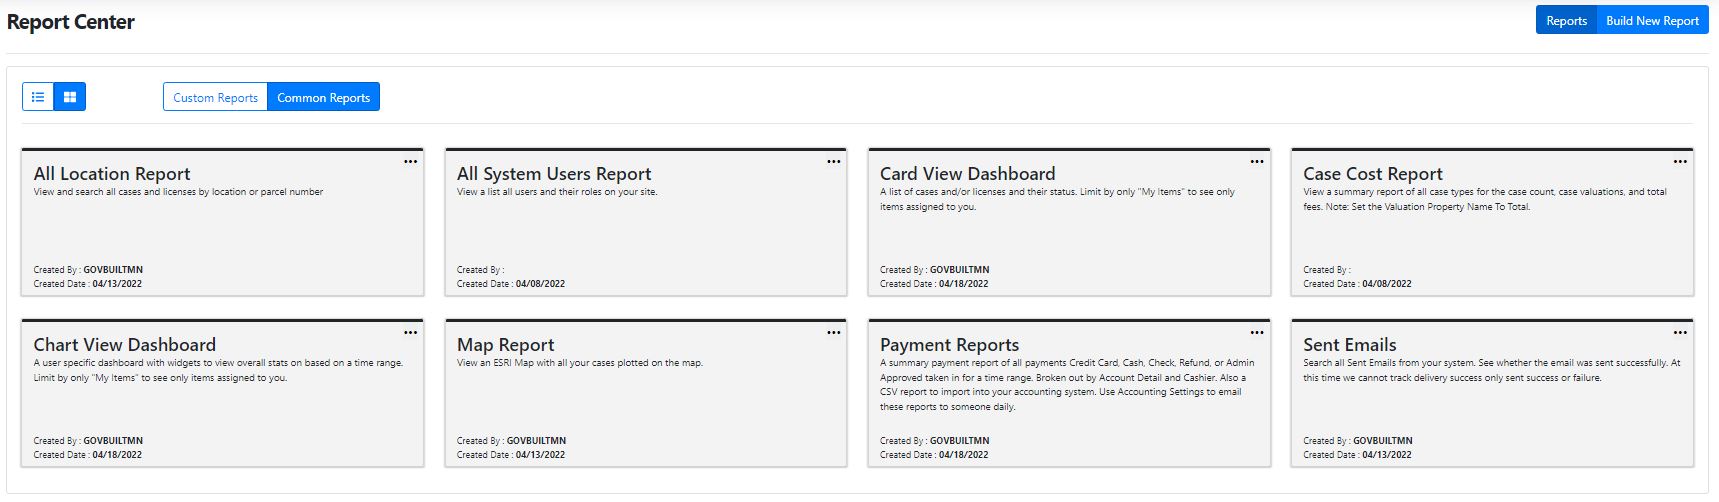
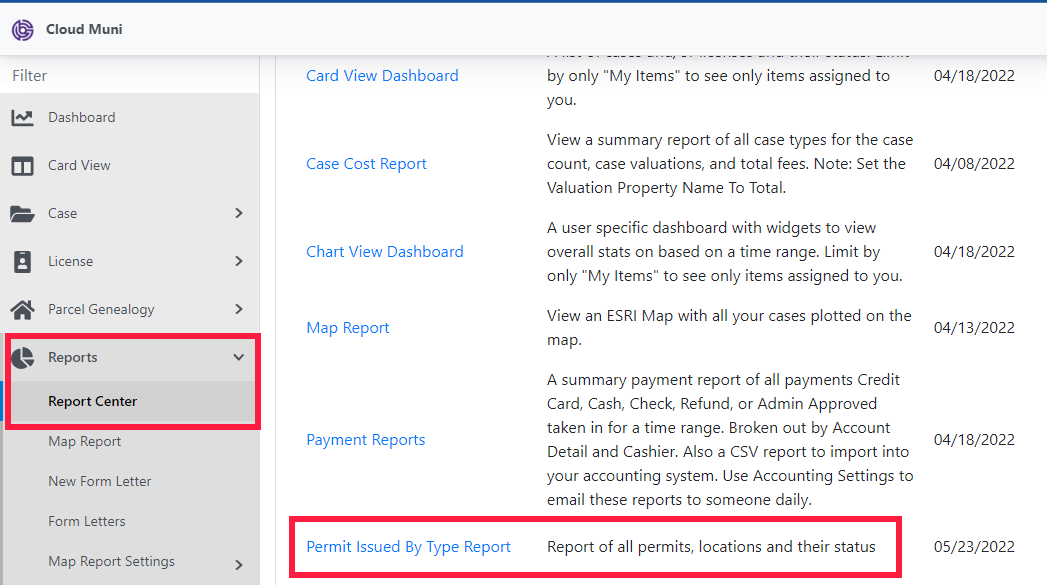
Report Center
Saved Reports is now the new Reports Center!
- Choose between list view and card view
- Choose between our Common Reports or Create a Custom Report

My Profile Settings
- We have added the ability to rename the menu items on the My Profile page
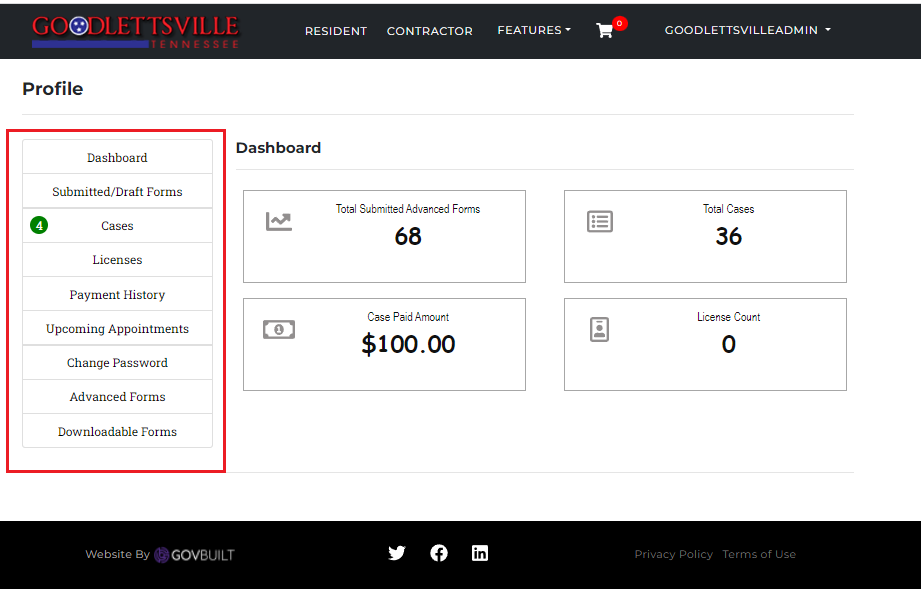
Check out this tutorial on How to change the My Profile Menu (Your role must be a MuniAdmin to access the Configurations Settings.)
Create Multiple Permit Enhancement
- Added the ability to auto-create more than one permit type and attach it in a single case when an application is approved.
License Details Enhancements
Workers Comp Insurance Expiration
- Add a field in License Details to help track the Licensee's Workers Comp Insurance Expiration Date.
- Add a date field in your form with the API Key workersCompExpDate to autofill in the License Details
- Hide a Licensee from the Licensed Entities Search if their license is expired.
Manage Case Content Search
- Added Case Type and Advanced Forms filter to Manage Case Content Search

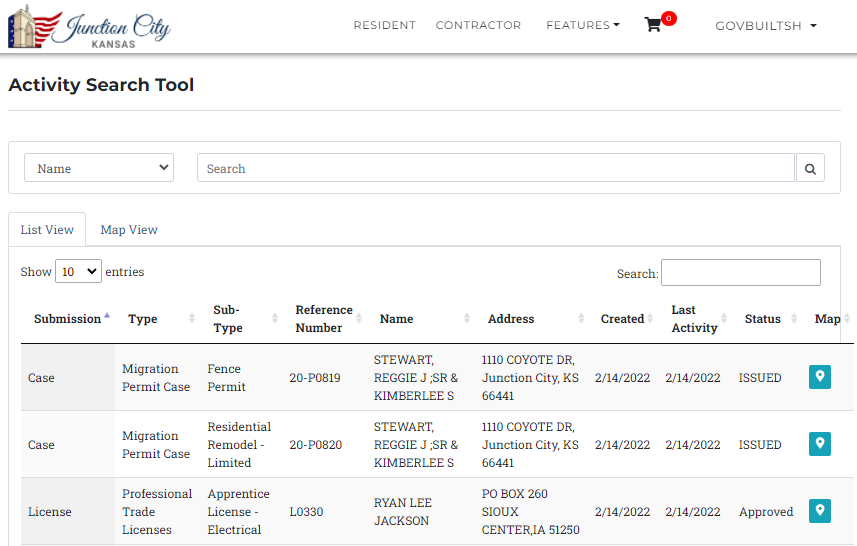
Activity Search Tool
- Added ability to publically search permits and licenses by reference Number, Name, and Address
- The client can limit which permit and license types are searchable
- **THIS FEATURE MUST BE ACTIVATED**
Dark Mode
- Enabled Dark Mode
This week's release has a few updates for Appointments with a bonus add for the Cemetery module. Check it out!
Updated Features
- For the Cemetery Module, we added a notification badge on the front end user's Profile when you add a Public Comment to the Cemetery Plot. Now they can't say that they missed it!
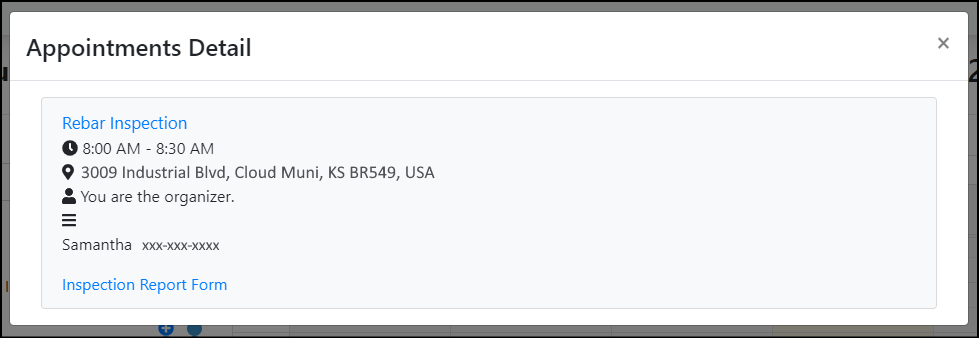
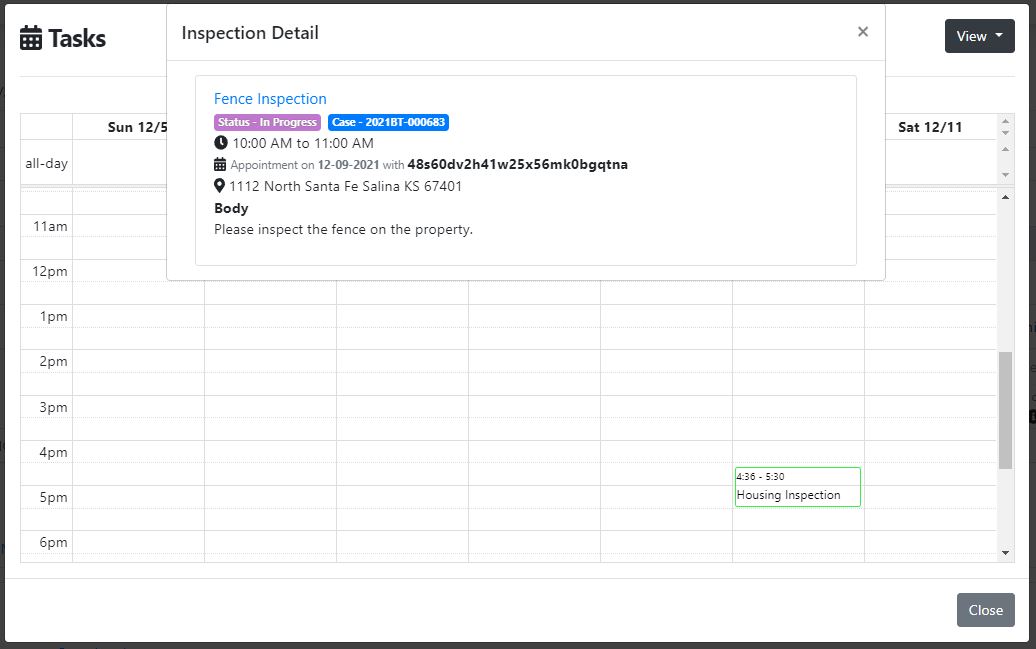
- This is one we should have put in earlier! When you view your schedule of appointments, it will now list the appointment title and appointment time.

- And this one too! When you view the details of an appointment, it will now include the address of the appointment. All good information that you need to know!
Issues/Bugs Fixes
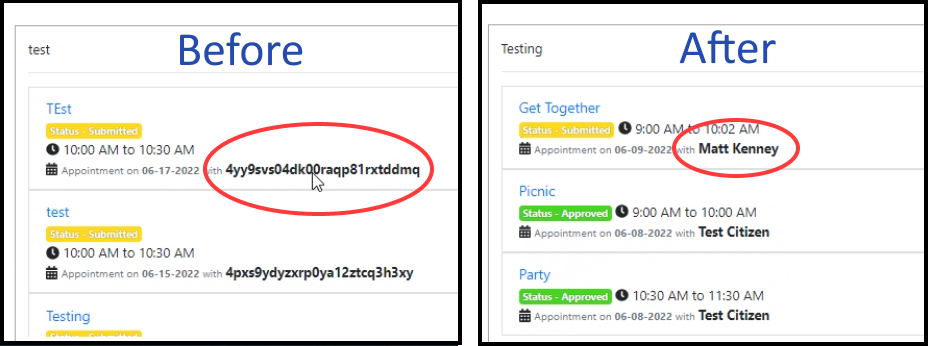
- Another one for Appointments: No, you haven't slipped into the "Matrix" when you viewed an appointment; the assigned team member's name was listed in "code," so we fixed it so it will now show their real name as it should.
Please let us know if you have any questions about what has been released. We're creating and updating training materials for everything in the GovBuilt system every week, we can't wait for you to see what's coming!
Enhancements
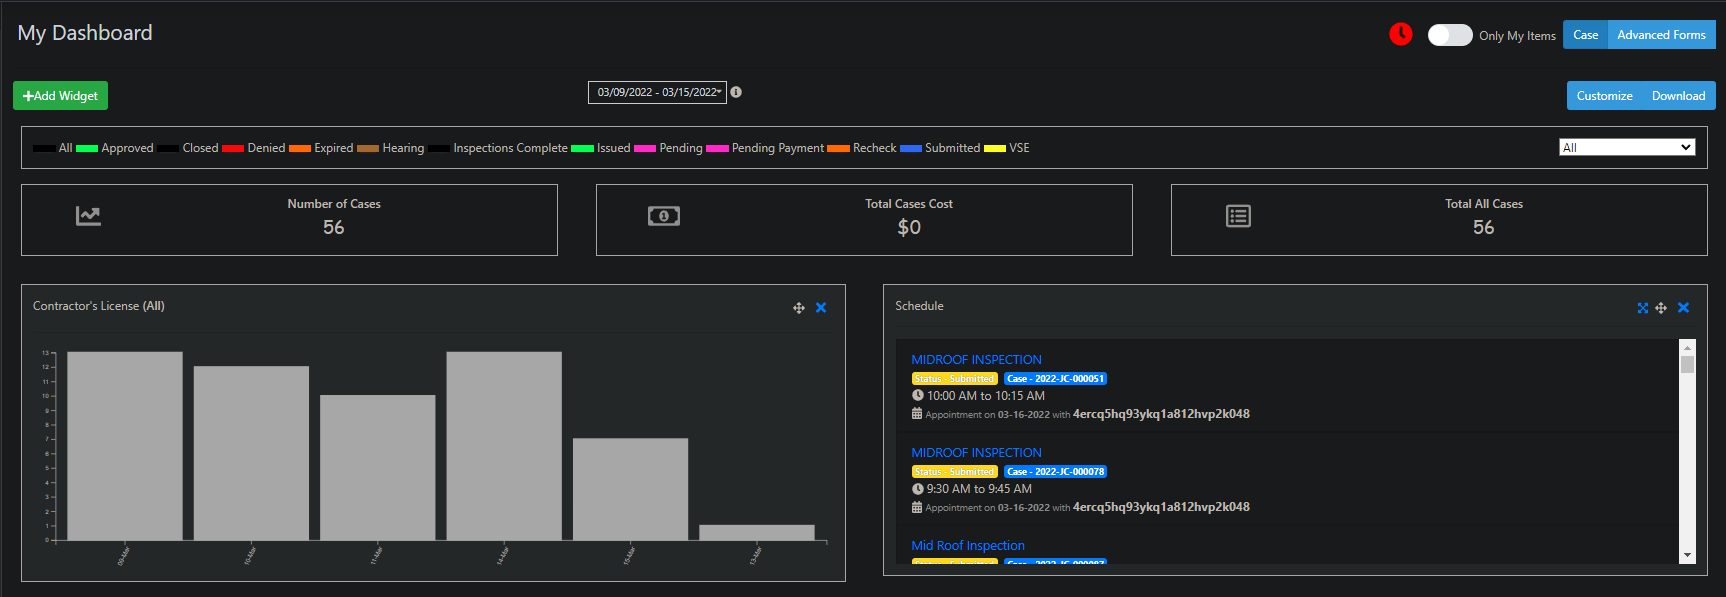
Payment Summary Report
- Accounting Reporting including payment reconciliation reports can be imported into your accounting system or used to verify the system
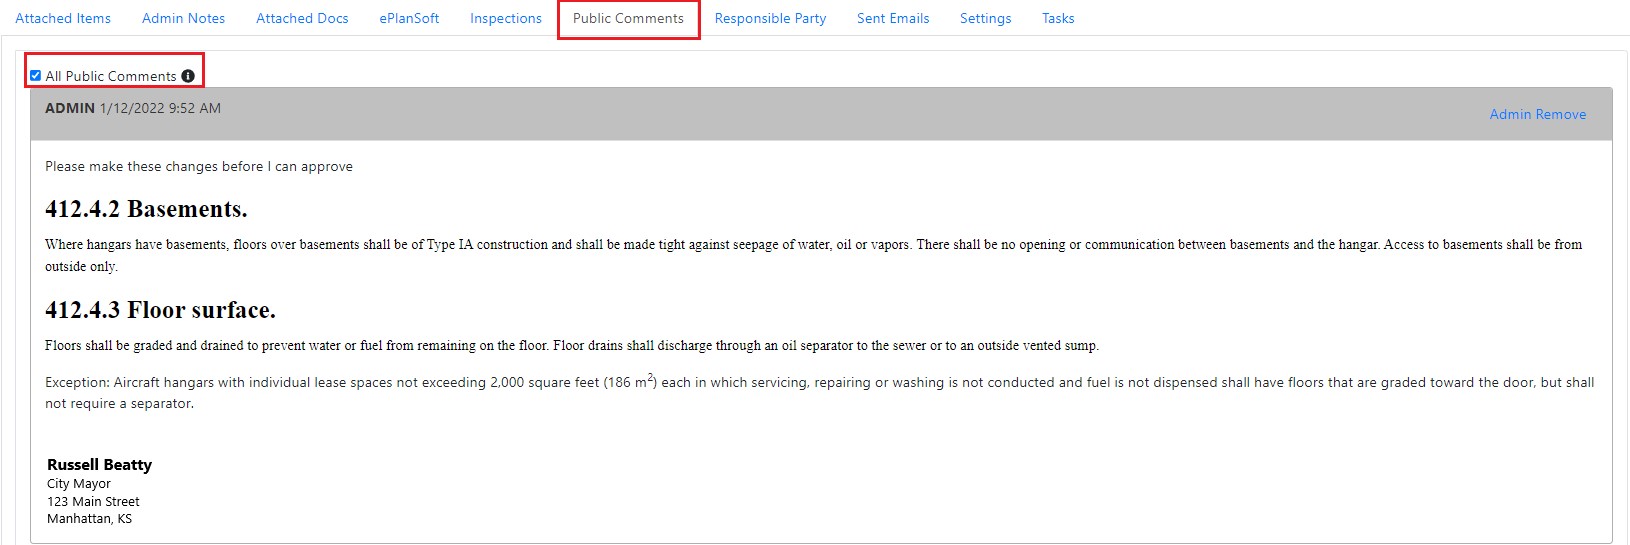
Public Comments
- Added ability to view all public comments attached to a case.
- This enhancement allows a team member to view all comments for all submissions and forms within a case.
Offline Payment
- Added ability to Have OpenEdge EMV Integration
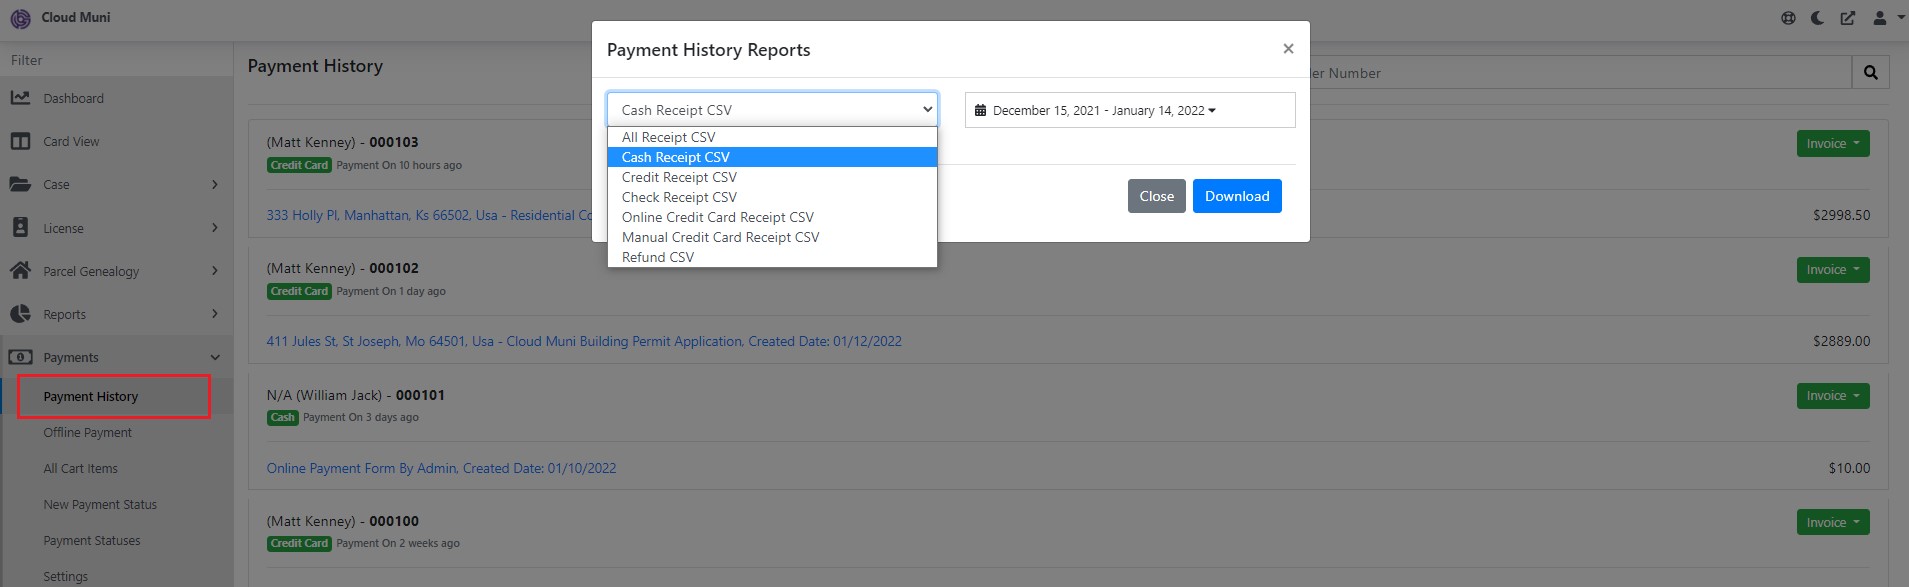
Payment Report
- Added ability to run multiple payment history reports by payment type into a CSV file
- These reports can be used to import data into an accounting system or used to verify the system
Features
License Updates:
Per License type, we've added: "Auto Create License Number on Approved Status set" so that when you approve a license, (...wait for it...) it will automatically create the number for you!
The All Admin Comments checkbox is now on by default (as it should be) for Admin Notes and Public Comments.

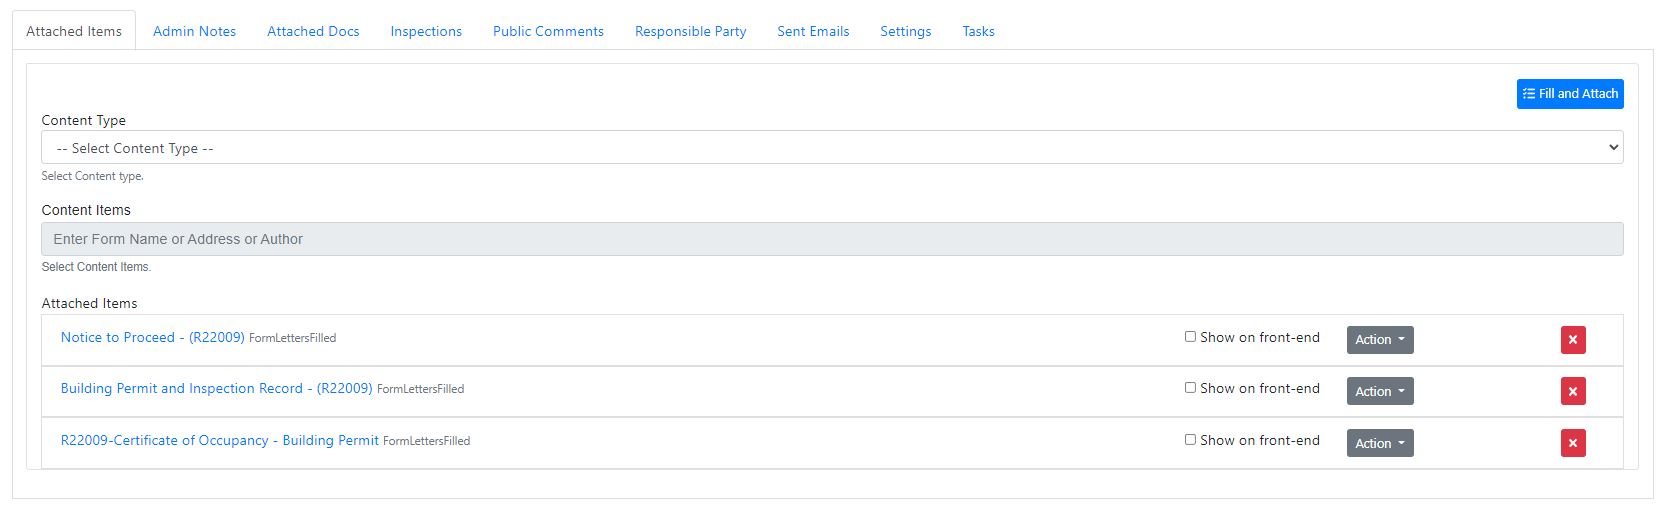
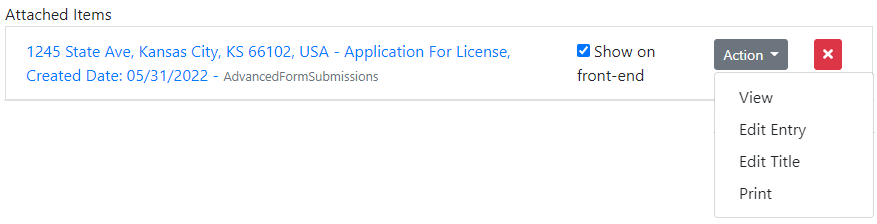
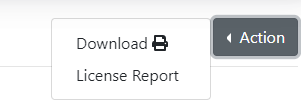
Each Attached Item now has an Action button with a drop-down for View, Edit Entry, Edit Title, and Print.
By popular demand, we've added Email License to the Action button for a license. (cheers heard around the country)

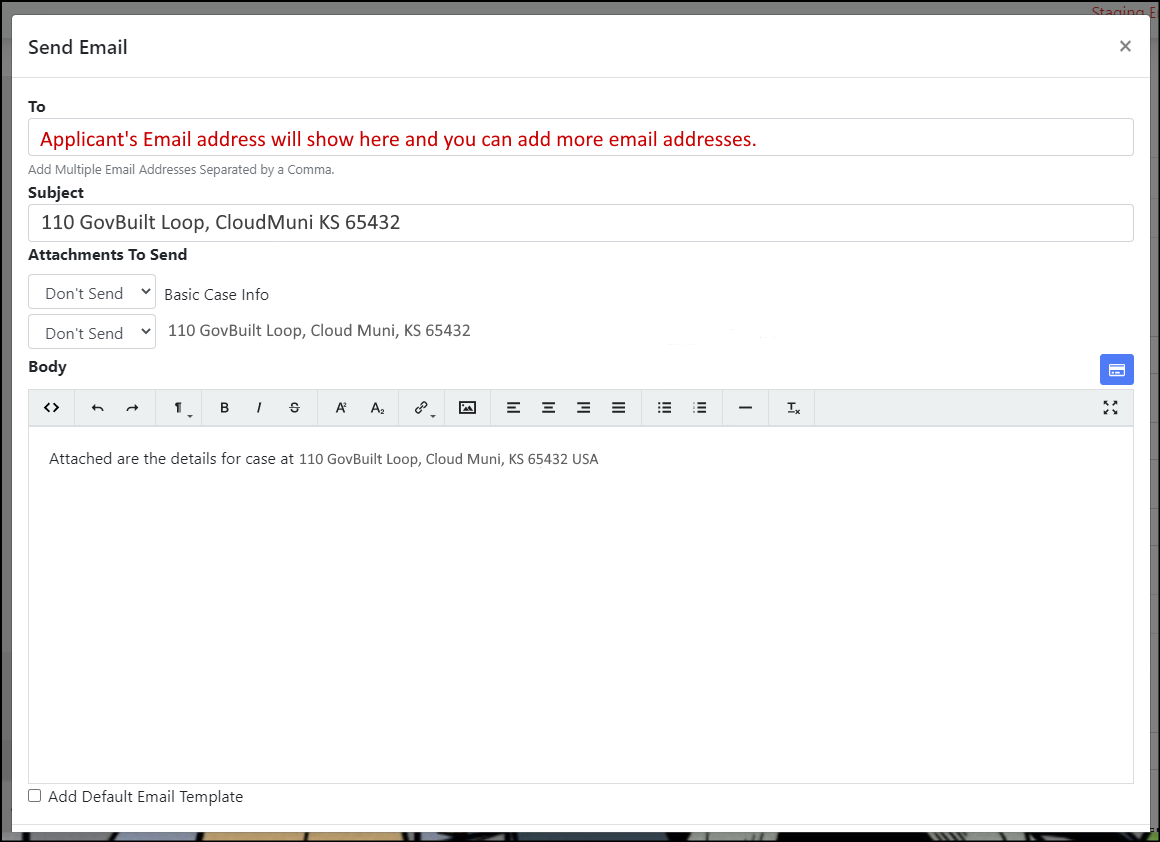
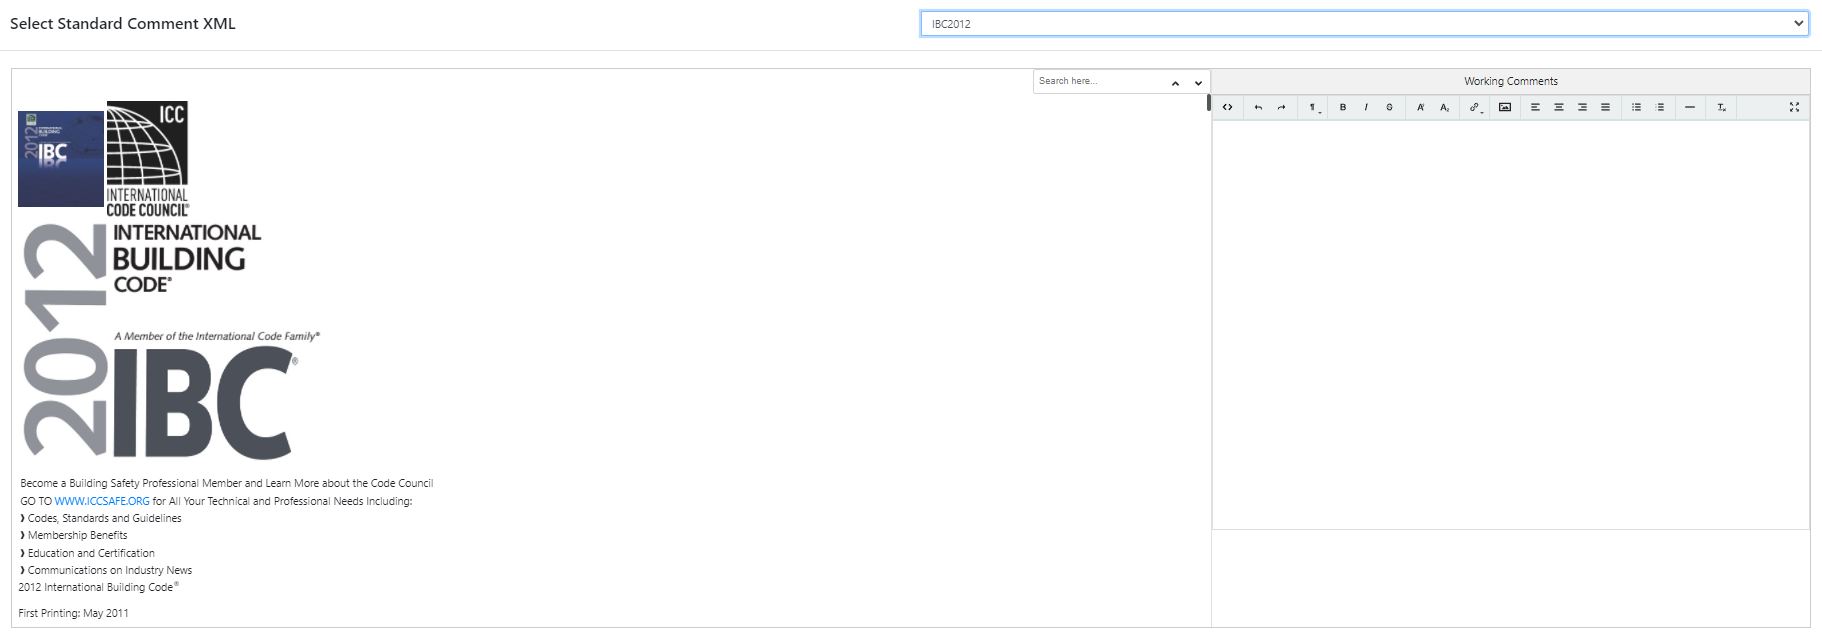
Standard Comment Updates:
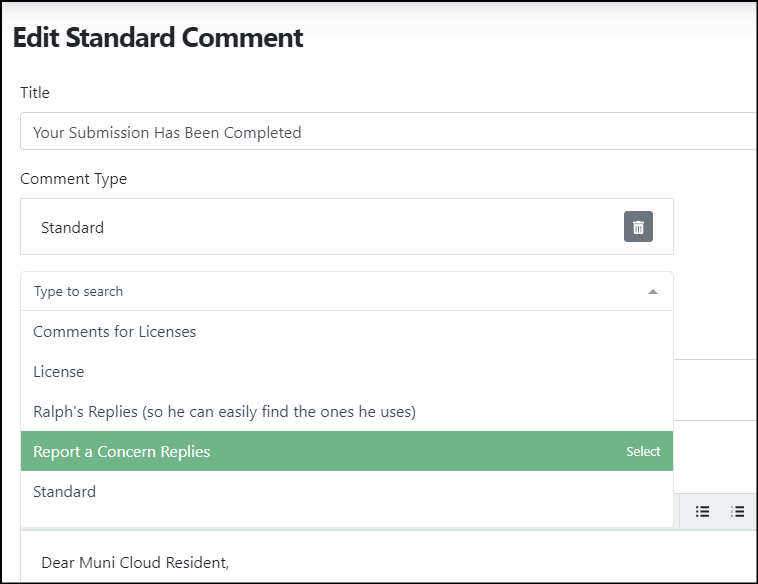
To help you stay consistent in your comments to your residents, you can now create your types (categories) of Standard Comments. This will make it easier to group comments by subject, department/division, or any other way you want to organize your comments. This means you won't have to type the same message over and over and over (and over) again to every applicant, in every comment, on every submission...
You can add your comment to one or many Comment Types from the drop-down menu or by typing into the Search field.

When you are viewing a Case and want to add a Standard Comment to a message, we've added a button that will do that for you!
Click the Insert Standard Comment button on the right.
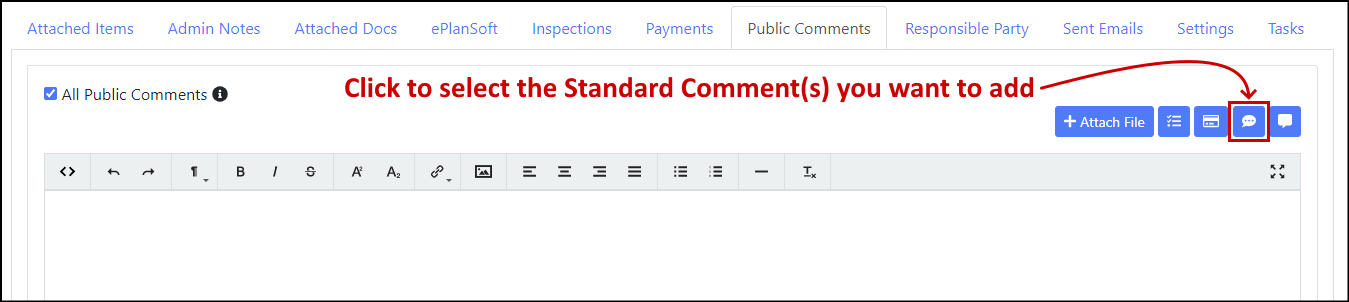
Check the boxes next to the comment(s) you want to use.
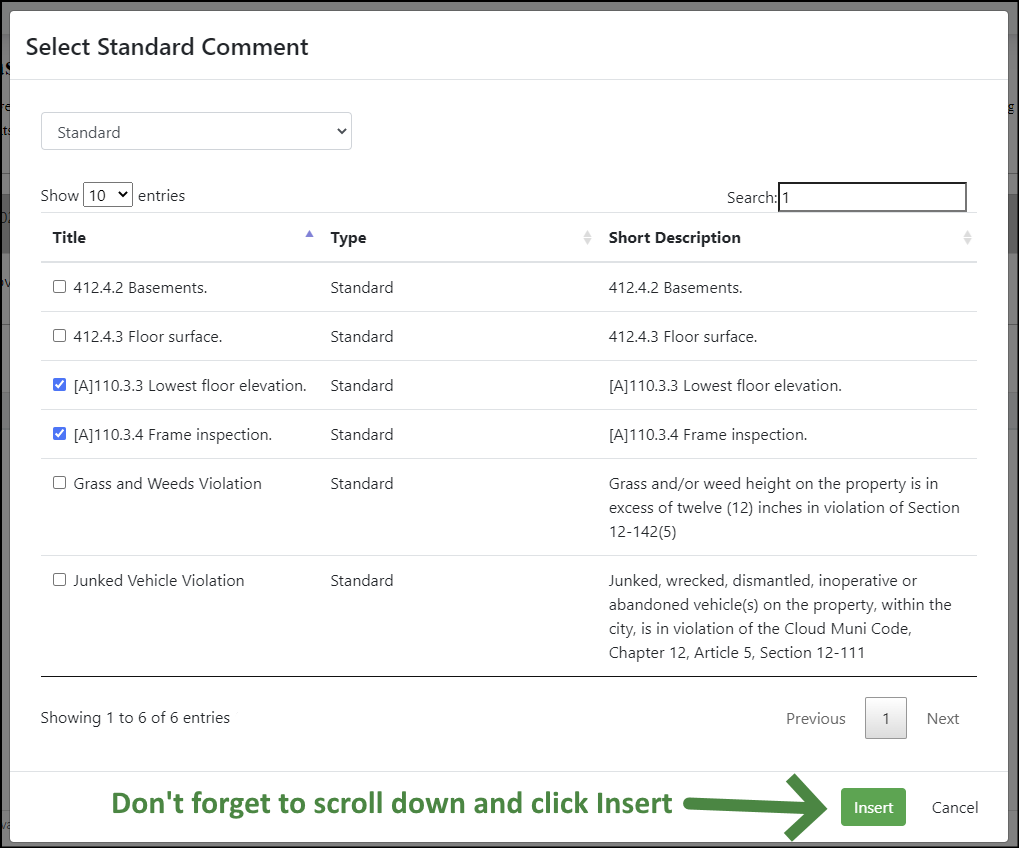
The comment(s) you selected will appear at the top of the Editor where you can edit and continue.

On Form Add Custom Control for Case Dropdown?
Issues/Bugs Fixes
When you print the Permit Type Report, the printed orientation was set to Portrait instead of Landscape. so all the columns in the table were all squished and it made it difficult to read. The report will now be printed in Landscape mode so there is more room for data in your columns if needed.
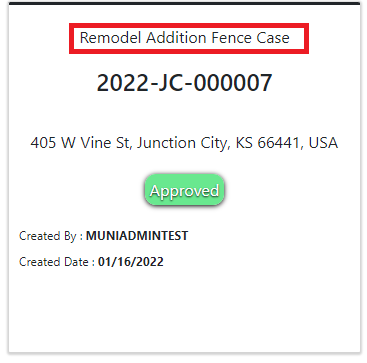
You can now set Admin Notes as an alert in Licenses just like you can in Cases Cases (that was added back in May 9, 2022, for version 3.3.0 which seems forever ago). This is great when you need to get the word out to everyone who opens the case.

Please let us know if you have any questions about what has been released. We're in process of creating and updating training materials for everything in the GovBuilt system, we can't wait for you to see what's coming!
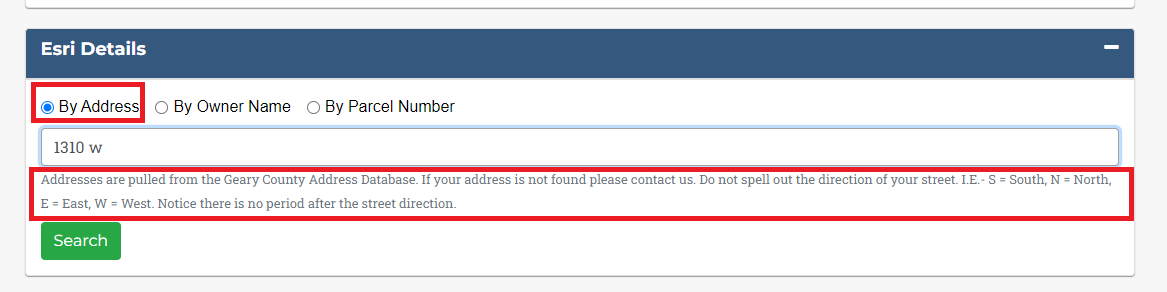
- Esri will pull back 50 records instead of 20.
- When you do an Esri search we add an "x" to the modal to allow you to get out faster.

- Moved the Address to the first option to search by (See below pic)
- Added an Esri Search Description so we can let Citizens know any details. This is customizable on the admin side
if you want any changes.
- On the card Dashboard instead of saying "Application Submitted" we changed to the type of case.
- Created a quick link to get back to the admin Dashboard.

- Card Dashboard New Submission Dropdown is categorized by form type to make them easier to find.
- Added an "All option" under the Dashboard which will allow you to see cards for both licenses and cases in one
list.

- License tab added Owner to the Contact tab.
- Added ability to run a report for a license while viewing the license. Any of our custom reports can be
added.
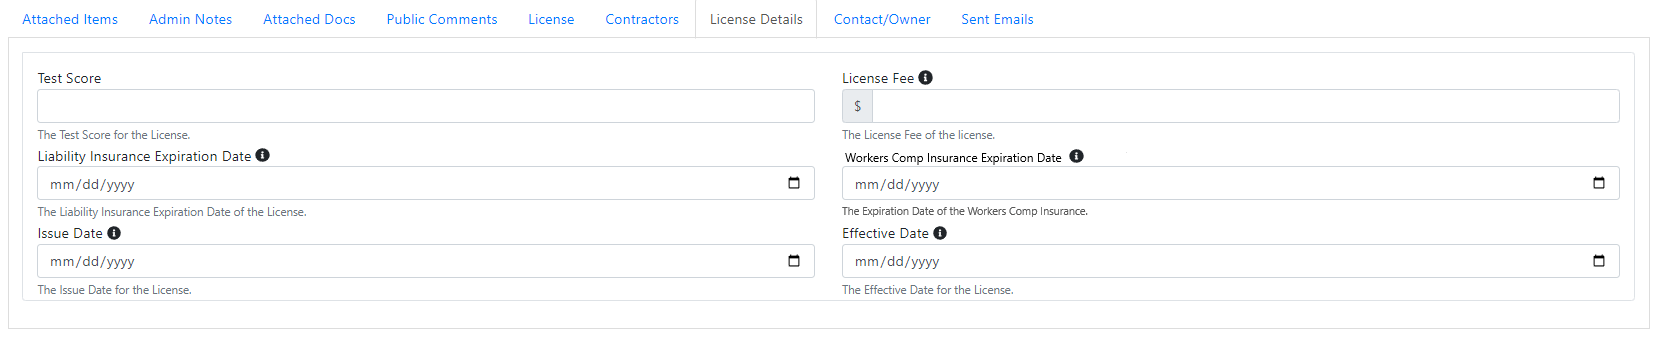
- License Details added: License Fee, Effective Date, Issue Date. All these can be filled automatically when an
applicant applies

ICC Integration
Added ability to integrate with International Code Council (ICC) content. With this new function, you can search ICC content by keywords or code number and copy and paste that information. This gives the user the ability to attach the selected information to an email. For example, attach your ICC comments to an inspection for the citizen.
Try it here with our online tutorial.
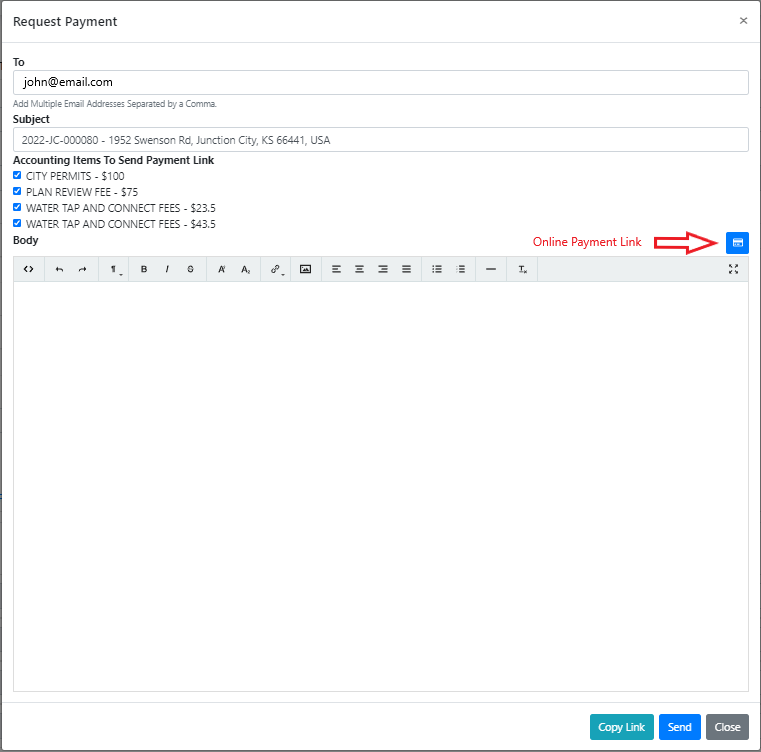
Accounting Details Enhancement
Added the ability to allow multiple payment GL keys on a single form and case in the Payment Tab. You can now request payment and take online payment for unpaid items.
Form Builder Payment Tab:

Case Accounting Details Tab:

You can send a request for payment for individual fees or the whole amount due.
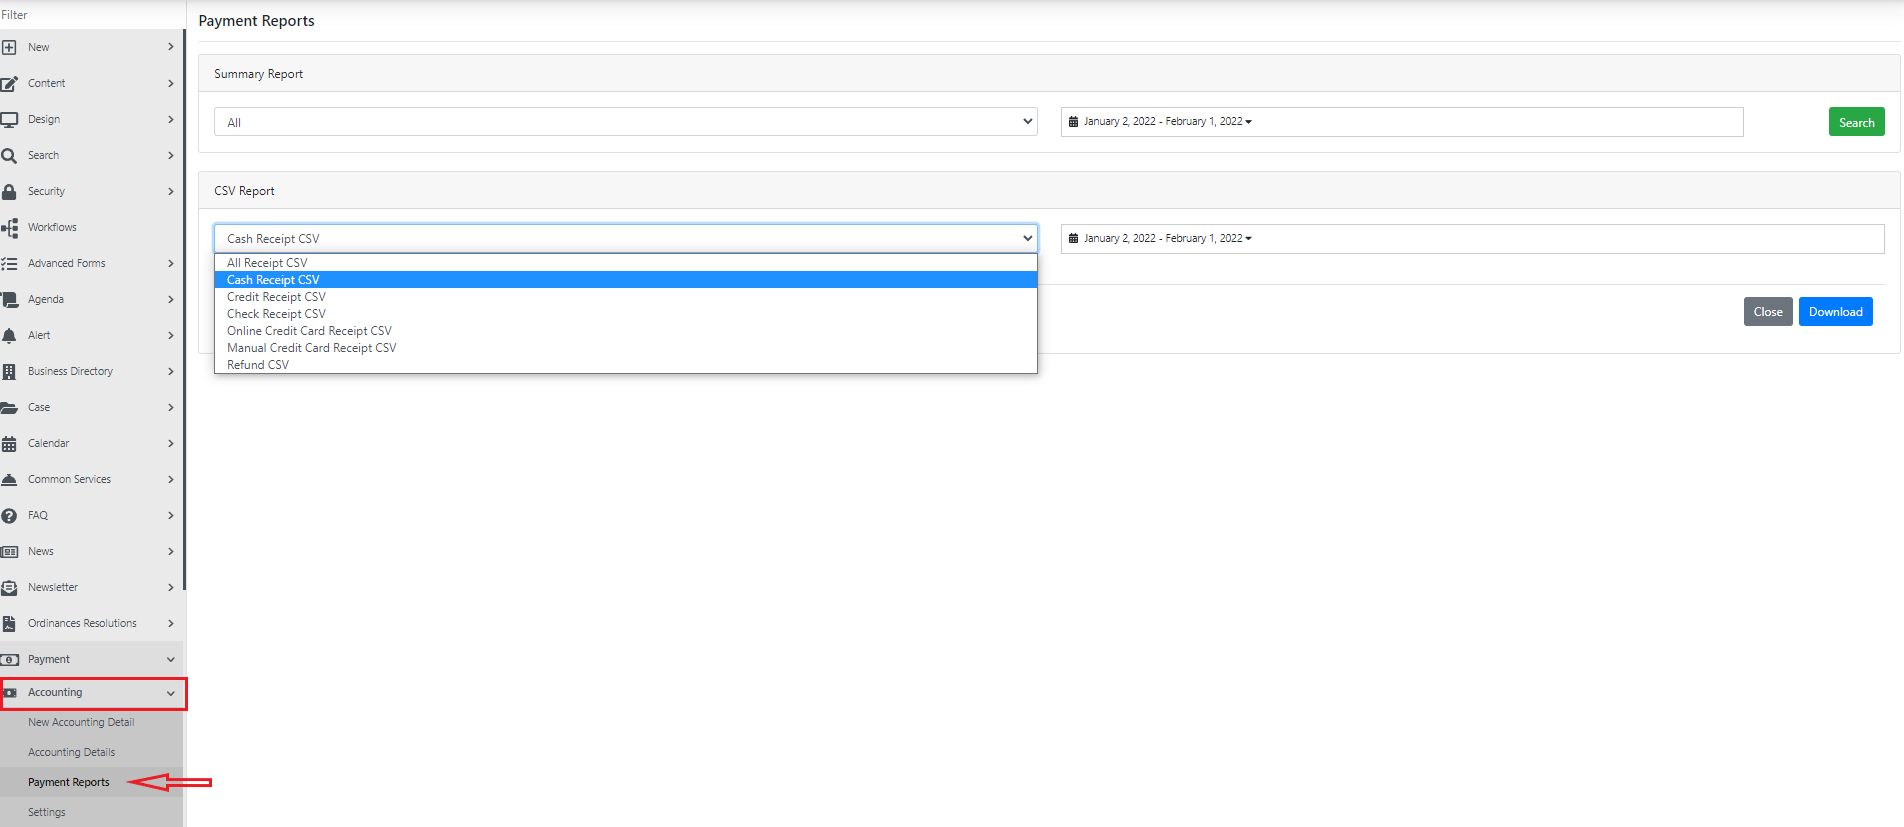
Accounting Payment Report
Added an Accounting Payment Report that breaks down fees by GL Key and payment method. This report can be exported as a CSV file for accounting reconciliation.
Create your report by going to the Payment Module > Accounting > Payment Reports. Choose which reports you would like to run.

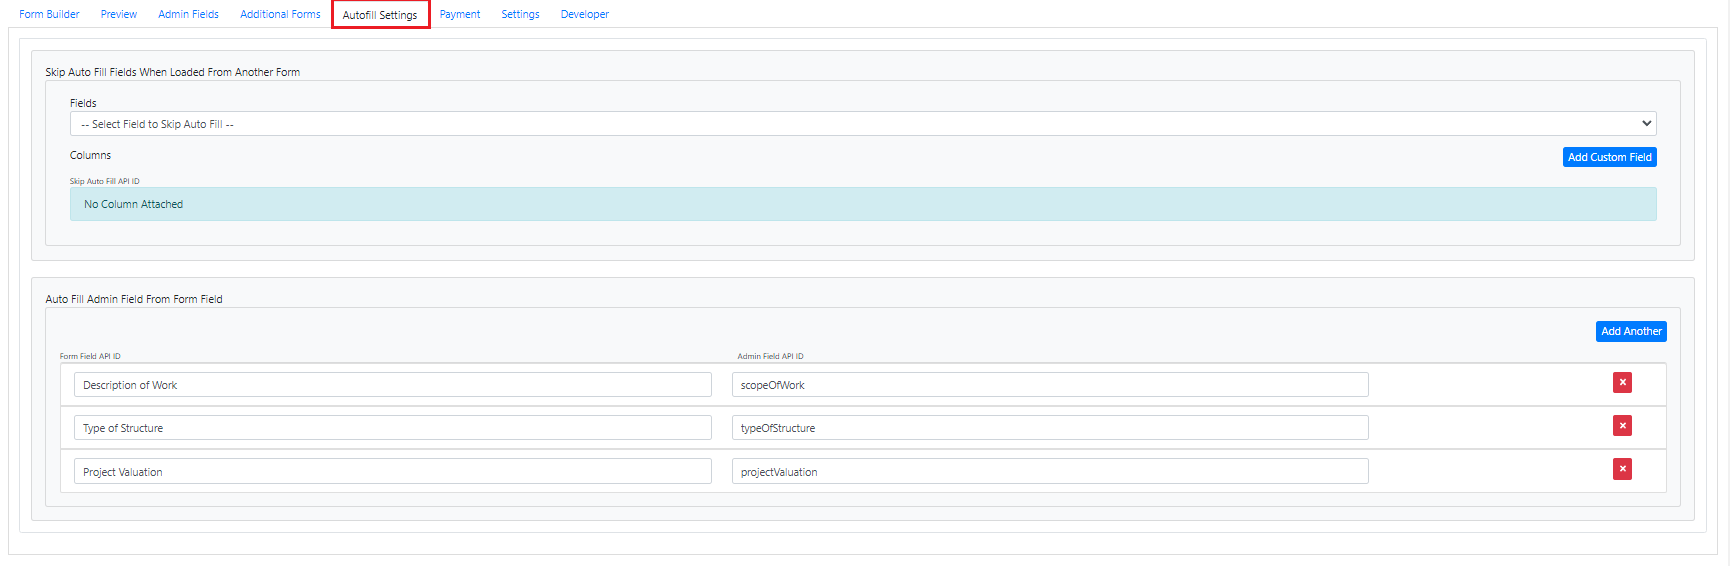
Autofill Settings Tab
Added ability to set fields from the form builder (front end view) to auto-fill in the Admin Fields (office only view.) This saves the user time from having to search the form for specific data.
Enhancements
Case Upgrades
Case Search Enhancements
- Added a Team Member Option to Limit Cases By the Team Members Assigned to the Cases
- Added a Text Search to allow searching by Responsible Party First Name, Last Name, Phone Number, Email, Address, and Case Title

View All Submissions on One Page
- Added a "View All Submissions" button to the Attached Docs
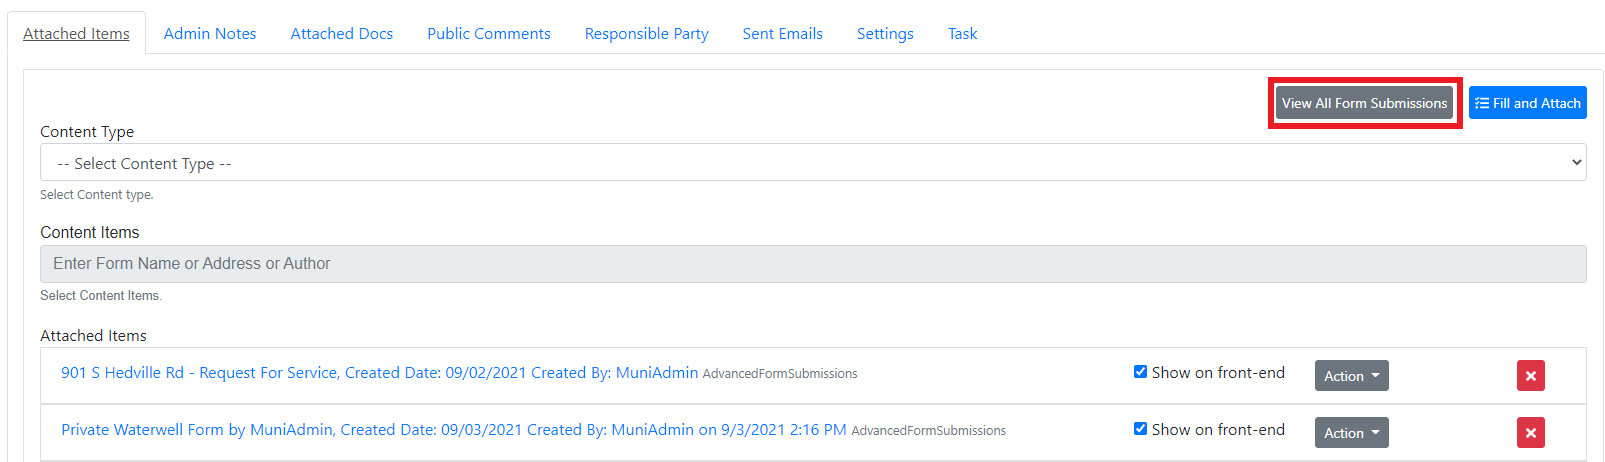
- Shows a page with the ability to view all the form submissions on one page without having to load multiple tabs
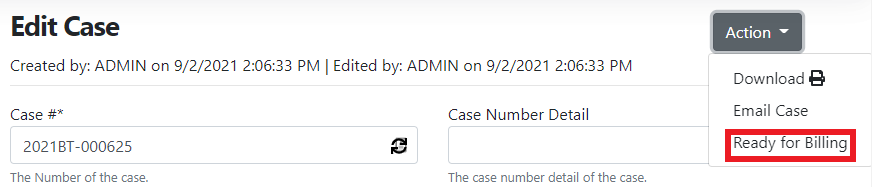
Ready for Billing Workflow Automation
- Added a "Ready for Billing" option that automates setting the case status, billing status, adds any new team members to the case, and creates an admin note.
Attached Documents Upgrades
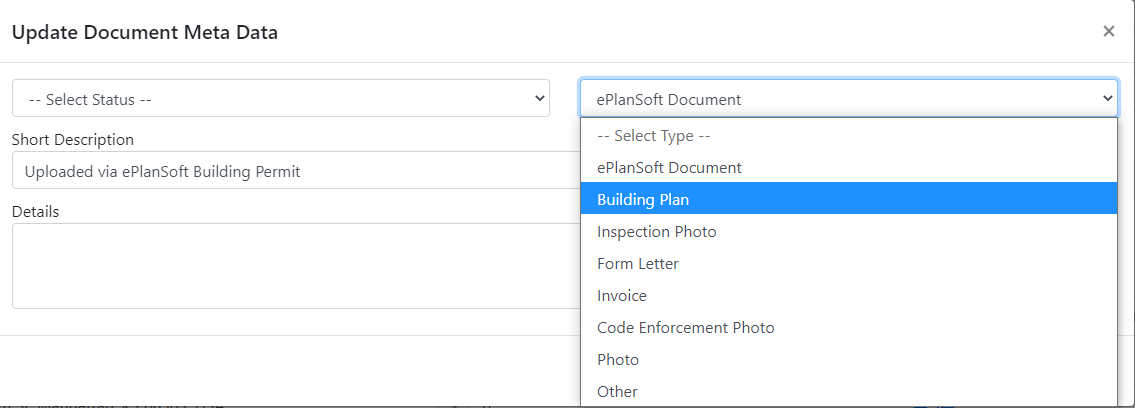
- Added a List View Option to view all attached documents on a case in a list view instead of a tile view

- Added Meta Data to Documents allowing you to track Status, document type, control whether submitter can view on their profile, short description, and a long description
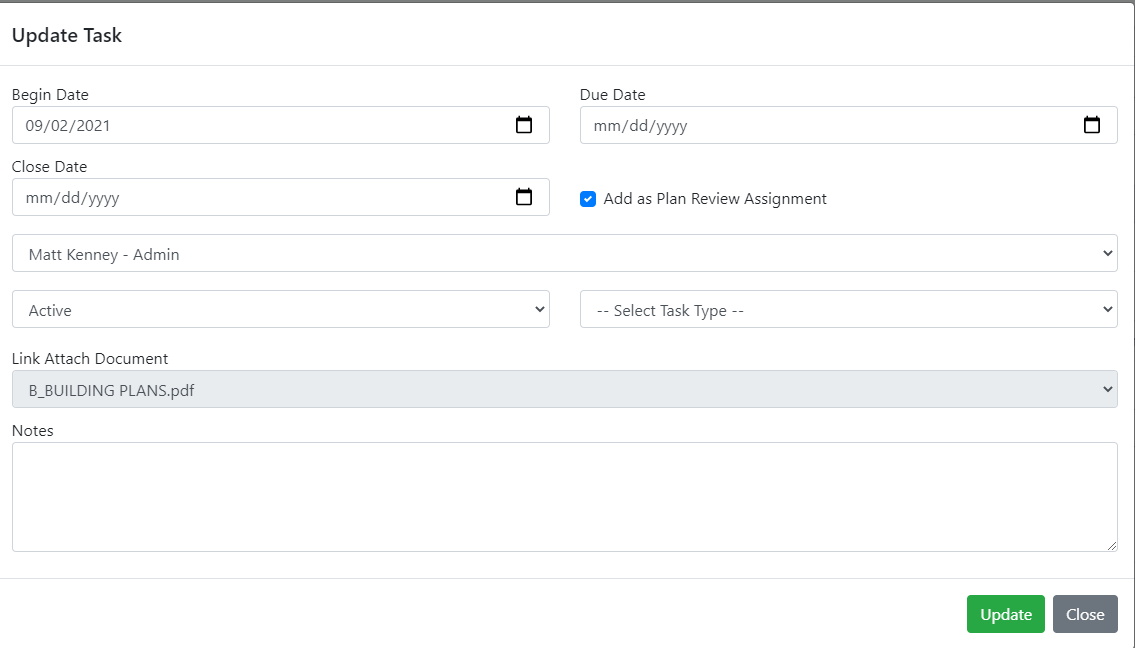
Create Task Upgrades
- Now you can create tasks on a case to track items like Council Meetings, Maps to Create, Meetings, and etc

- Each task has a begin date, due date, close date, team member assigned, status, type, document it is linked to, and notes.
Case Comments Add Edit on Your Comments
- Gave the ability if you added the comment in a case you can edit the comment
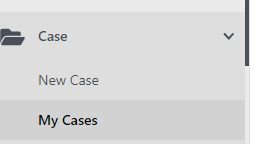
My Cases Option
- New Menu Under Cases for a quick link to view only your cases
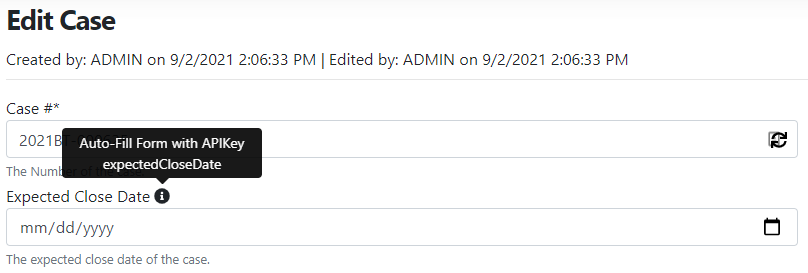
Case AutoFill Expected Close Date
- Automatically Grab the Expected Case Close Date on Form Submission to Save Time
Sent Emails Report and Tracking
- All emails are tracked in the system and now we gave you a report to easily view these emails including the status of them being sent
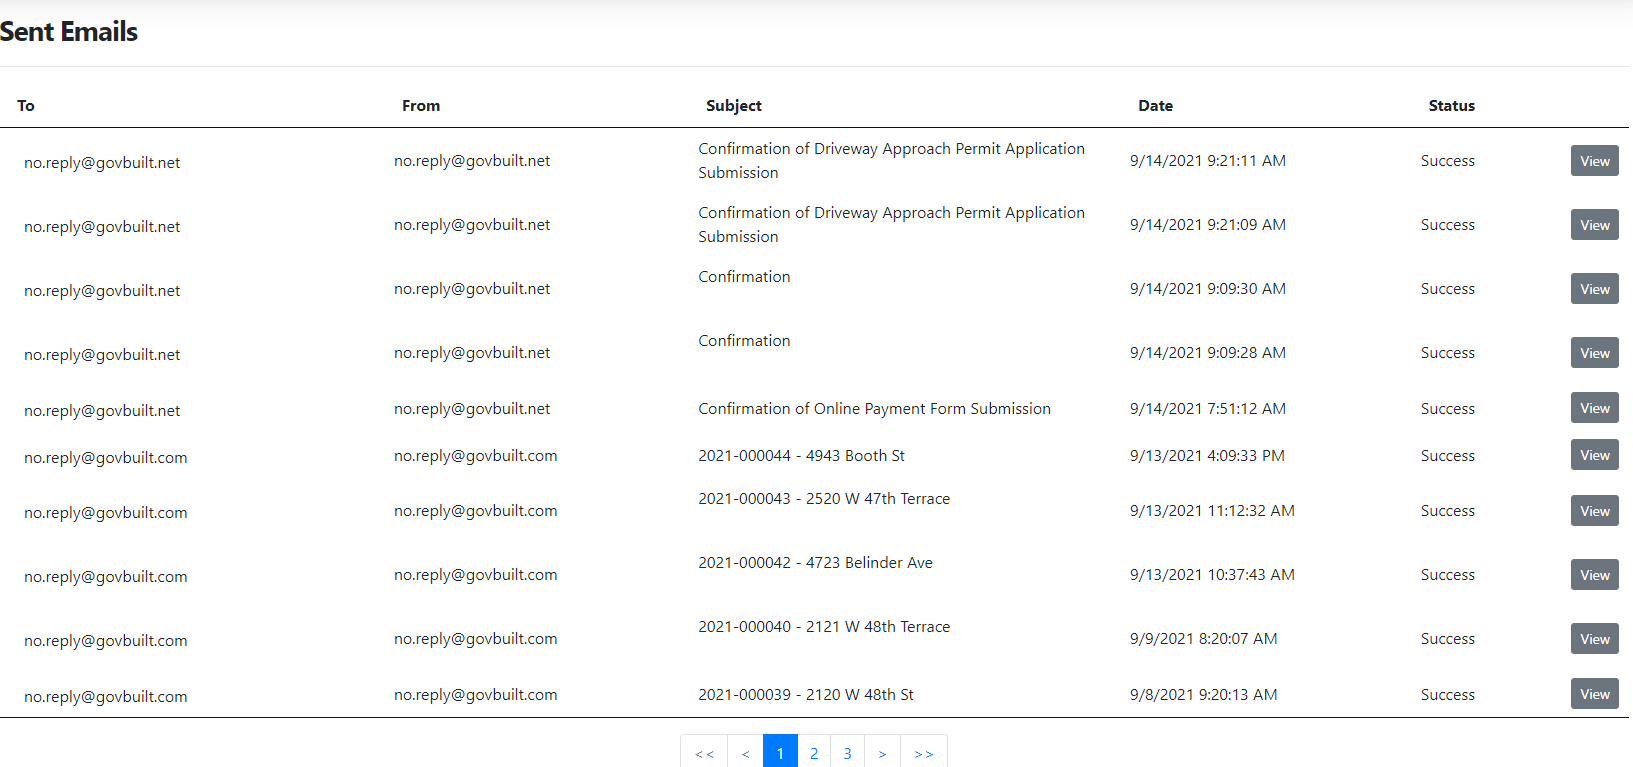
- Report Includes an Option to View the Email
- If an email was in relation to a case whether a comment or an actual "Email Case" it will now show in your sent items tab
Bug Fixes
- Admin Edit of Form the Maximize Form Description had CSS Overlap
- Clicking Attach Print and Cancel Then Discard Changes Showed Wrong Message
- Mailing Address on Forms Was Not Pulling Back Address in Permit Type
- Case Create and Edit Time was Showing in UTC
- Case List View Button on Case Type Showed All Cases instead of Limiting the Filter to Only that Case Type
Some really cool updates to share this week...check it out!
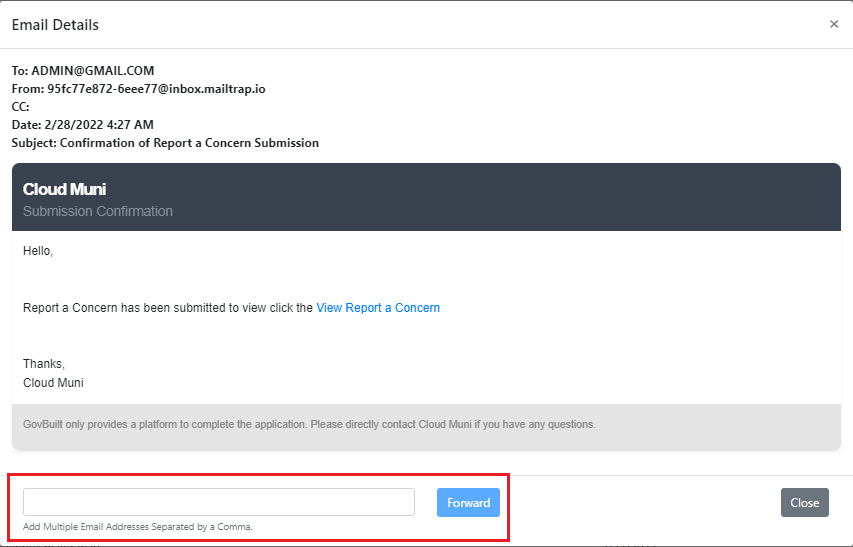
New Features
Have you ever needed to forward an email that the GovBuilt system sent out? Now you can! You can now forward an email from the Sent Emails tab.
Start from the Sent Email tab when you are viewing a case or license.

At the bottom of every email will be a forward field. Put in an email address or more separated by a comma. And hit the blue Forward button and you are done!

We've added a few enhancements to the Facility Module I think you are going to like!
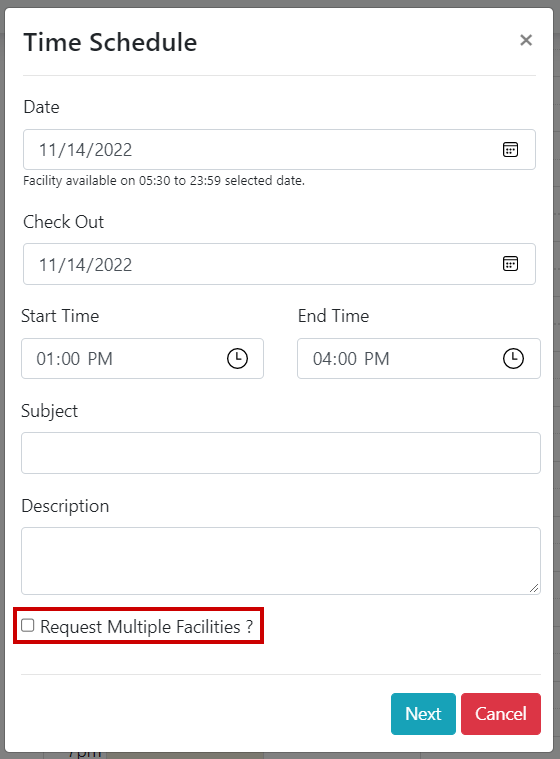
For Facility Approvers on the Admin side, when they schedule a Facility Appointment, the appointment is automatically approved!
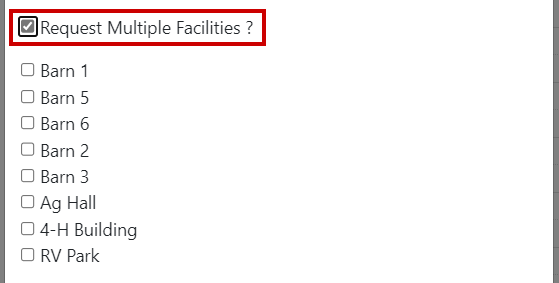
When reservations are being made on either the front or admin side, you now have the ability to select more than one Facility. When you check the "Request Multiple Facilities?" box, all of the other facilities will show up as an option to check.
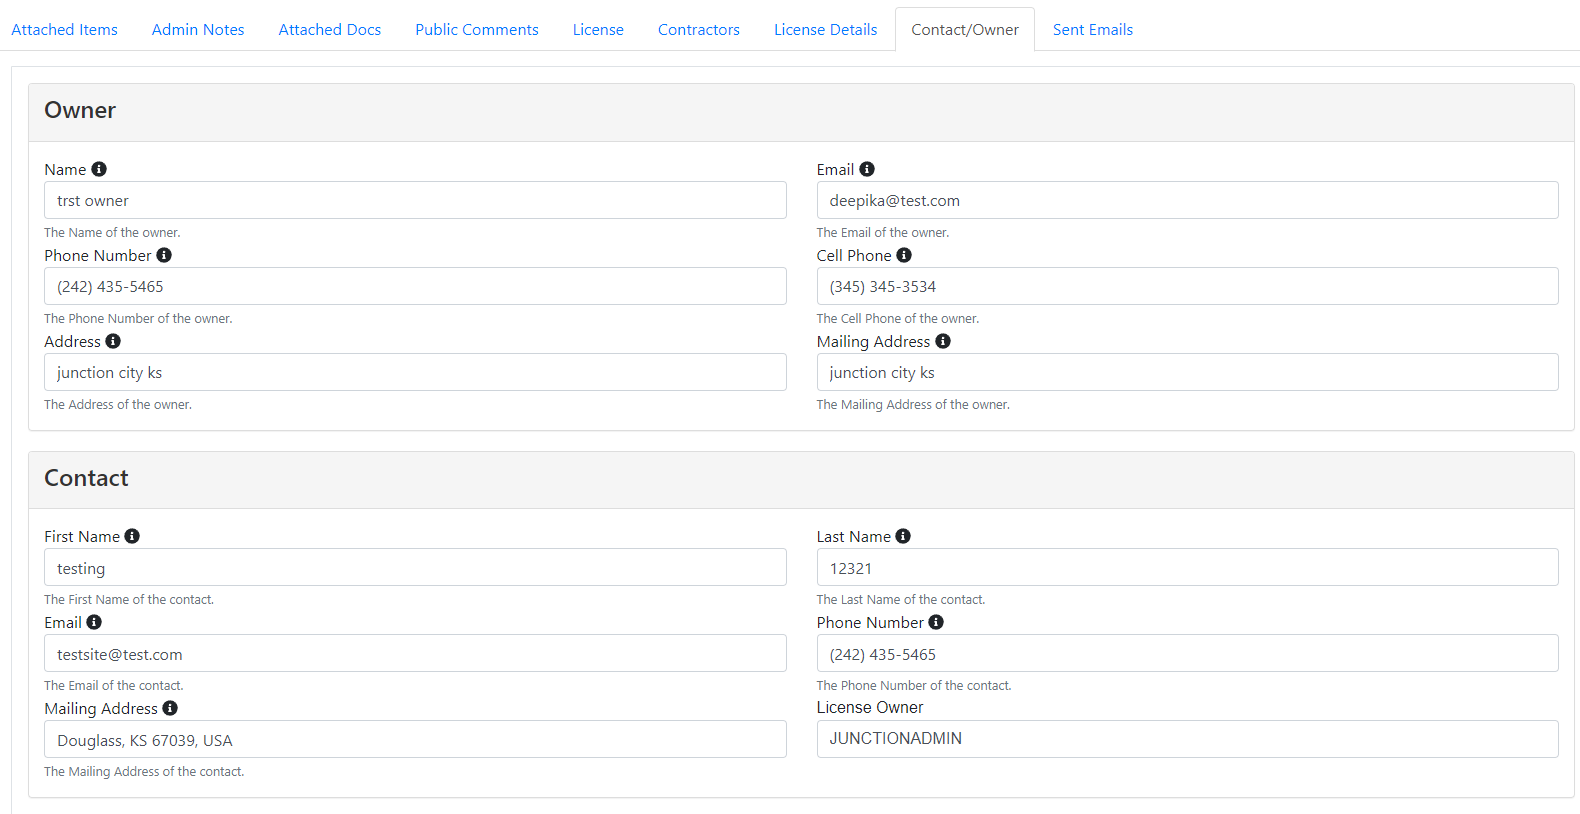
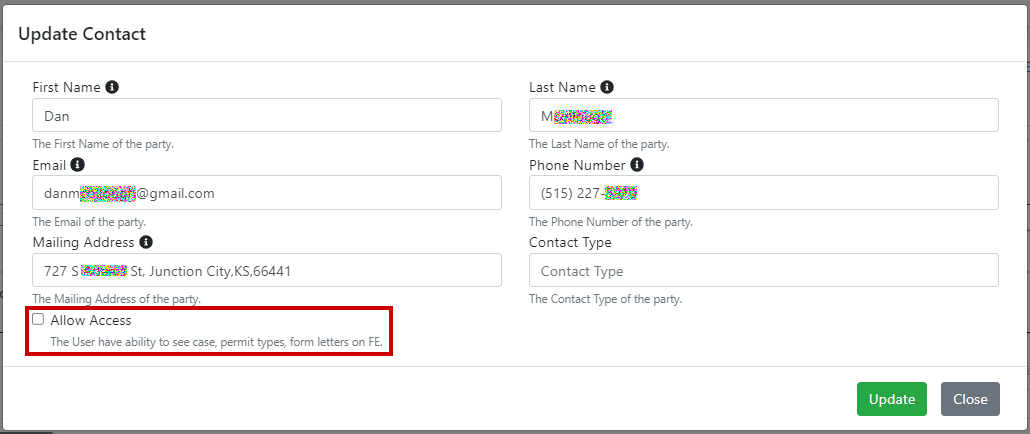
In the Contacts tab for a case or license, you can now allow someone access to a case or a license. You can create a new contact and give access there:
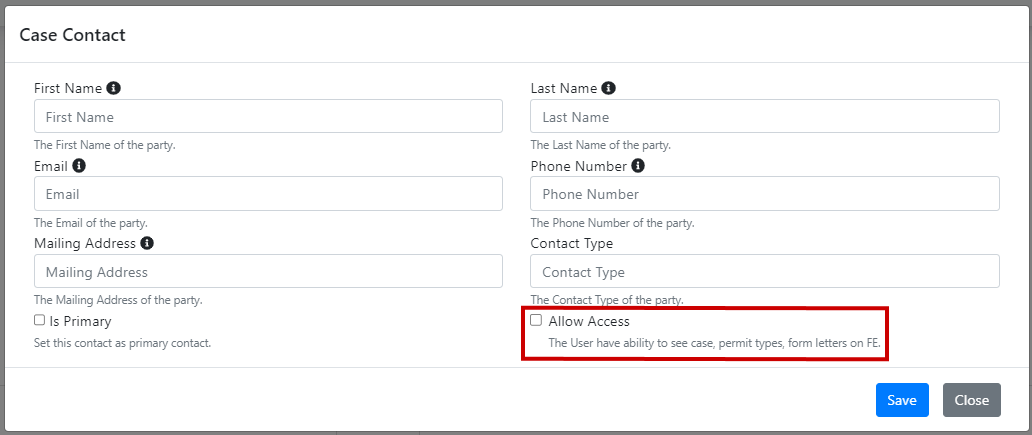
Or you can Edit a contact to check the Allow Access box.

Bugs/Issues Fix
- We had an issue with the Firefox browser not loading a page with a form widget on it (Report a Concern). We put the fire out on the fox and it works now!
- Some permits that were created with a Word document "template" weren't created and showing on the front end. They now appear as they should.
- In My Dashboard, the All/Case/License dropdown doesn't show ALL cases and licenses, now it does.
If you have any questions or want to know more about the Facility Module, please contact our new Client Success department at ClientSucess@GovBuilt.com or from the chat on the admin side!
- In My Dashboard, the All/Case/License dropdown doesn't show ALL cases and licenses, now it does.
If you have any questions or want to know more about the Facility Module, please contact our new Client Success department at ClientSucess@GovBuilt.com or from the chat on the admin side!
Wow! Wait 'till you see this week's release!
Our dynamic developers have been working hard to help you work easier!
We have a slew of updates and new features that you will want to check out, like the new Facility module! You can add places to meet (internal or public) with a new Slideshow widget to show off those places, request a reservation with or without payment, and you can even see a calendar view of those requests and reservations. That's just the tip of the iceberg (in July)!
Here we go!
Updated and NEW Features
Search will now auto-complete when you or someone searches for an address. It starts to work in less than a half-second (0.3 seconds to be precise) and after you type in at least three characters it will show you the top five listings.
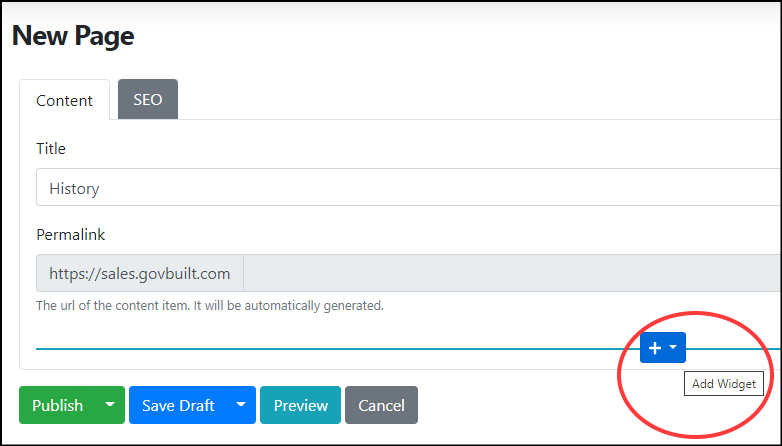
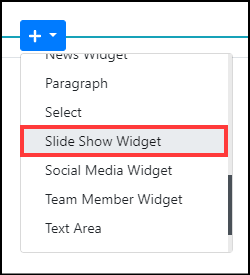
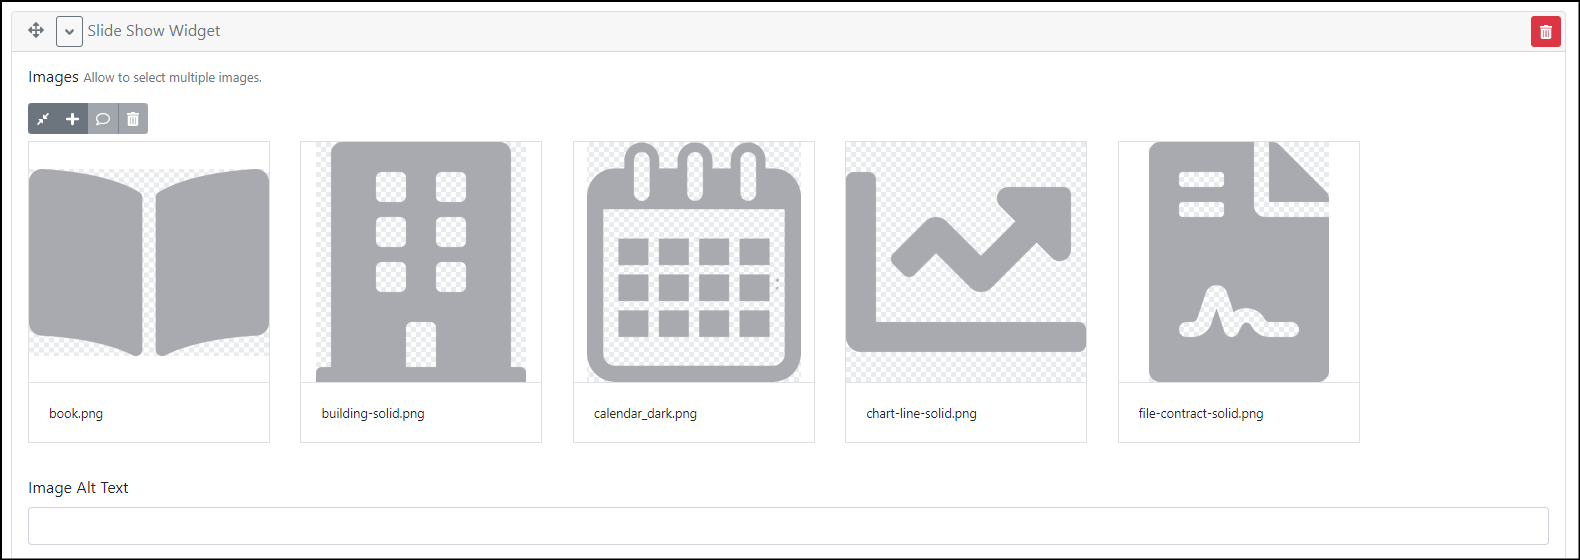
NEW Slideshow Widget where you can add a Slideshow to a page
Add or Edit a page. click the blue "Add Widget" button, then scroll down to select the Slideshow widget.
Click the + (plus) button to add images to your Slideshow.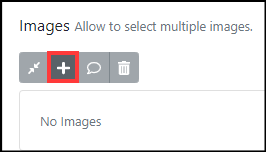
The Media Library will appear for you to select the images you want to use, or you can upload new images (Drag and Drop) to the Media Library folder of your choosing and then select each image you want to use in the Slideshow. 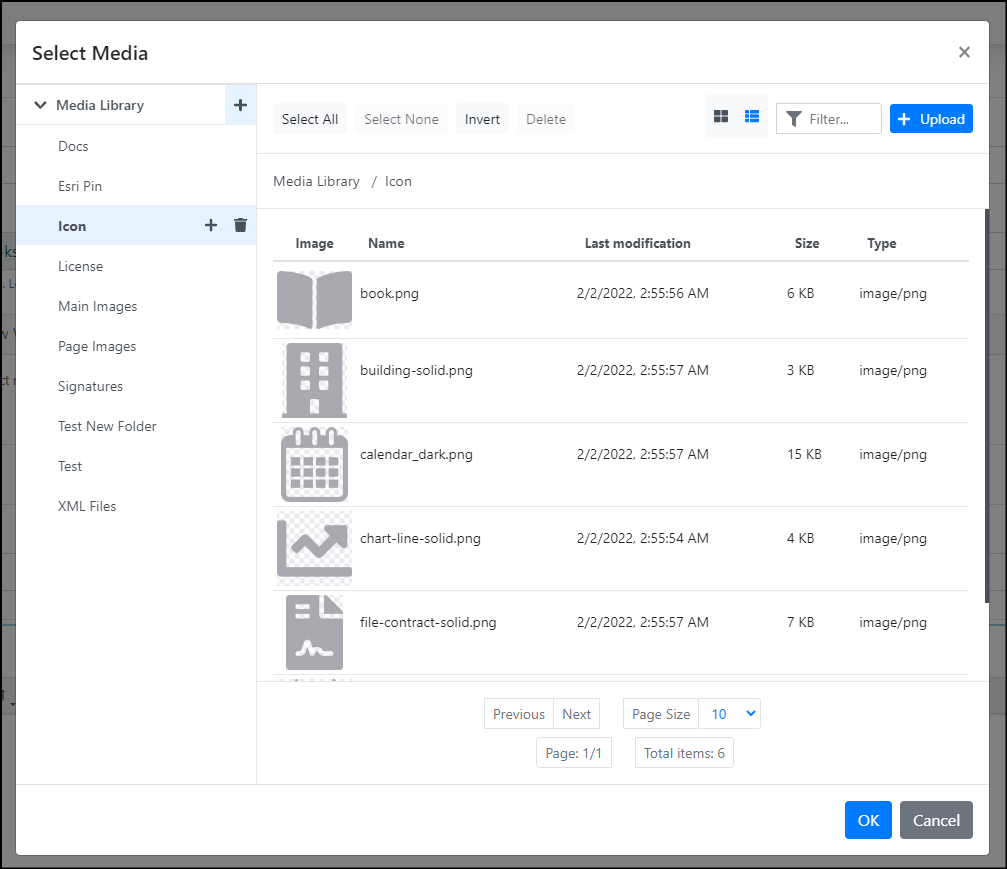

Drag and Drop the images in the order you want.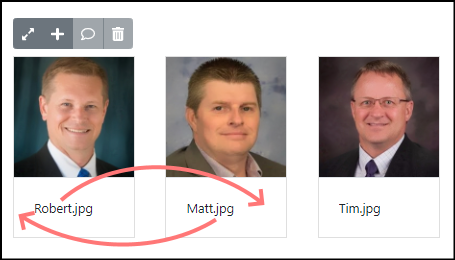
Reminder: Don't forget to add the Alt Text for your Slideshow. With Alt Text, you are describing the images in the Slideshow to someone who is visually impaired. Some web browsers will show the Alt Text in a small pop-up when your cursor hovers over an image. This functionality is a requirement of the Americans with Disabilities Act which requires that all images on your website have Alt Text.
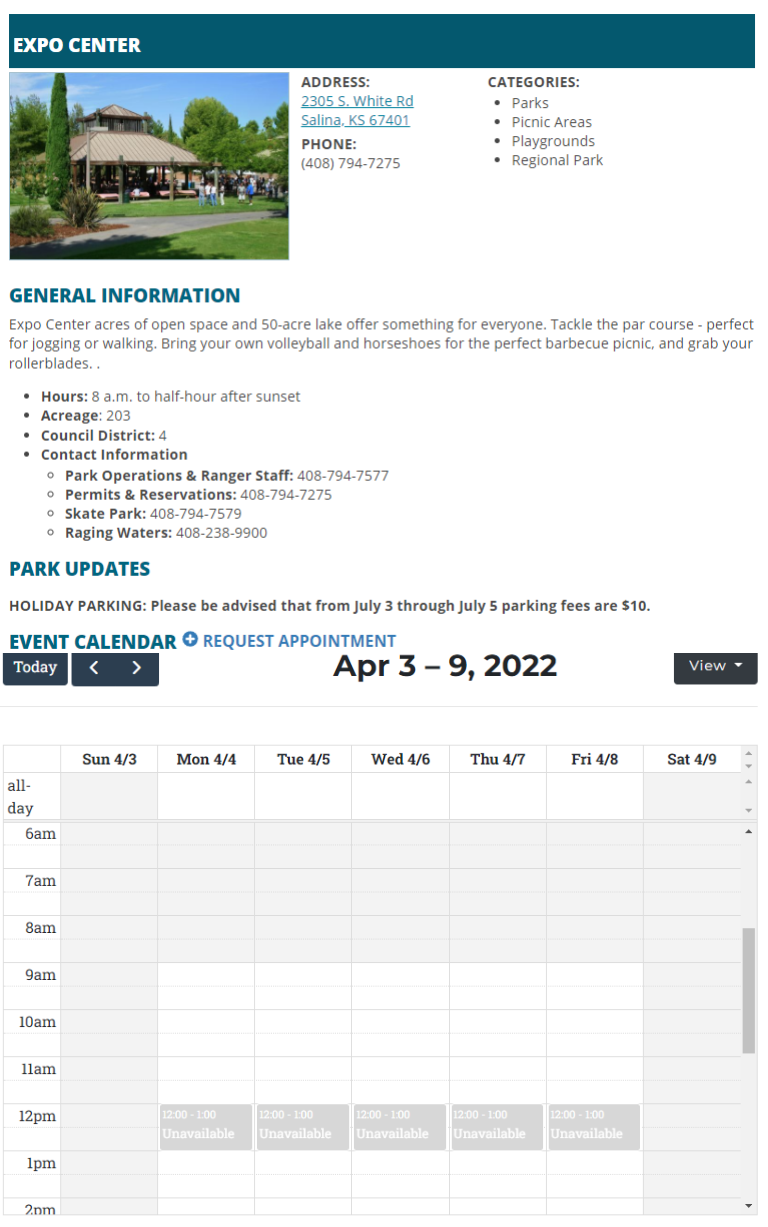
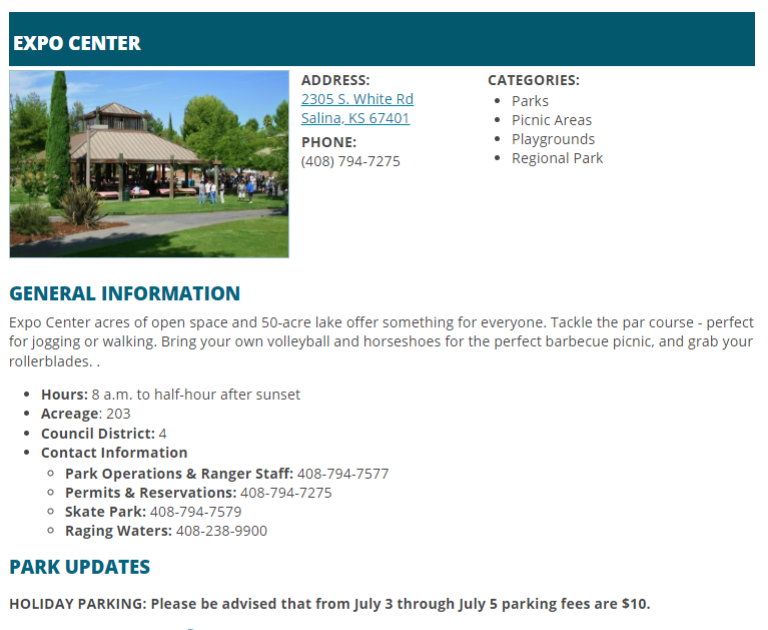
The new Facility module is a great way to show the public places they can meet and accept reservation requests. Whether it's a ball field, park bench, shelter, a conference room in your offices, or your local recreation center.
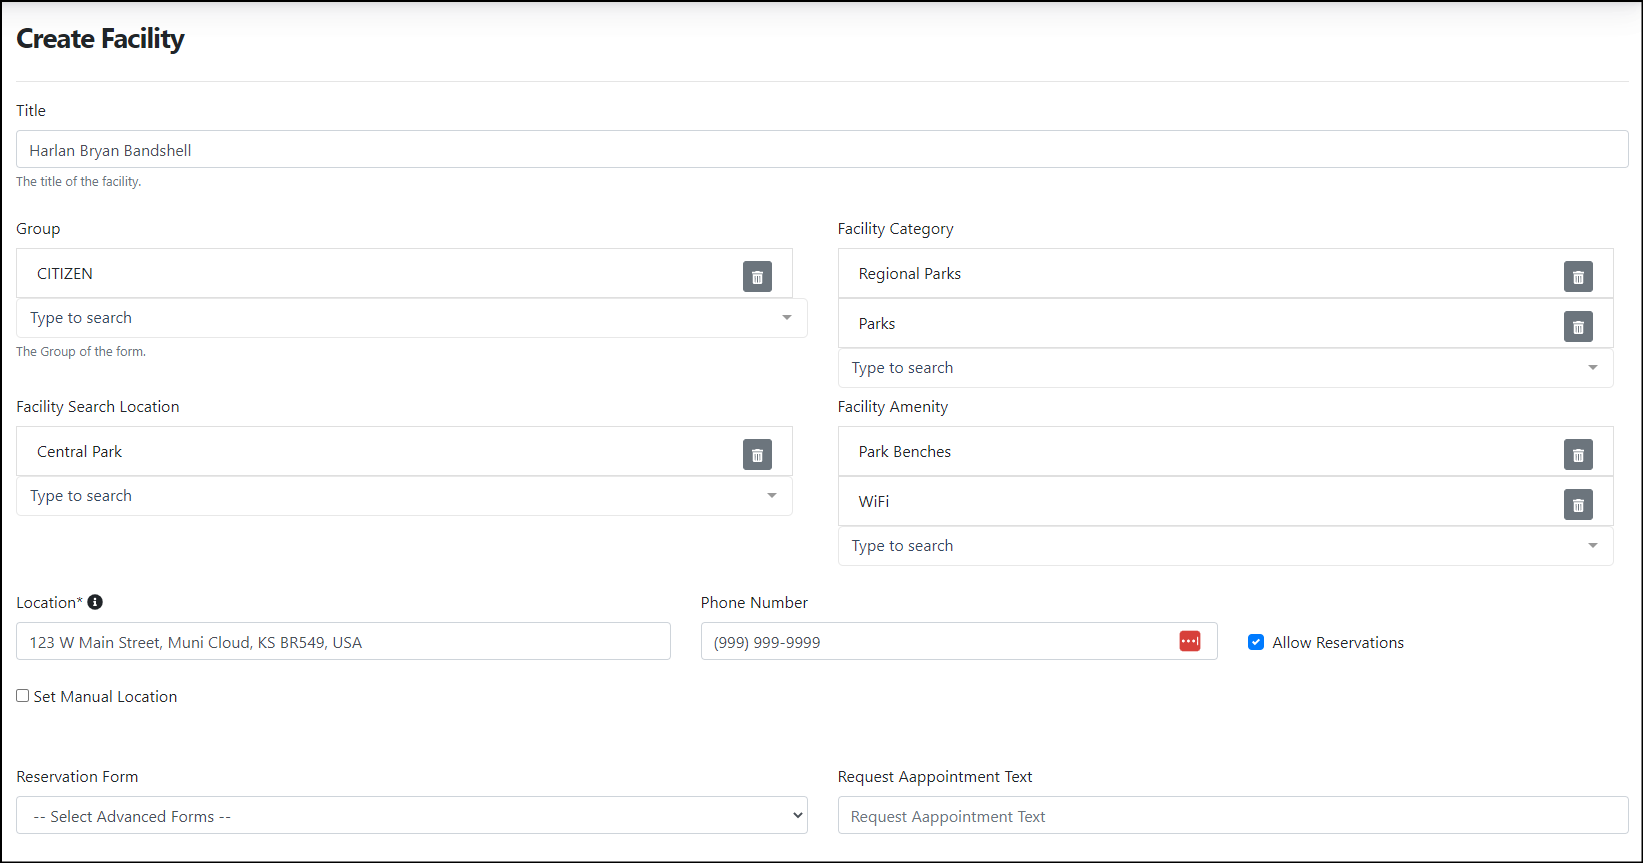
You can also sort your facilities by category.
The Facility Details page can show facility information, contact information, a Slideshow of pictures, and an online map for directions.
You can allow reservations of your facilities (with or without approval) that use your calendar with a Reservation Form you create in Advanced Forms.

There are, of course, settings for the reservations so that you have some required "set up & tear down time" between reservations...don't worry, we won't let you double-book your facilities unless you need to. There are more settings for the Facility for minimum and maximum meeting durations, facility hours available, and rental cost per hour. Can you say "revenue generator"?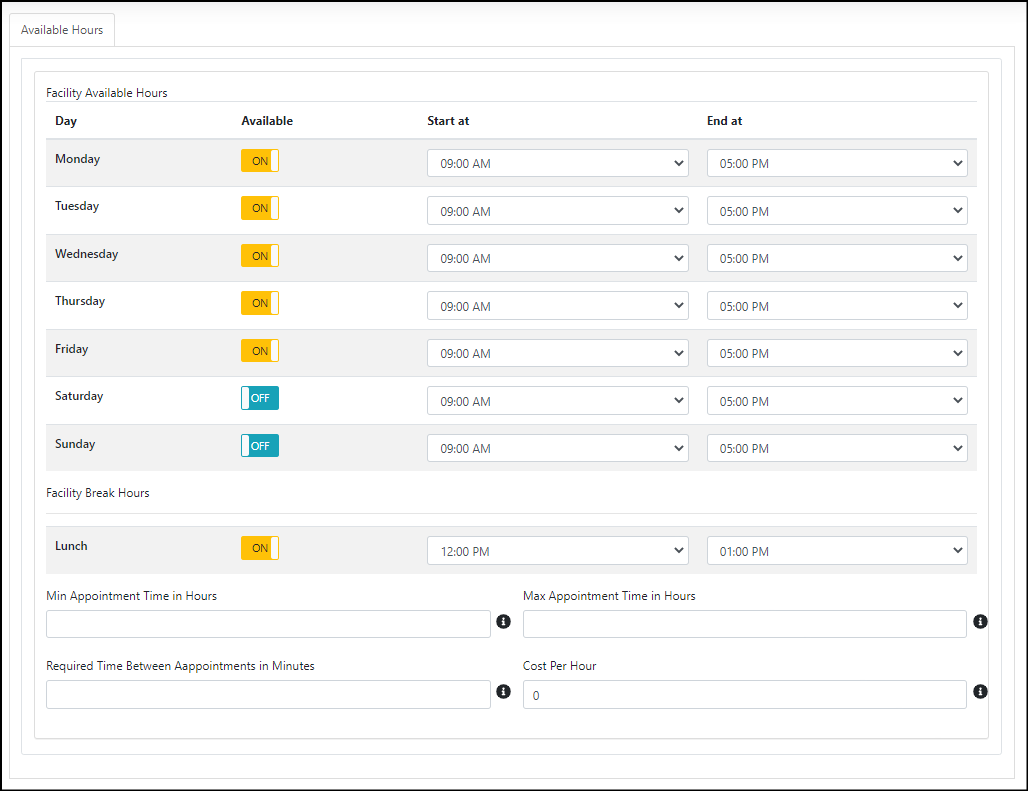
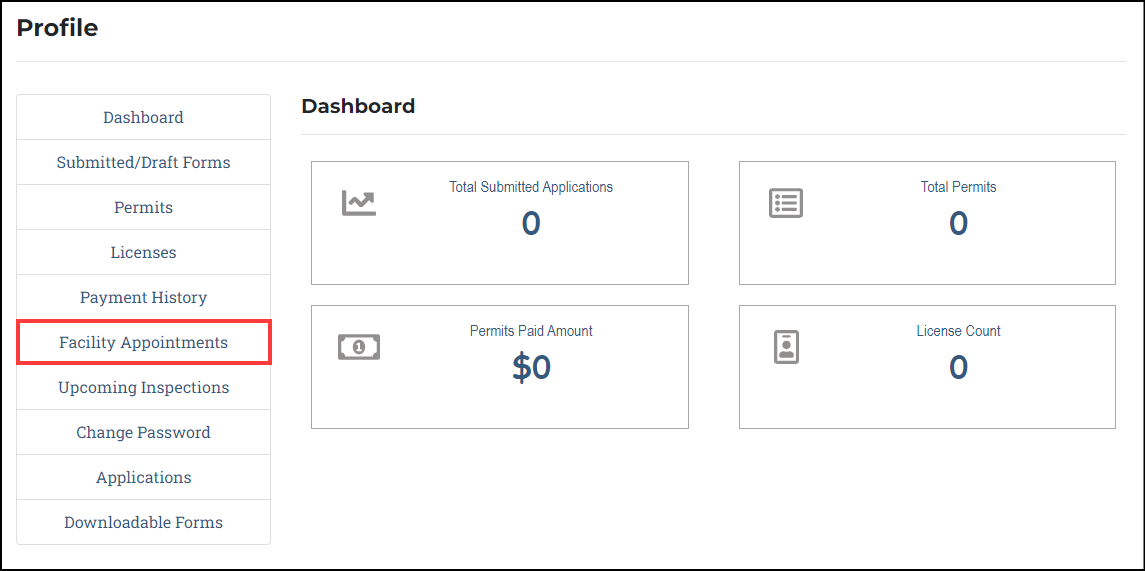
When someone makes a facility reservation, the public can go to their Profile and they will see a new menu item on the left side for "Facility Appointments"
Get ready for this, you can now create your own Packet Report for a Case or a License! In the top right corner, when you select the Action button, you will see "Packet Report."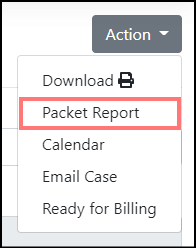
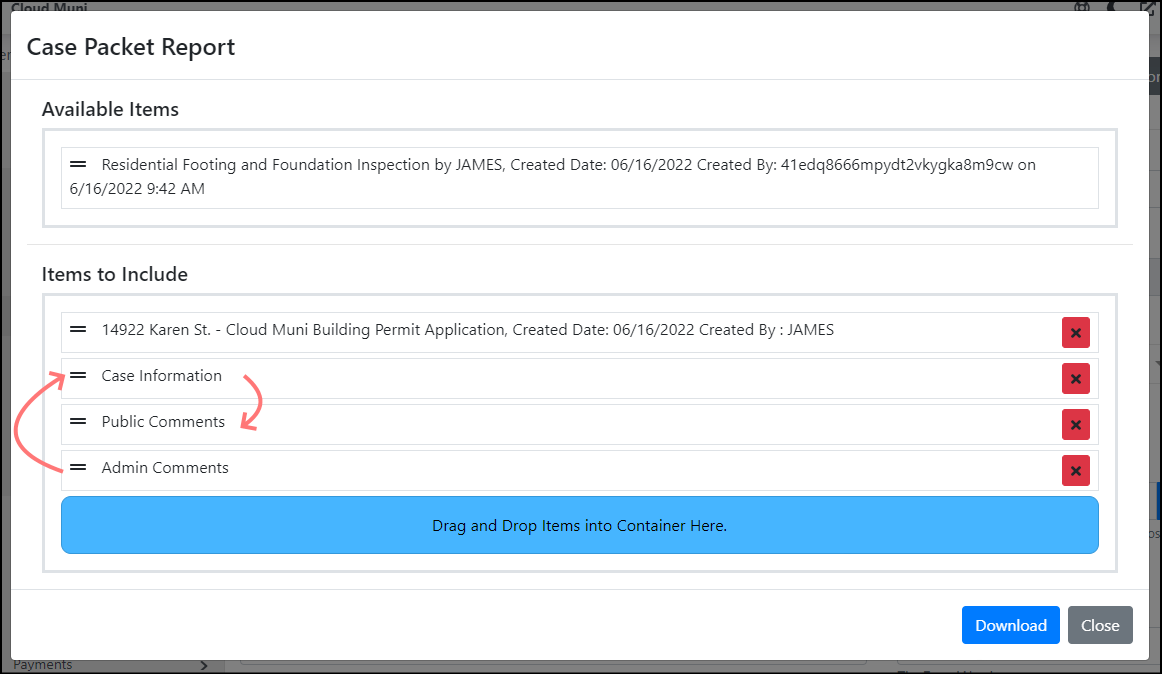
The Case/License Packet Report will appear with all of the available items that you can pull information for your report
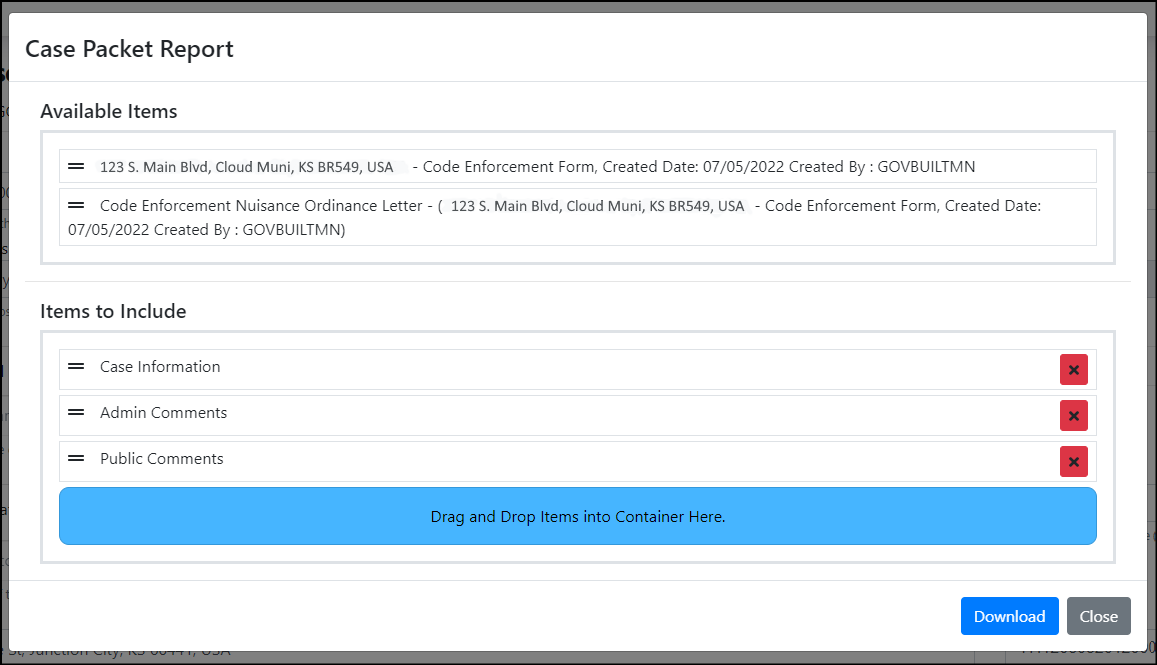
Drag and Drop items you want in your report, and put them in the order you want in the top window. Click the blue Download button.
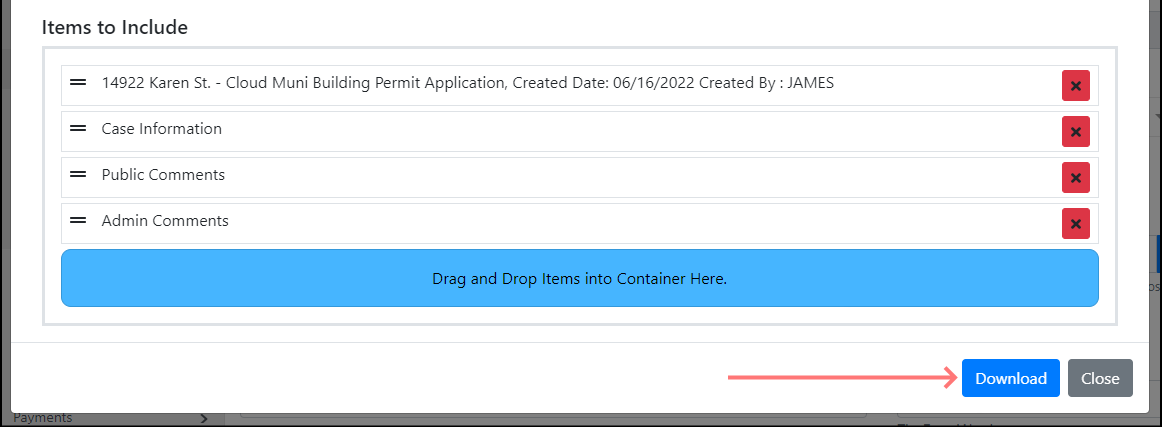
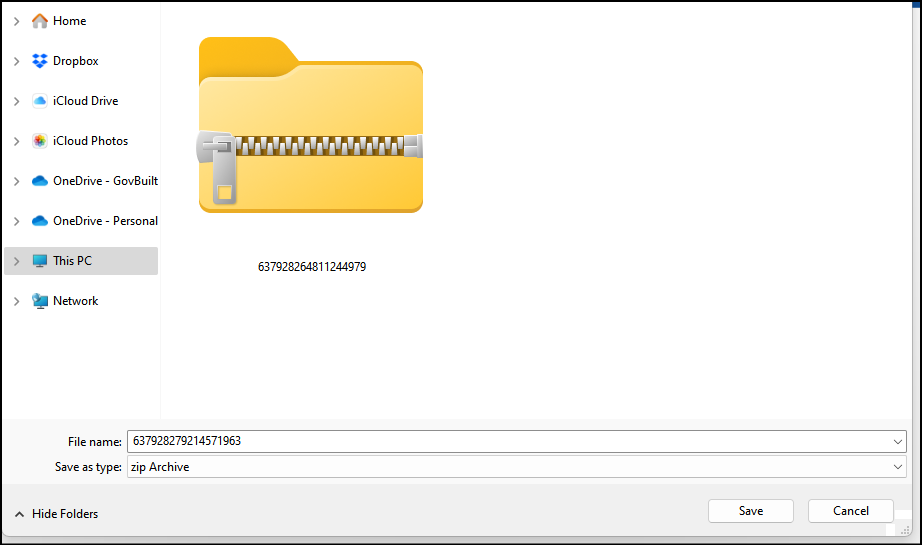
The system will work to pull all the information together in a ZIP file that you download. Viola!
Download Case Upgrade - I know that sounds like an oxymoron, but it isn't! We've improved the Case and License Download process so you can select the items in that Case or License that need to be part of the download. Attached Items, Attached Documents, Pubic Comments, Inspections, Admin Comments... they're all there! Similar to the Packet Report, when you select Action - Download, you will see available options to download with Case or License.
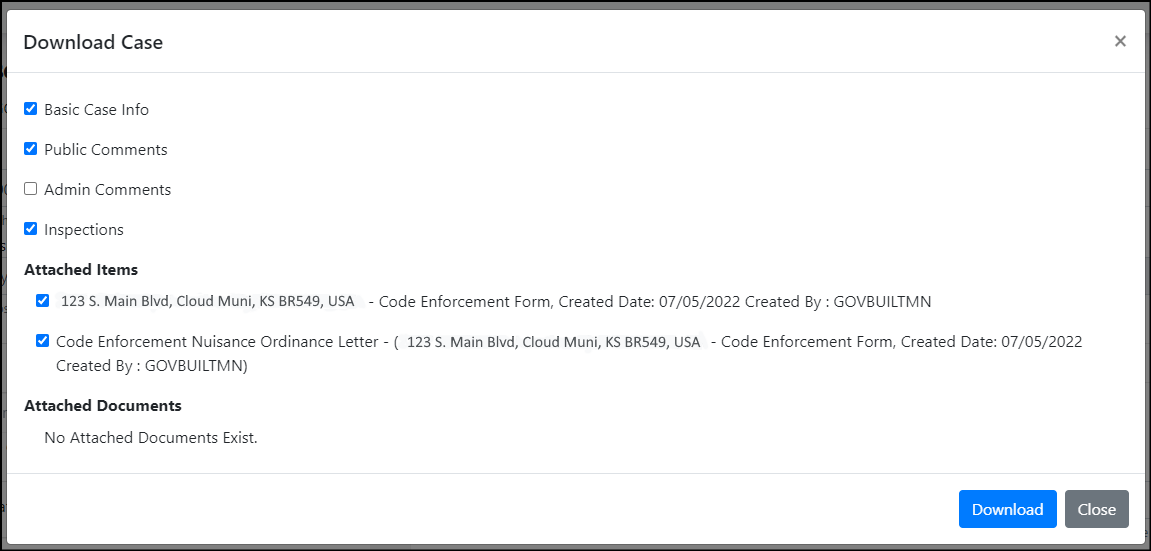
When you click the blue Download button, everything will download for you in one ZIP file! How easy is that?!
Case Type Inspection Upgrade - Another new item added to the Case - Action button to view all of the Inspections for a case.
Issues Resolved & Squished Bugs
With all of the new features added to the system, we are still working hard to squish all the bugs we find. One of them was happening when you add a Standard Comment to a Comment, the text would not save after putting them into the window. Poof! Gone! Rest assured, it's fixed!
Thank you for joining us this week for a huge round of new stuff! Do you have a question? Email us! We're in process of creating and updating training materials for everything in the GovBuilt system, we can't wait for you to see what's coming!
Enhancements
Added Open Edge Integration
- Allows the client to take payment online before and/or after an application is submitted.
- Payfields eCommerce Integration
- Express Cloud Present Integration
- EMV Card Intergration
ESRI Integration
- Added ability to search by Parcel Number, Address, or Owner Name and view ESRI details

Staff Directory Upgrades
- Allowed team members to be assigned to more than one department.
- Ability to create a field in an Advanced Form with a dropdown list of licensed contractors, plumbers, electricians, etc for the citizen to choose from.
- Ability to create an event then add to Team Member's schedule i.e. an inspection. This enhancement also allows the event to be attached to a case and sends the Team Member an email alert of the event with the link.
- Gave the option to feature the Team Member on the front end page or hide a Team Member on the front end Staff Directory.
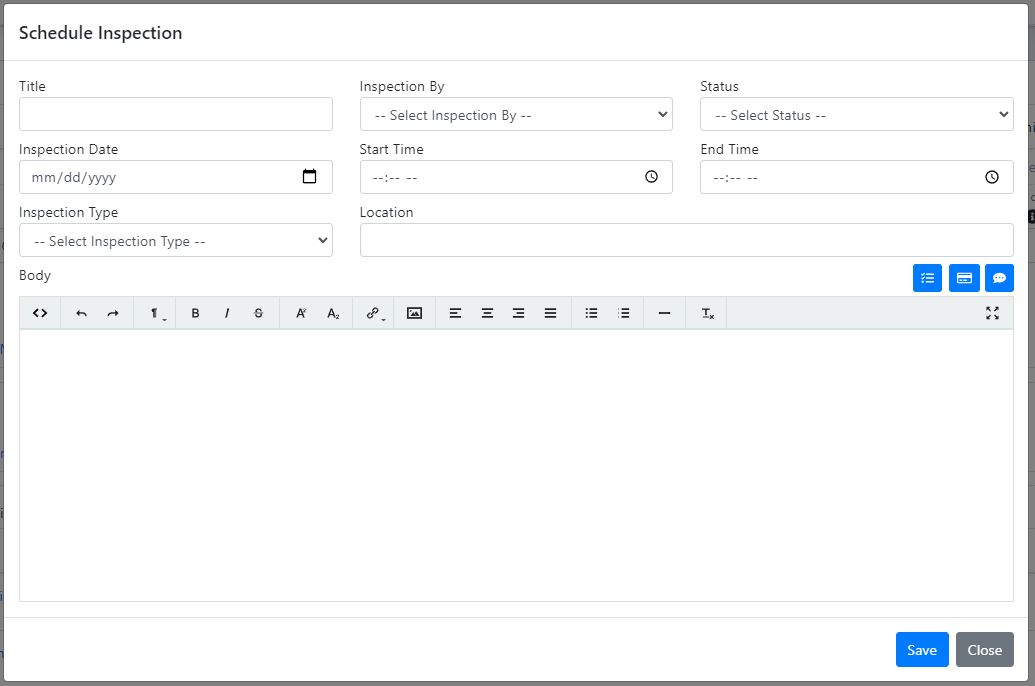
New Feature: Inspection Tab
- Added inspection tab in the case with a fill and attach button that will only show forms in the inspection form type.
- Created ability to schedule an inspection and attach to the case with progress view.
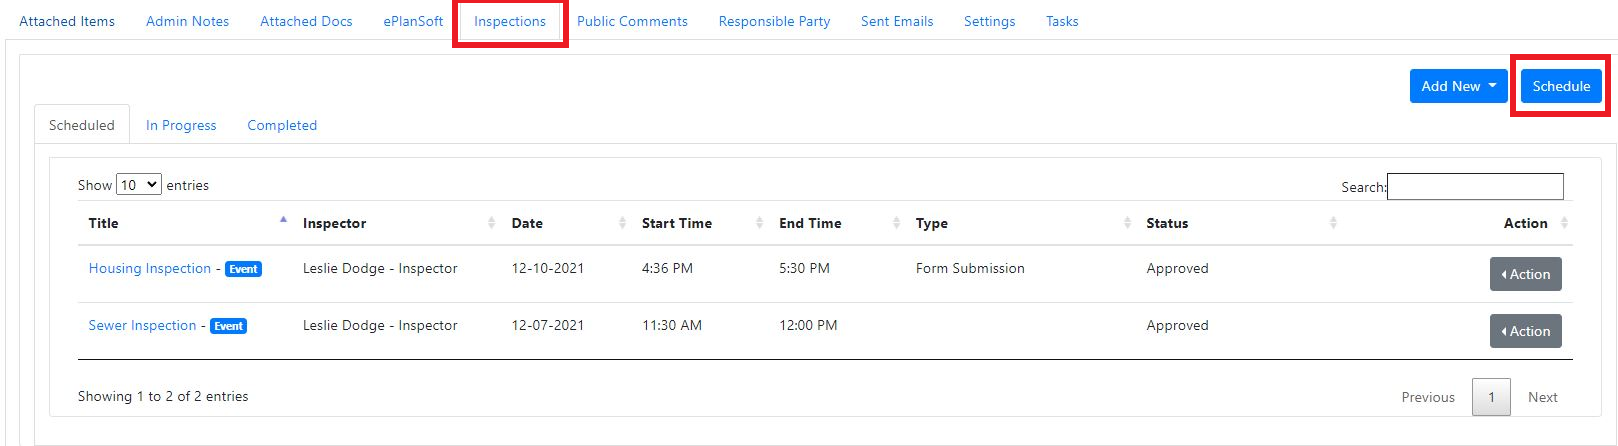
- Ability to view all scheduled inspections by day, week, or month view the calendar.
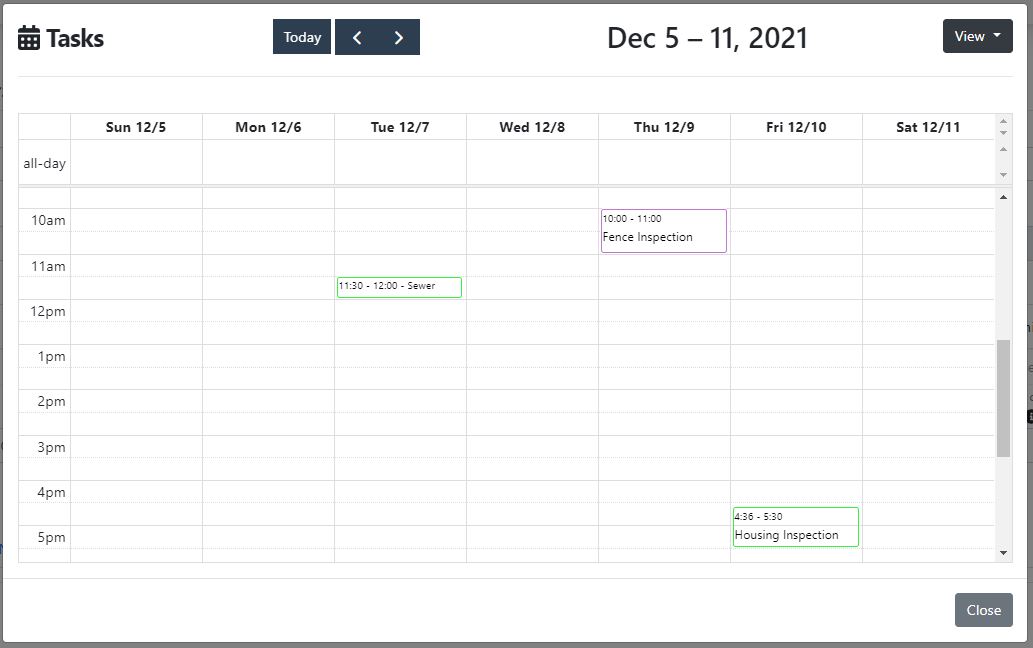
- Added ability to click on an event to view more details
New Feature: License Renewal Tool
- Gives the ability to search for expiring licenses and send out an auto-renewal notice.

License Upgrades
- Added ability to add multiple license subtypes on license.
- Added ability to add a watermark to printed license.
In our v3.0.0 release, we upgraded our overall backend system. Your user experience will now be faster, and more secure with enhanced features! We will release those features in the next coming weeks so stay tuned!
We have another great set of tools to talk about today! Summertime is no time to rest when we have updates and new stuff to add to our already robust system! Let's go!
Features
Set Permit Types to Show on Front End by Default
This is one where we realized it should have been this way from the start! Permits are now set to "Always show on the front end". You can change this setting if needed, but most Permits need to be shown publicly (digitally); we're just trying to save you a step.

Renewal License Tool Link Security
When the license renewal emails are sent out with a link to renew their license, the link will be a one-time link. You may have a developer filling out multiple permits and using the same link in his email for all 100 of them! That would mean that all 100 permit renewals would be under ONE CASE because he used the same link. Now that won't happen!
I do confess that I'm an email hoarder and when I try to click on something from 5 years ago, it doesn't usually work. It's the same thing here only we're making sure the link really doesn't work.
I would show you a picture of the link but you would only get to see it once. ;)
Audit Trail
Yes! You now have an Audit Trail that will show you a history of what's been changed! Every action is saved so you can go back to different versions

You can see the difference between two versions of a case or a form and then restore the version you need to keep.

It will come back as a Draft that you can review and then Publish to make it public again.

Front-End Advanced Form Map Changes
Have you ever received this error message when you typed something in Esri? Have you ever wished you could change that mesage?

Now you can change it! It's in Settings under Advanced Forms, all the way to the bottom of the page; you will see a Description field with the current text. Delete it and put in what you want it to say:


You can now drop multiple pins on a map! Why? Let's say you need to find out where people are cutting down trees without a permit in town. You want your residents to help you out, so you ask them to fill out a "Concern" form where they would be able to put a pin drop in multiple stops where each tree used to be; the pin drops will gather the exact latitude and longitude of the pins so you will know exactly where to go.
We'll do just about anything to make your jobs easier!
Bugs/Issues fixes
In Accounting Details, we changed the name of the Payment Status "Lien" to "Release of Lien" and change the case status to Paid. That makes more sense to us; we hope it does to you as well. Accounting terms can be confusing sometimes.
The last bug we were able to squish for this release was an issue where a payment didn't "attach" to the license, didn't record the payment, and didn't even show in the Payment Tab. If you experienced confusion and potentially upset customers, we apologize if it caused you any undue stress. We will do our best to make sure that doesn't happen again.
Ok, that's it for this release. Don't forget that you can always chat with our Support Team if you have any questions, suggestions, or want to report something. We're here for you!
Ease of Use Upgrades
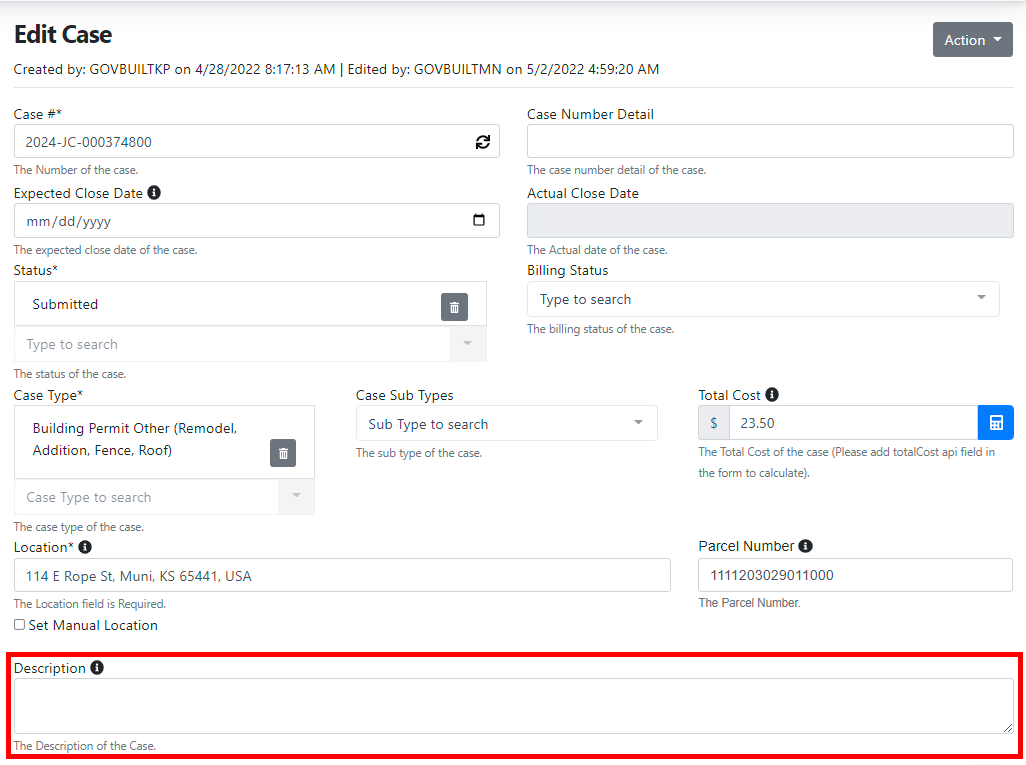
- If you have any forms with a Description box, we've made it easier to see that information by adding a Description field to the Case page. It will automatically pull the information from the submitted form.
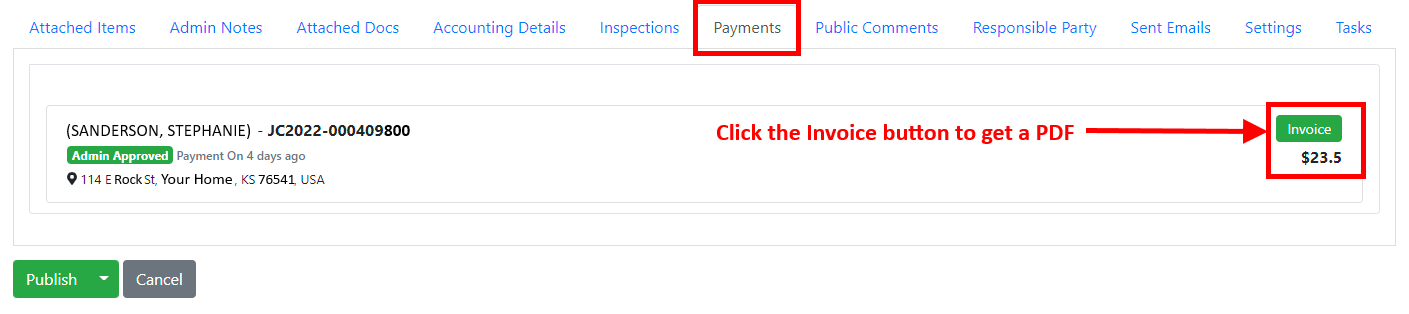
- We have also added a Payments tab to Case and License pages. It will show all of the payments that have been processed for the Case or License and it will also give you a link to a PDF copy of the receipt.
- On the Accounting Details tab, you will see a new option for Lien as a payment type and it will be treated as Paid on payment reports.

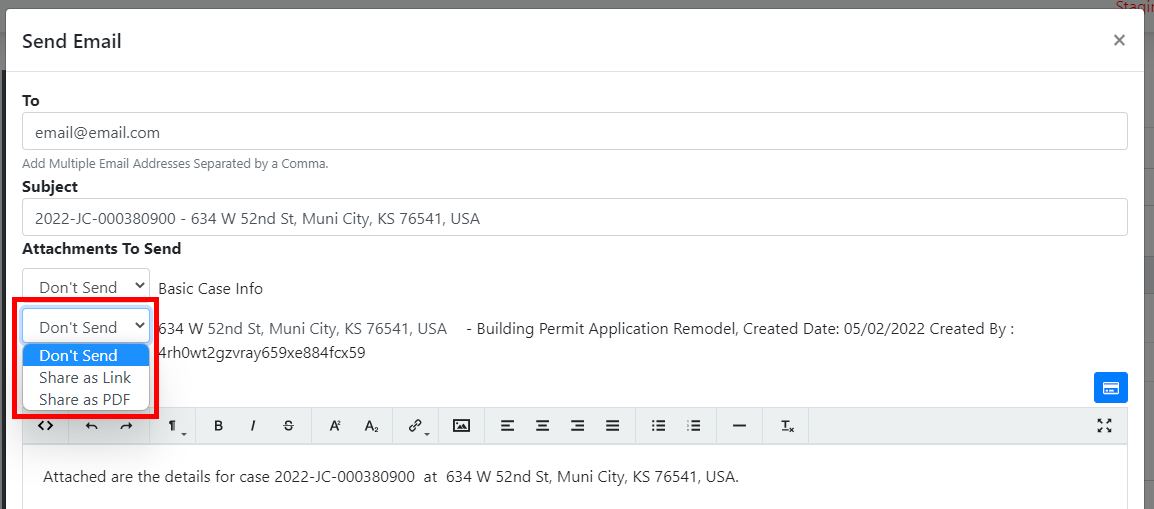
- When you are sending an email, there wasn't an easy way to attach a file or send a link for a download. Now you can do either one!

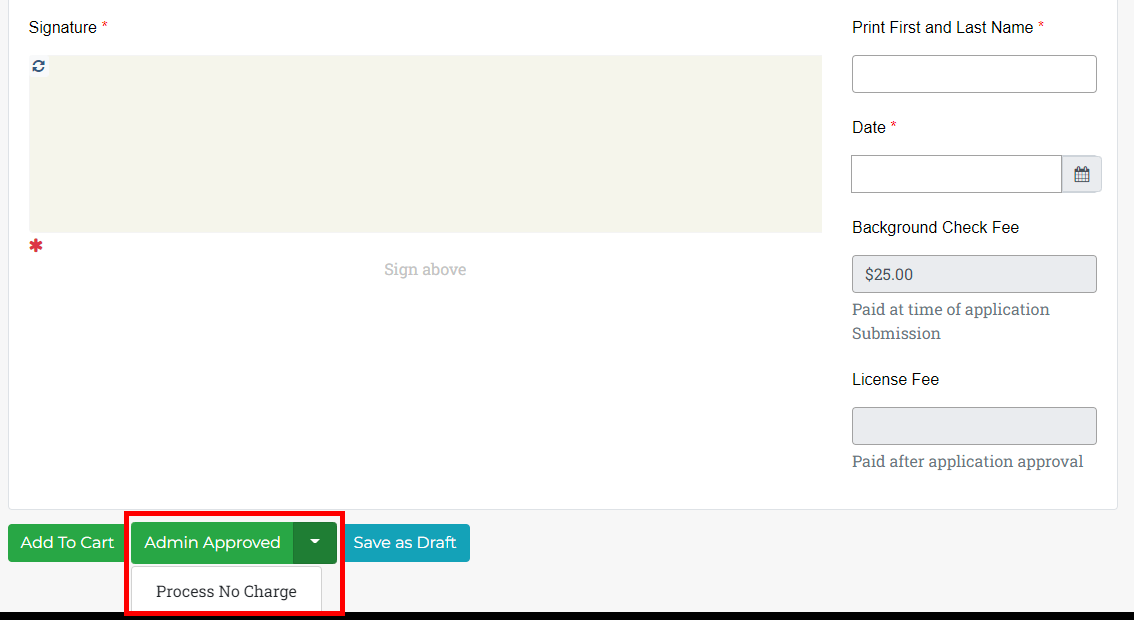
Option for an Admin to approve without payment
- When you have someone filling out an application but you need to approve it without payment, you now have that as an option in the Admin Approved button. That option will create a $0.00 case with a $0.00 fee.
Redirect Module
- Sometimes you need to create an easy-to-remember web address (URL) to use in your emails, marketing materials, etc. Now you can!
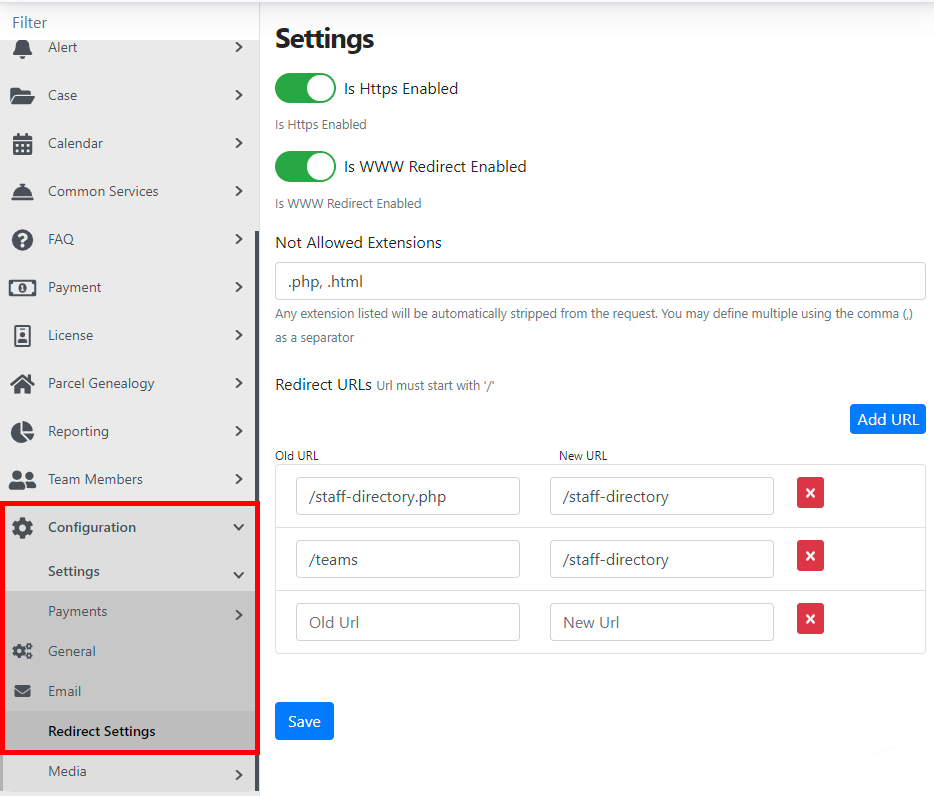
- Instructions:
- Click the Add URL button and you will see two boxes appear at the bottom.
- Add the current URL to the box on the left and create your new URL on the right.
- You don't need to put the full web address in the Old URL box on the left, just everything after ".us" or ".com" in your URL.
- For example, if you are trying to get someone to this link:
https://muniks.govbuilt.us/AdvancedForms/Merchant-License-Application
you would put in the Old URL field:
"/AdvancedForms/Merchant-License-Application"
and in the New URL field, you would type
"/Merchant"
without quotation marks.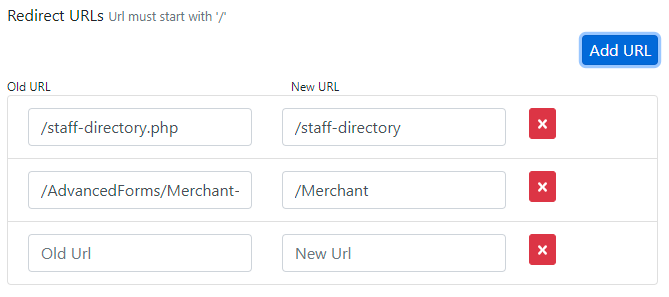
We have another set of new functionality tools to look at this release! There will be some changes to the User Interface, you will want to take a look!
New Features
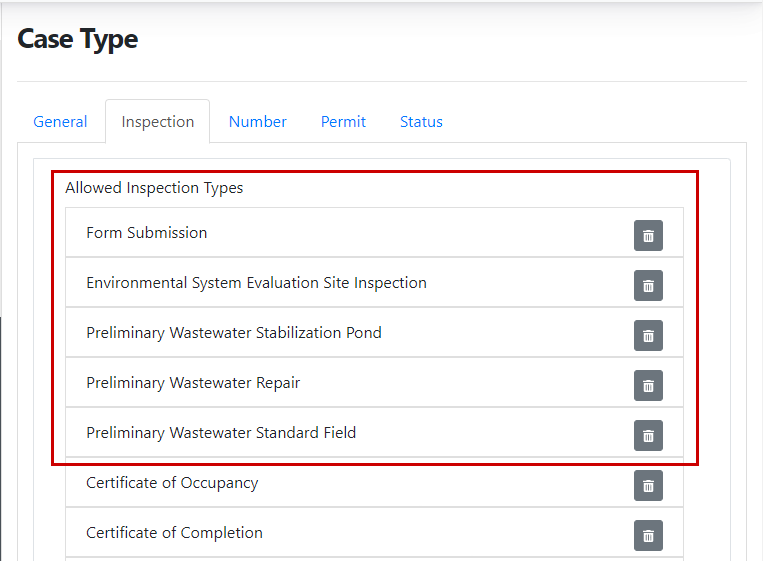
You can now limit inspections by type of case and by Status. This will make it much easier for your people in the field to find what they need when they need it, in as few steps as possible. First, we start by editing or creating a New Case Type, then select the Inspection tab.
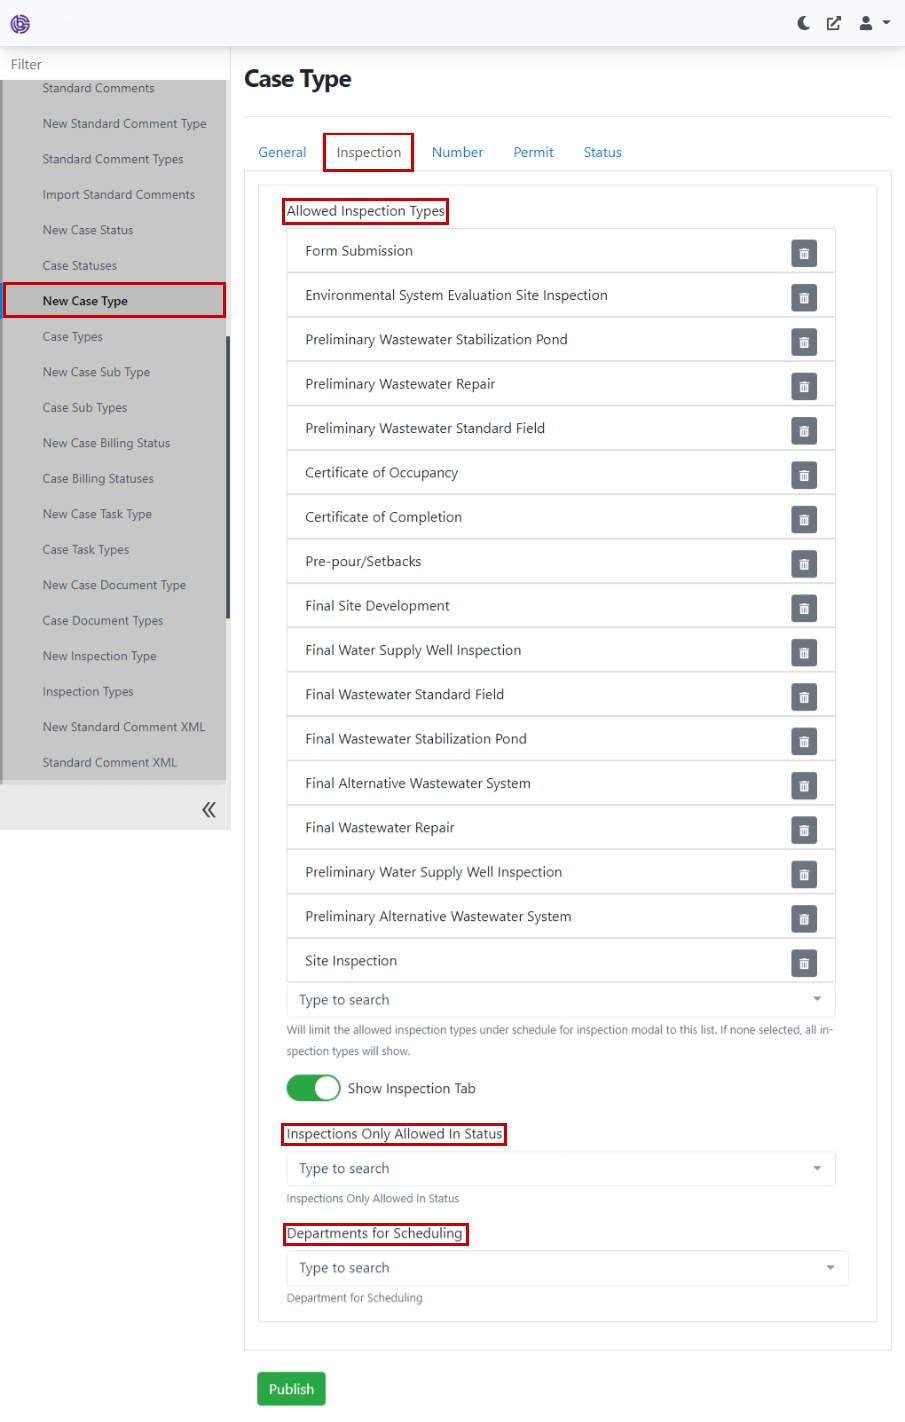
Remove the Allowed Inspection Types that you don't want to be a part of this report.
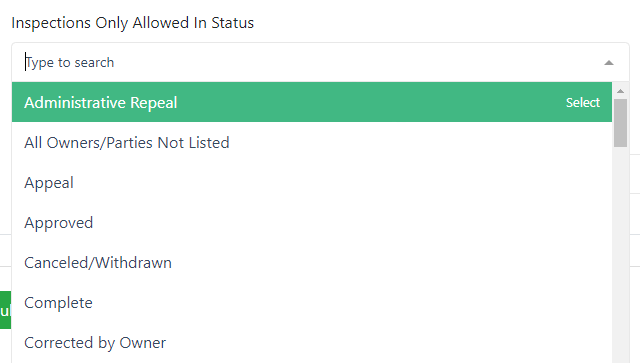
In the Inspections Only Allowed in Status, you will find the different statuses that can be applied to your Inspection.
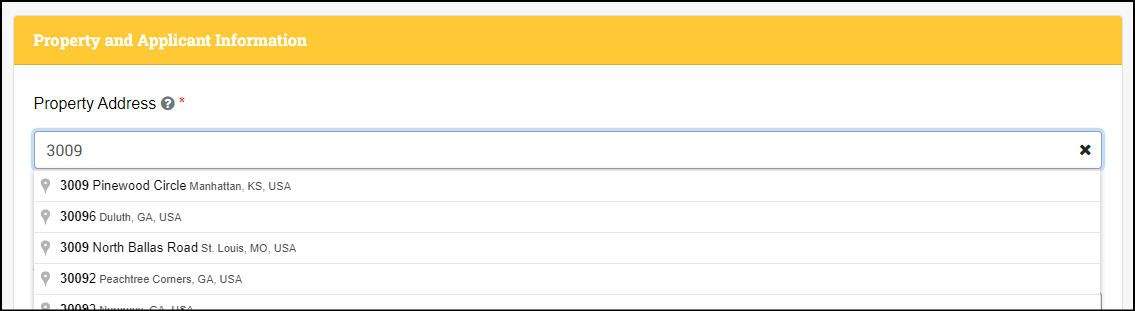
Ever need to fill out the form, but you don't know any of the information? Now you can select a parcel from an Esri map and use that to fill out the form. You can also select more than one parcel to add to the form as well! Pretty cool!!
We rolled out a couple of bug fixes and some new tools this time to help you customize the page that is printed when you select "Print Page." Here's what our team of talented developers have created for this release:
New Features and Upgrades
- You can extend the expiration date for a permit if needed. We know extenuating circumstances happen.
- We've created a new Common Report for you of all permits, locations, and their status all in one report!
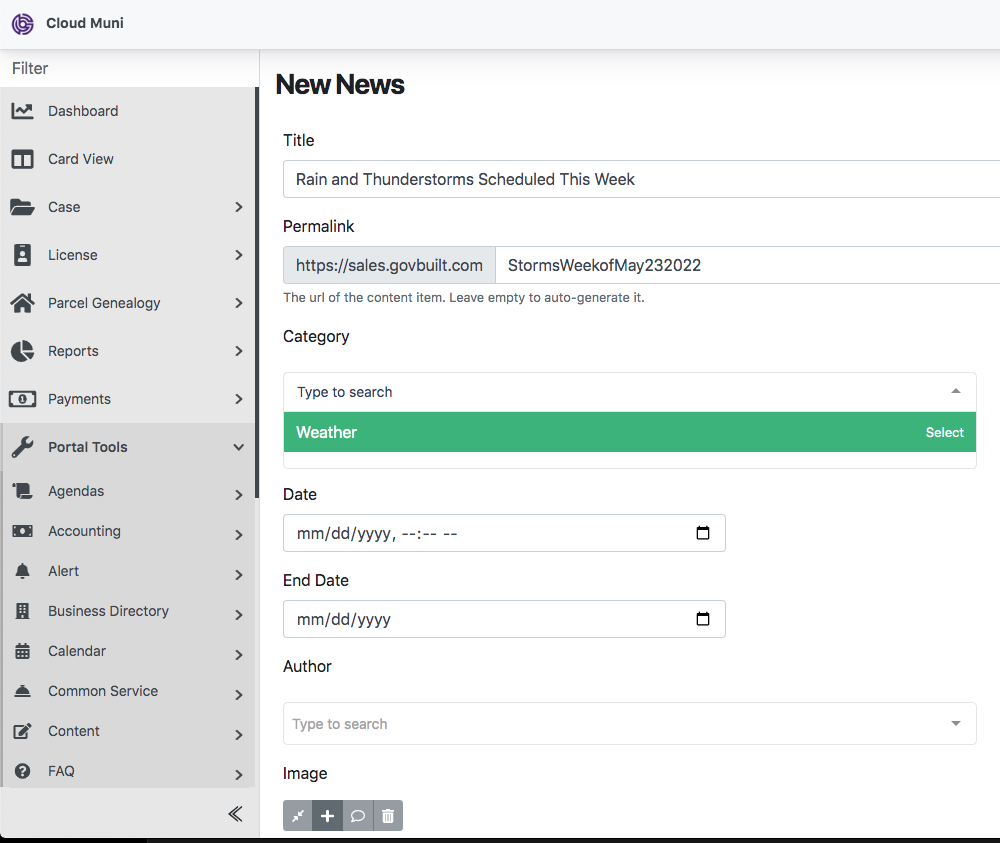
- News upgrades include adding a Spotlight and categories to organize your news
Squished Bugs
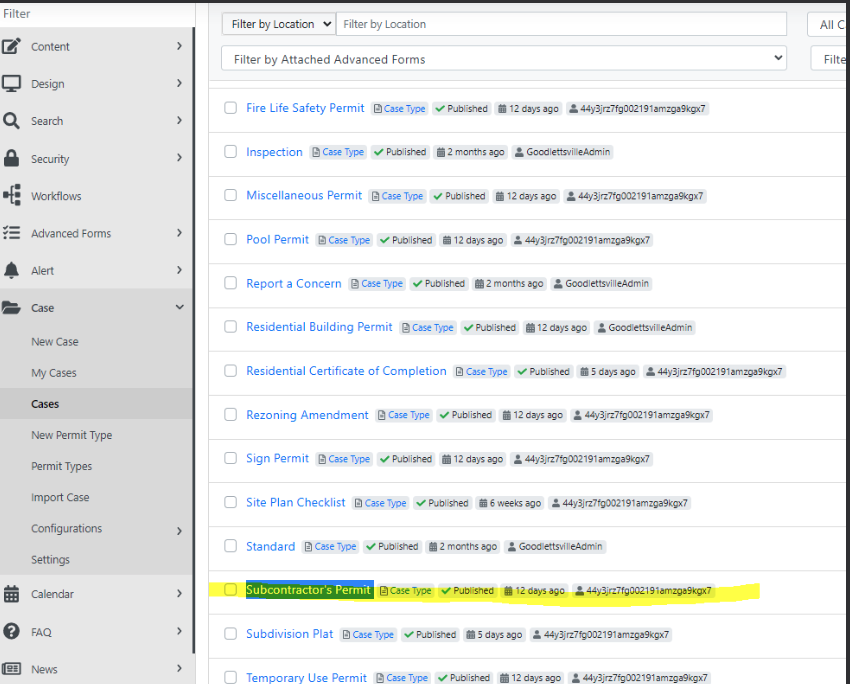
- When looking for the Subcontractor's Permit on the Case Type screen, you wouldn't get anything...now you will get their permit like you thought you would.
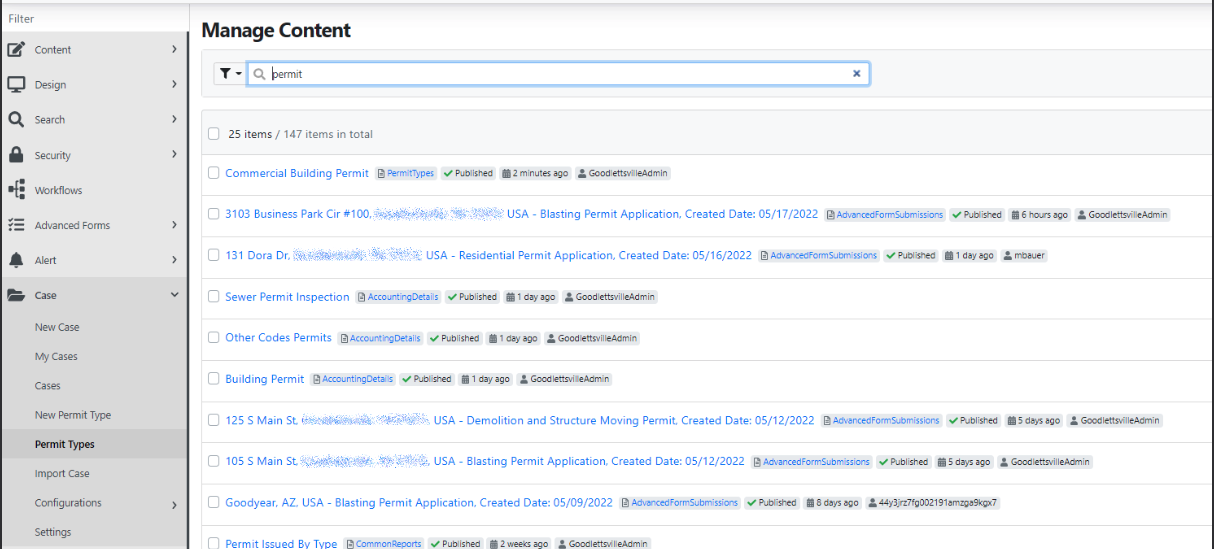
- When you would search in the Permit Types area, it would bring up all items with the work permit when you just wanted the Permit Types. How rude!
- The Case Number didn't auto-fill when a Building Permit was first approved. It does now just like it's supposed to.
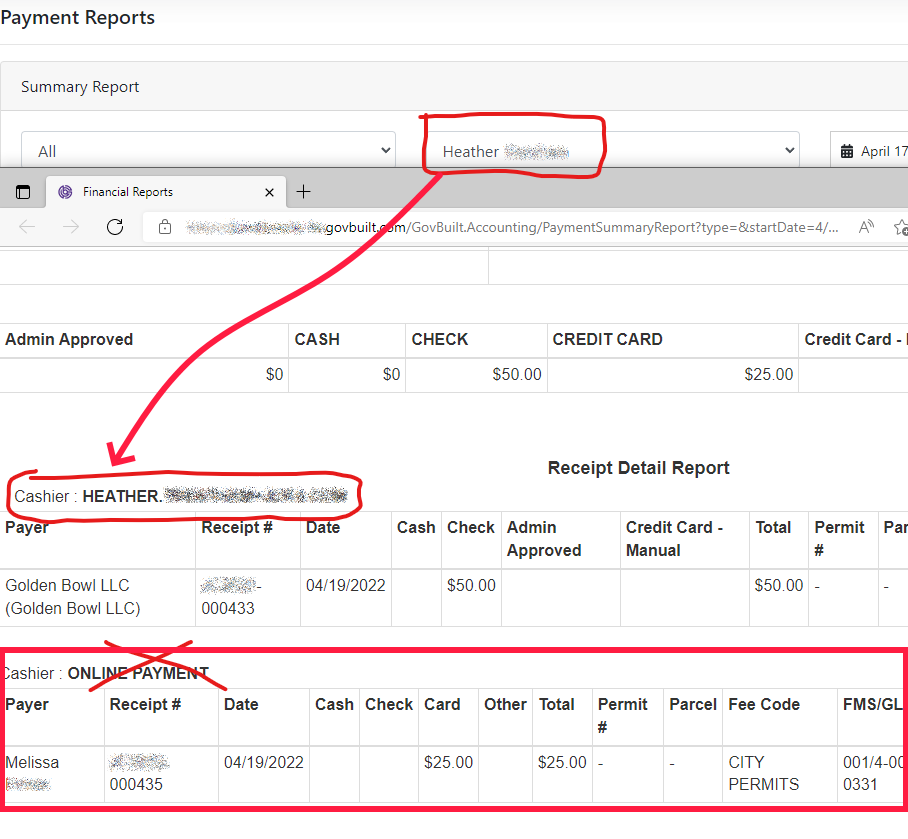
- We had a report of a problem creating a Summary Report for a "single cashier." The report would also pull the online transactions to go with it.
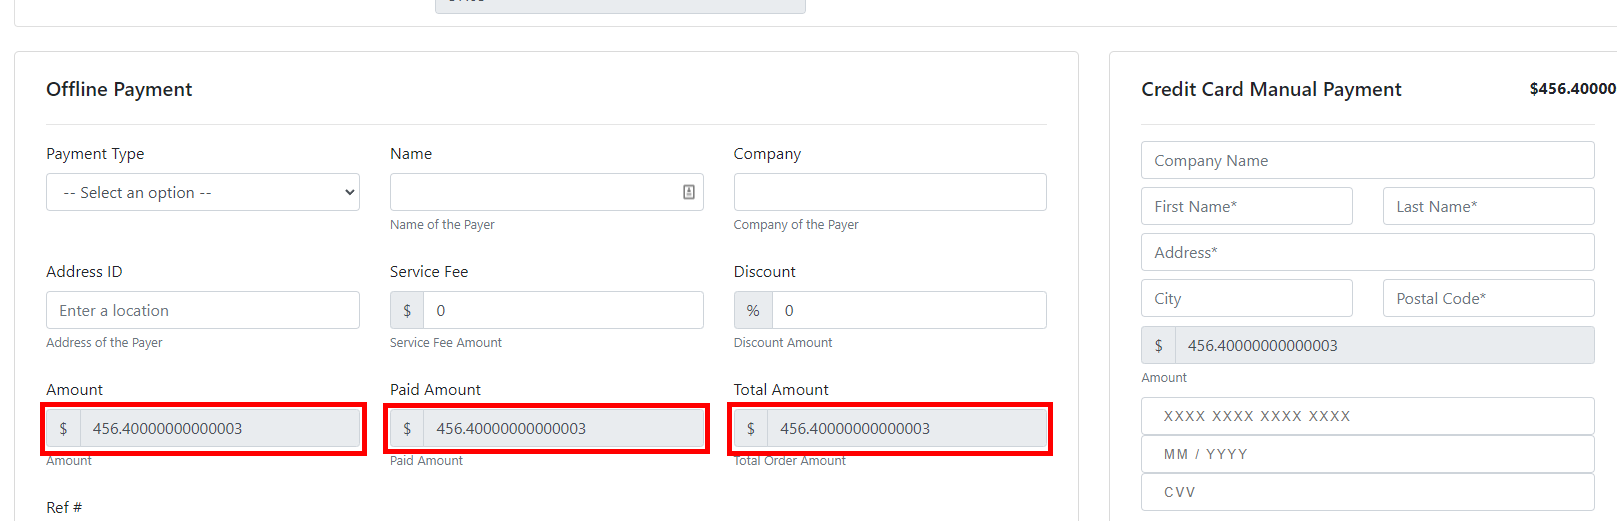
- We had a 0 (zero) problem in a couple of fields where it would add 8 of them after the decimal point in an amount that wasn't needed. They're gone.
Please let us know if you have any questions about what has been released. We're in process of creating and updating training materials for everything in the GovBuilt system, we can't wait for you to see what's coming!
New Features and Upgrades
Extending an Expiration Date - I'm sure there are times when you want to give a little "grace" for one reason or another...now you can!
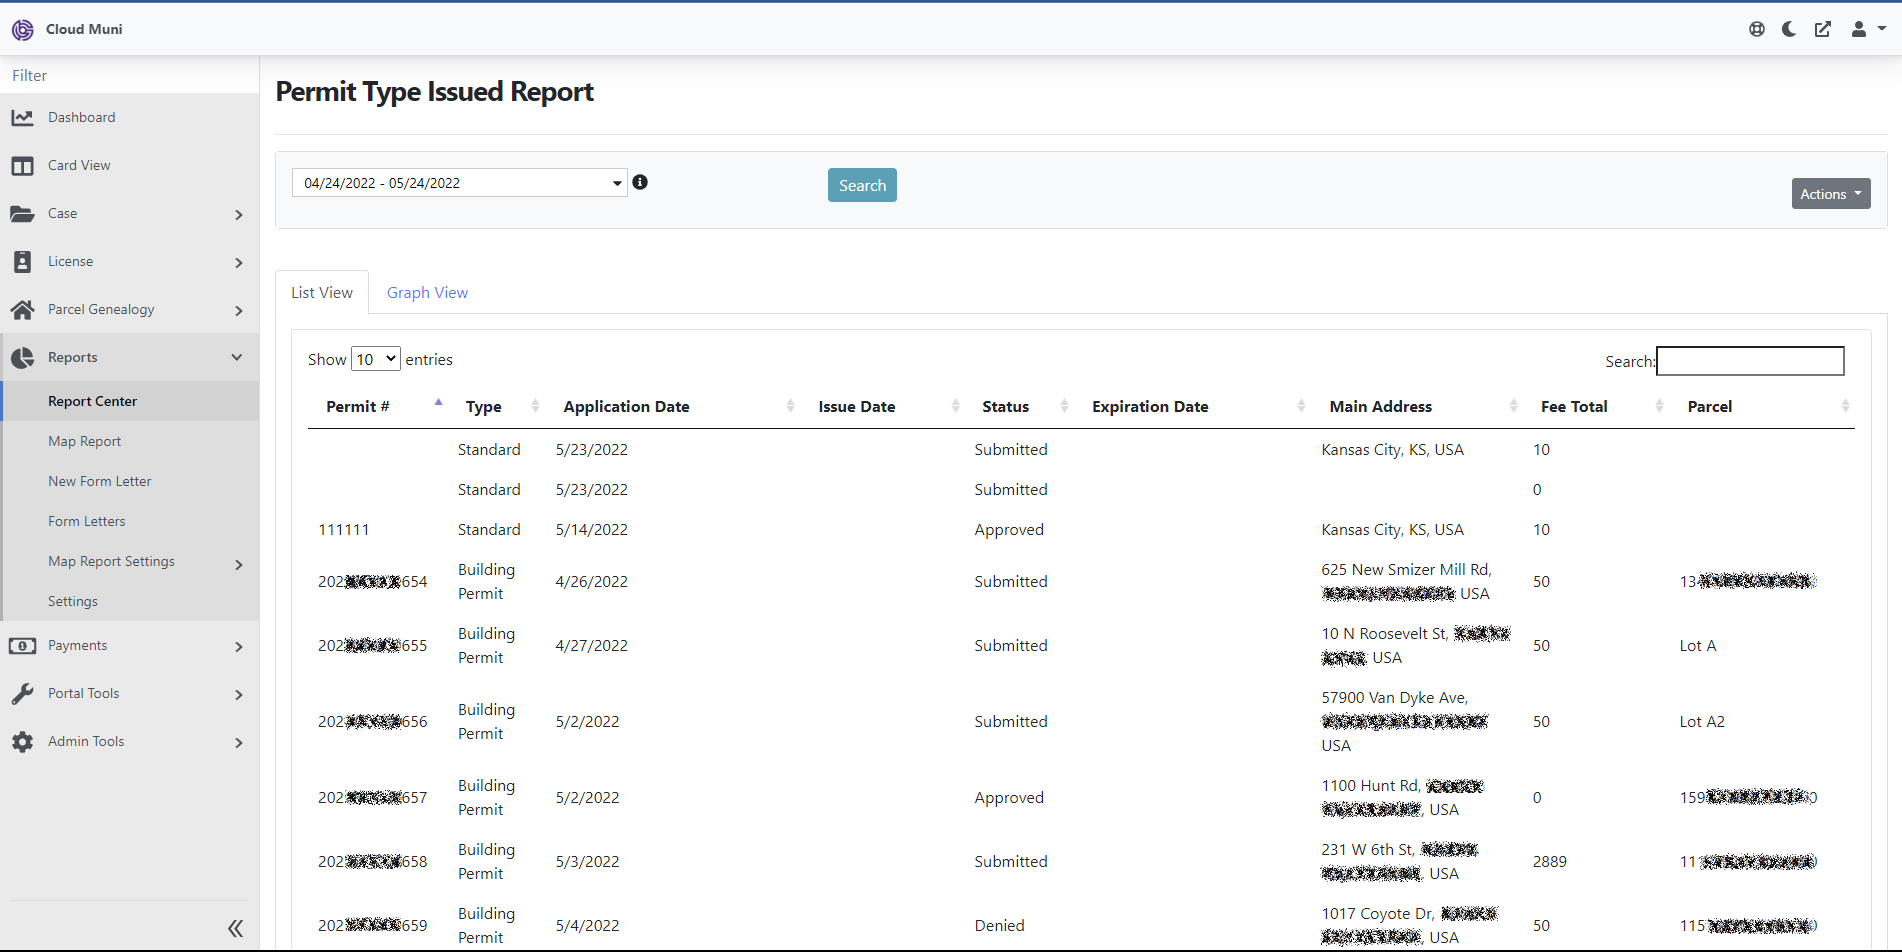
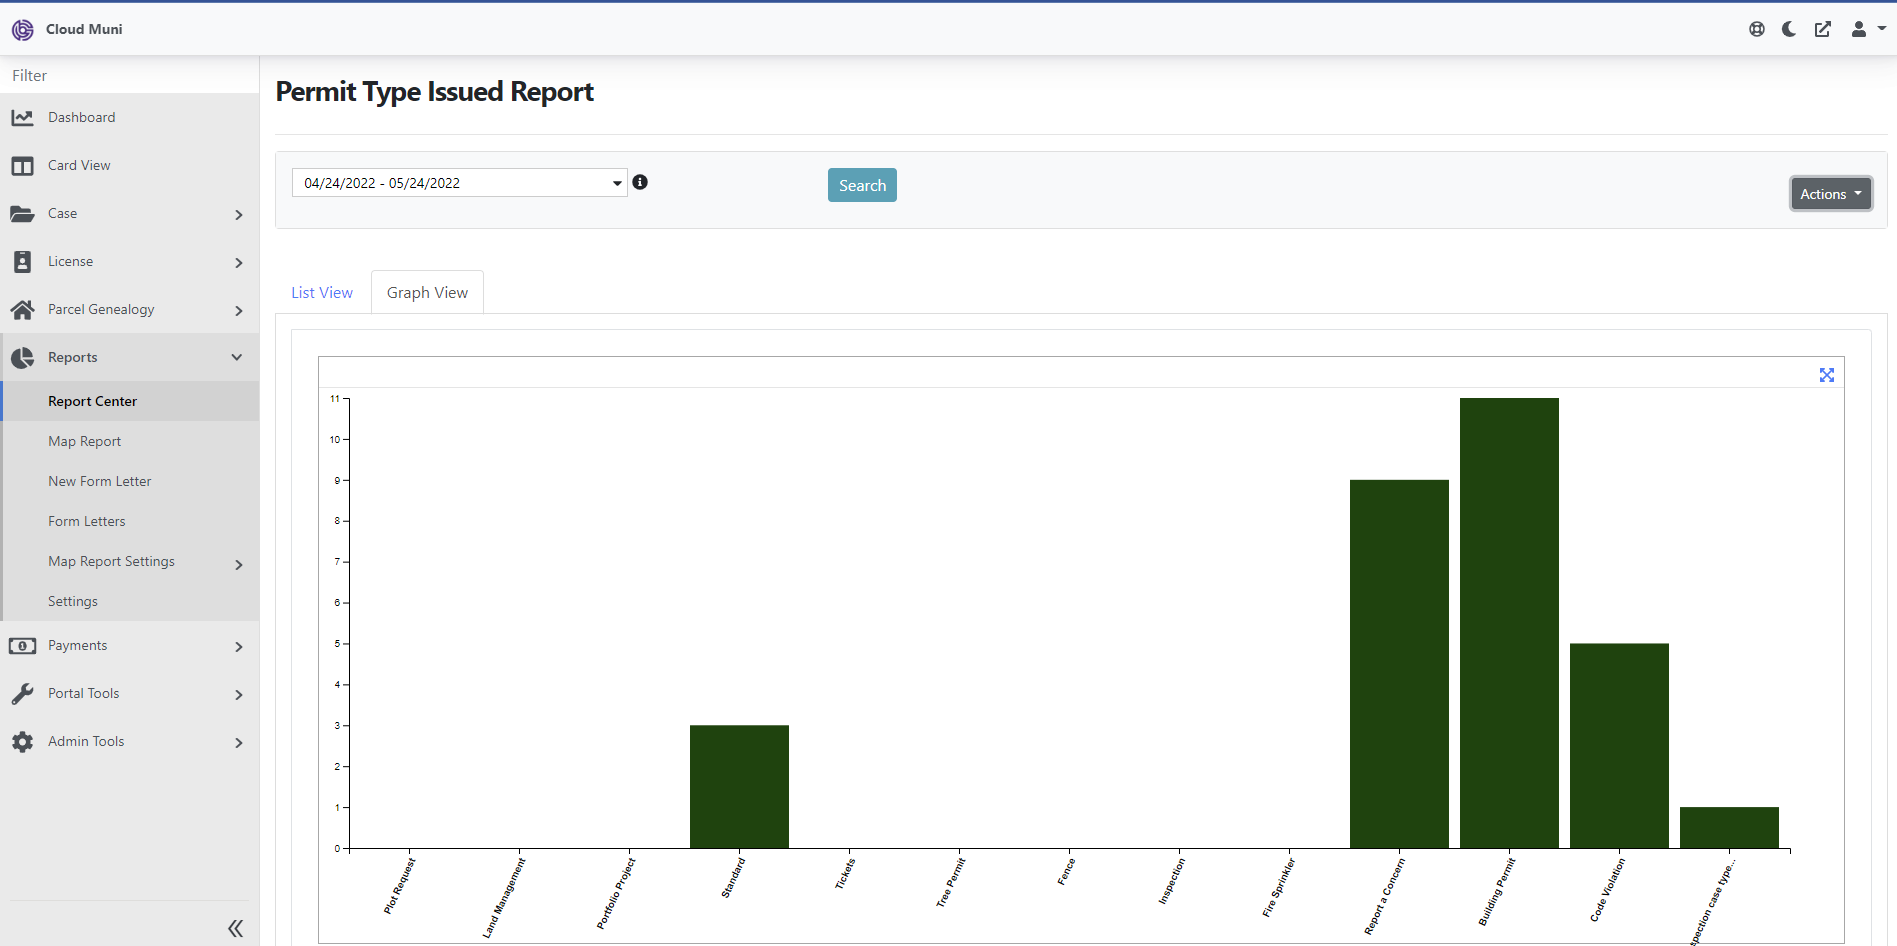
New Common Report - Permits Issued by Type - This will give you a printable report of all permits, locations, and status.
News Module Upgrades
You can use Spotlight to highlight news items on the home page.
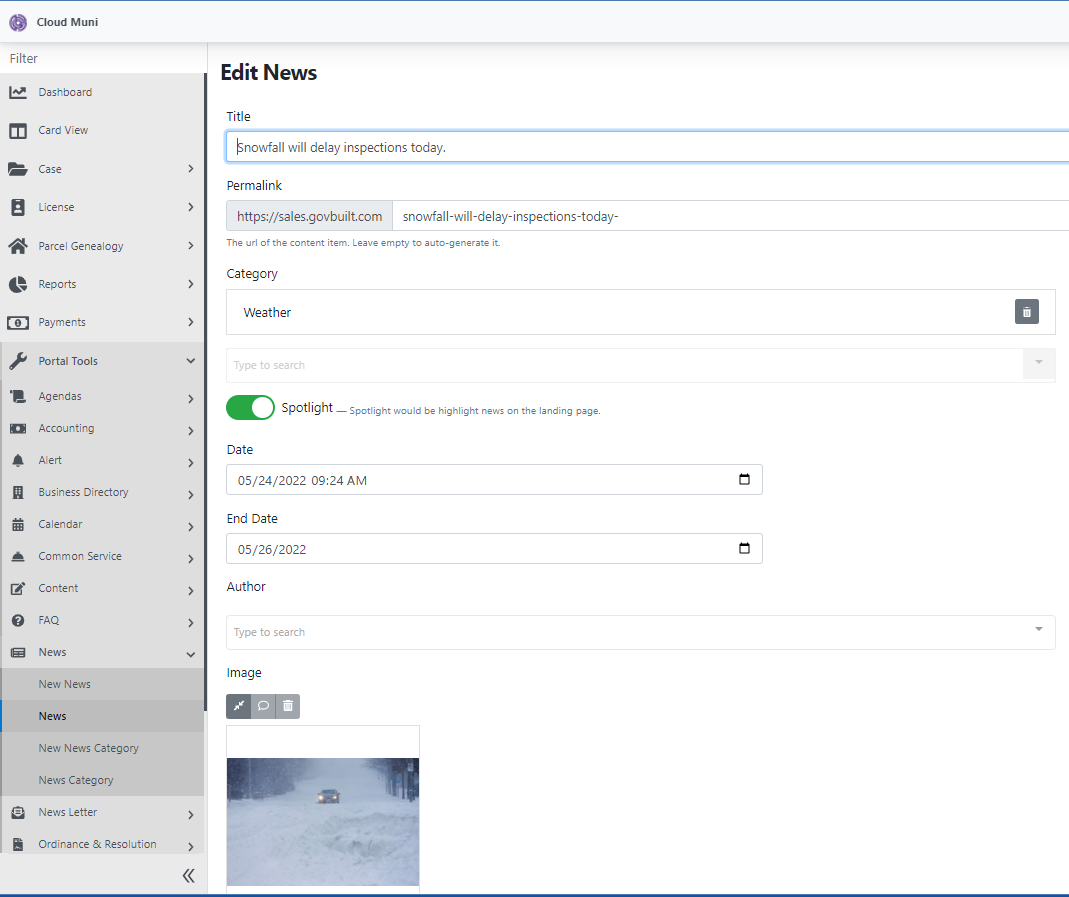
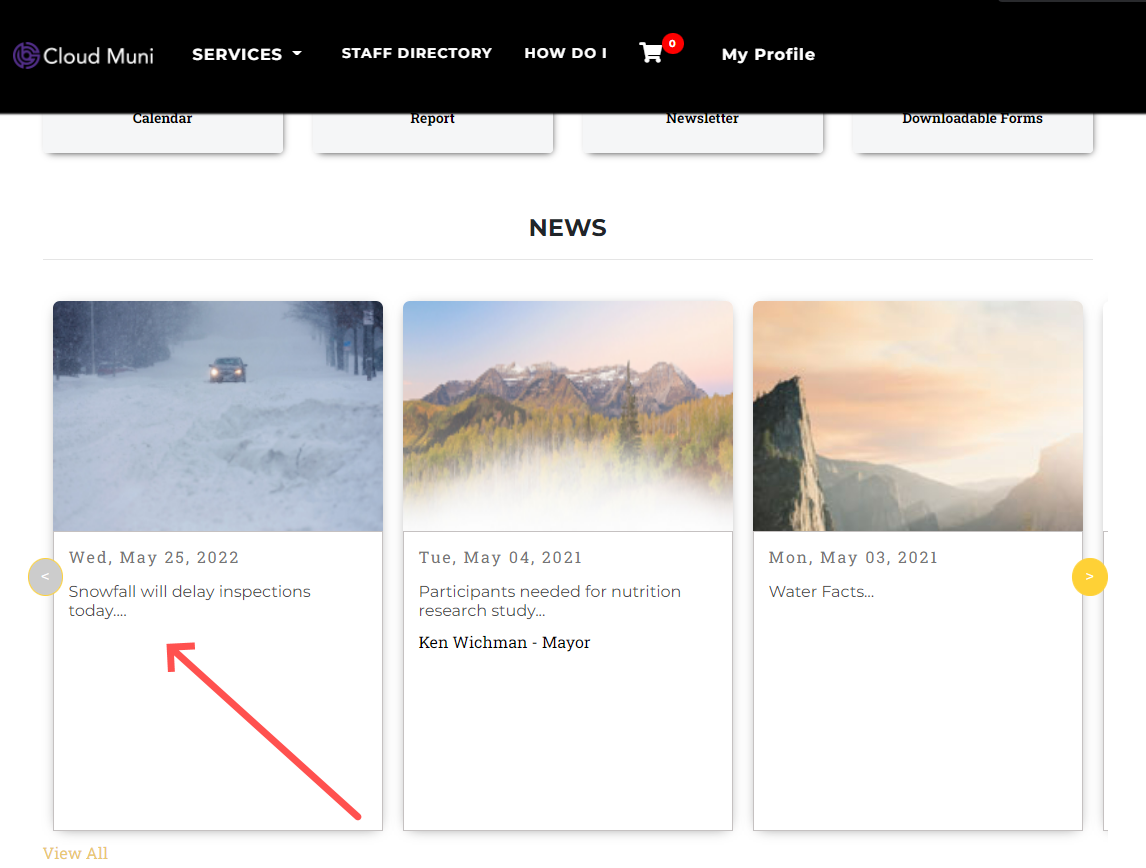
Categories will help keep your news organized by topics of your choosing.
Bug Fixes
When you click on a Subcontractor's Permit from the Case Type screen, it wouldn't open the Permit when you clicked the link.
When you search in Permit Types the search brings up all items with the work permit and is not narrowed down to just the Permit
Types.
Case Number not auto-filling on a Building Permit will now fill automatically
(no image available)
Single Cashier Summary Report Showing Online Transactions - They have been removed
Extra zeros in payment amount fields have been removed.
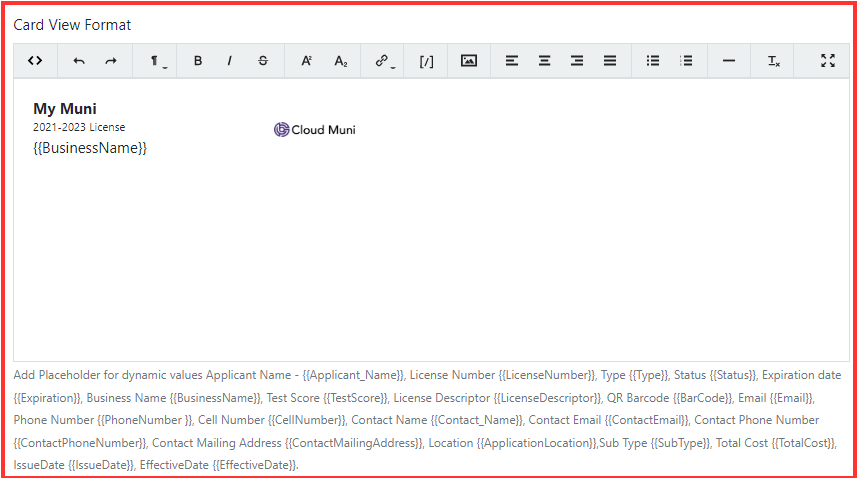
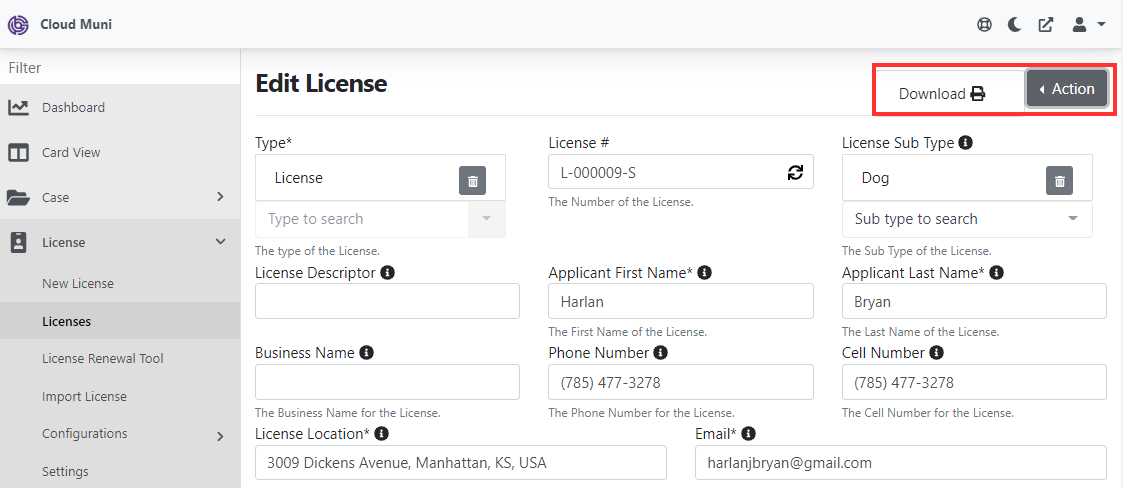
Card View for Licenses
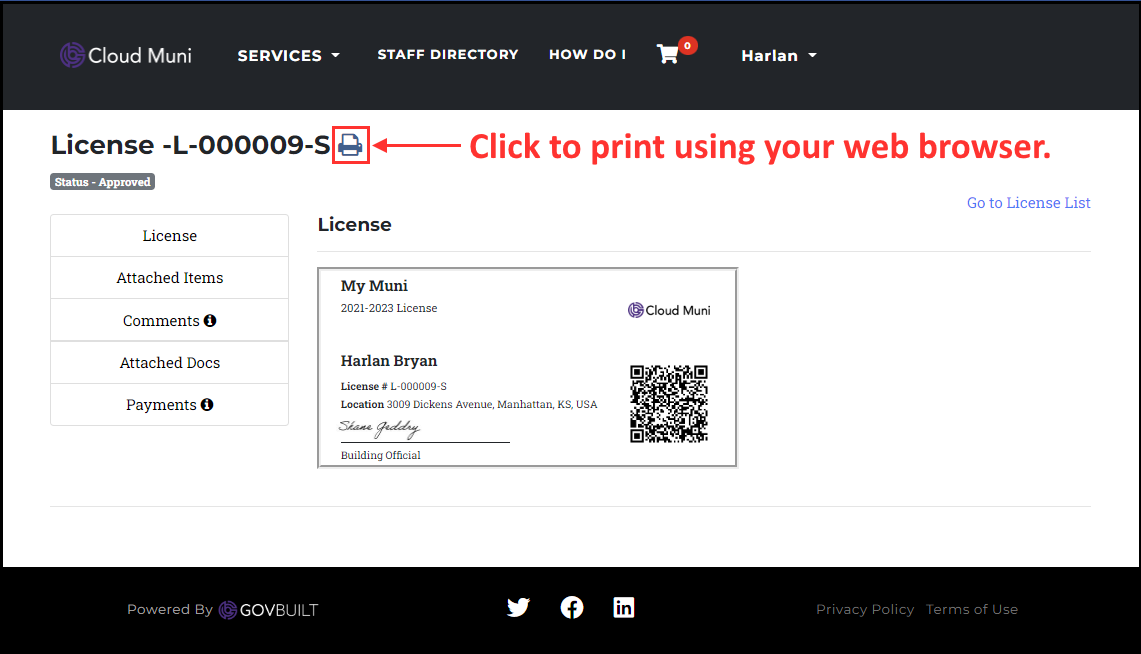
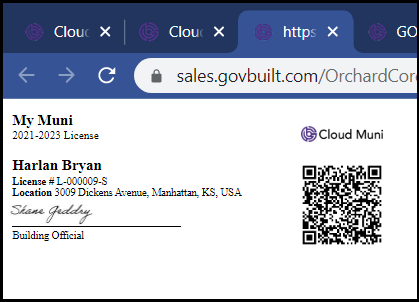
You can now print business card size licenses! We've added a Card View Format Editor to the License Type. Here you can customize your license cards with your logo, branding, and images.
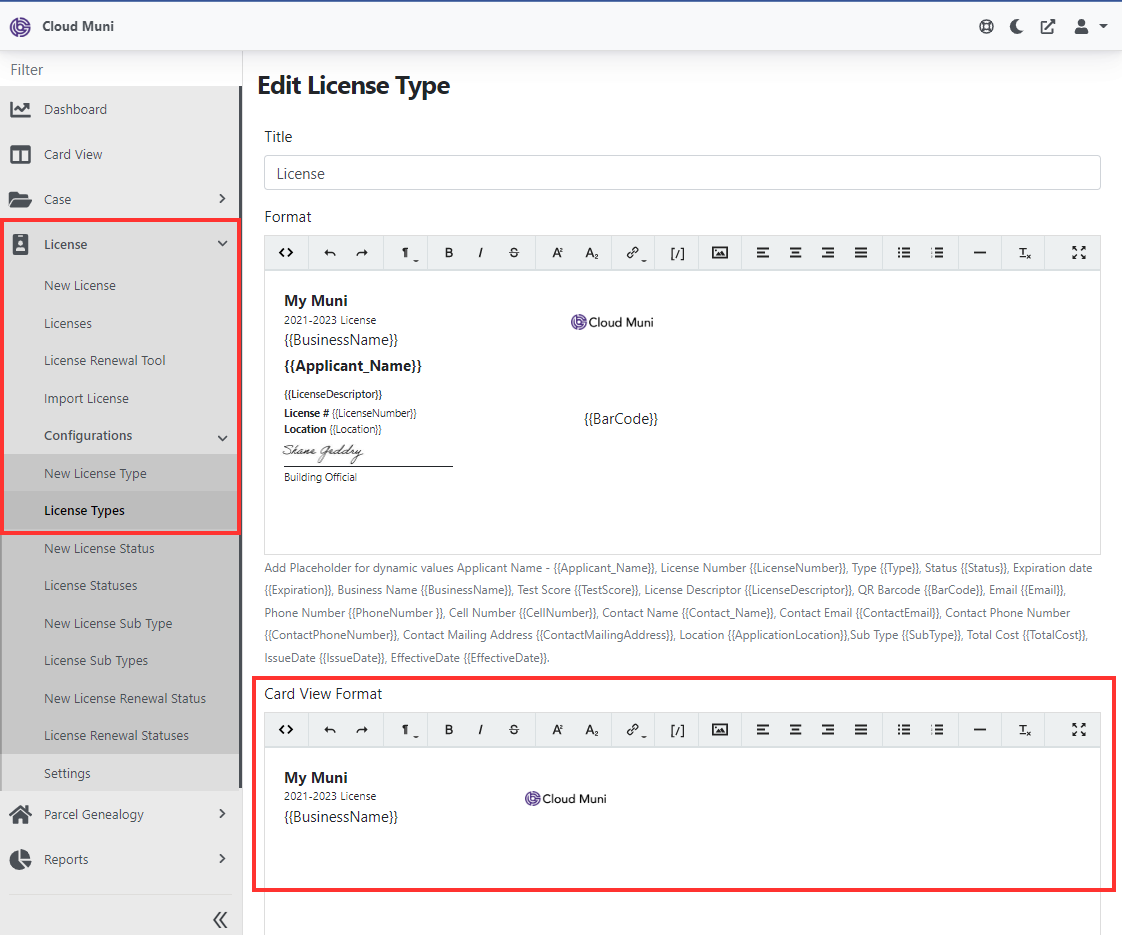
You can access the license when you Edit a License:

Or you can click the Print button to open the License in your web browser where you can then print it off.
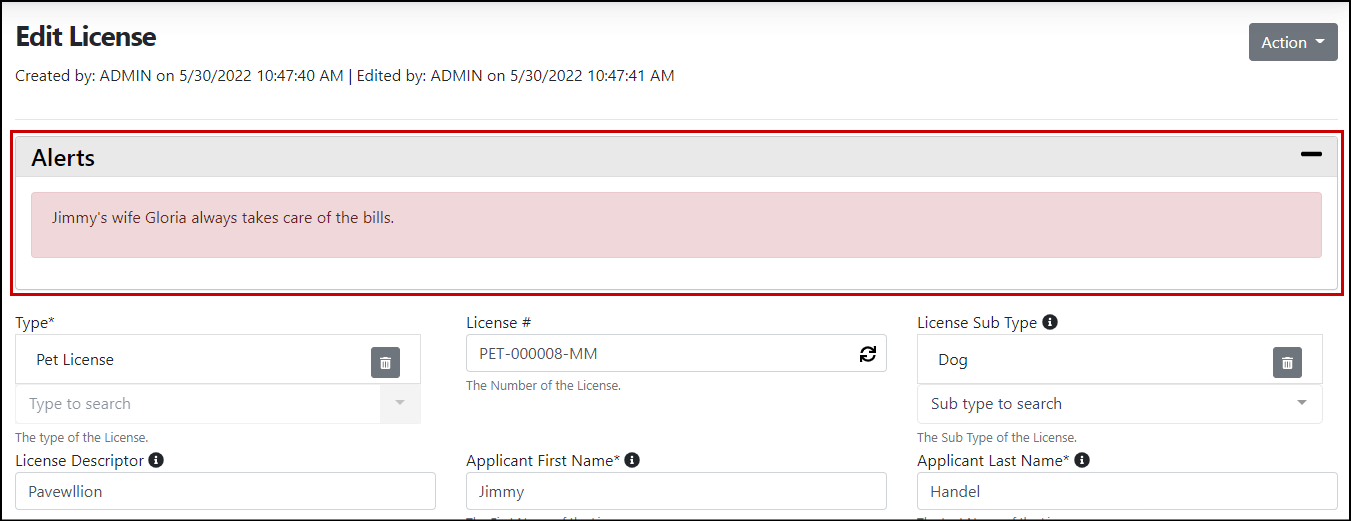
Admin Notes into Alerts
Have you ever needed to alert the team about something in a case? Do you want to make sure that everyone sees it internally? Now you can!
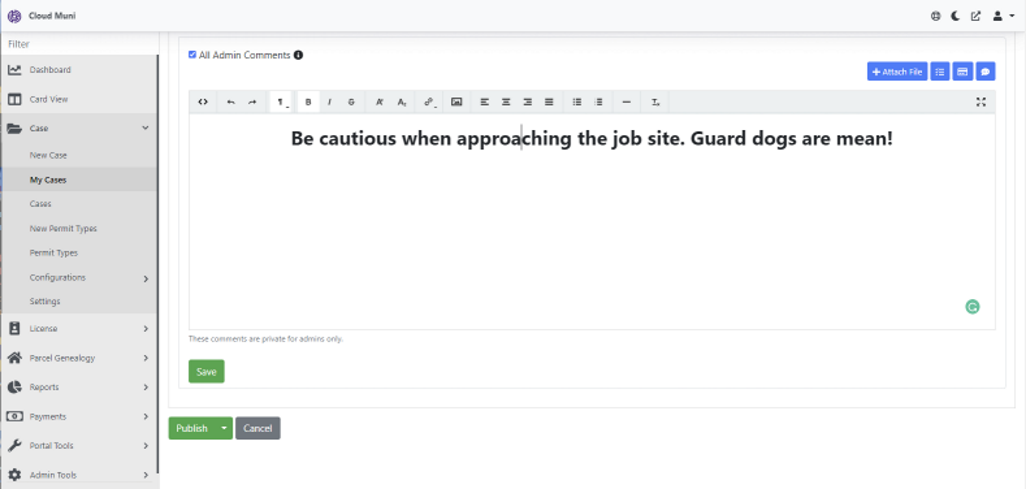
After you save an Admin Note, you will see a new checkbox off to the right that says Set as Alert.
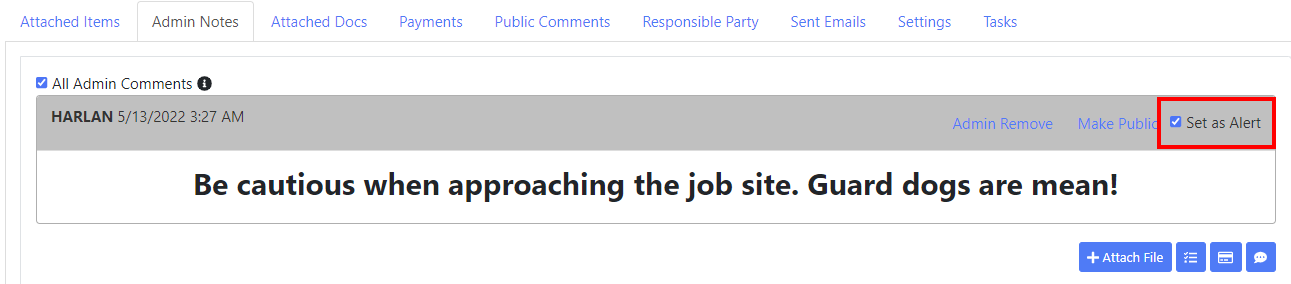
When you check that box, the Admin Notes now become an alert at the top of the page.
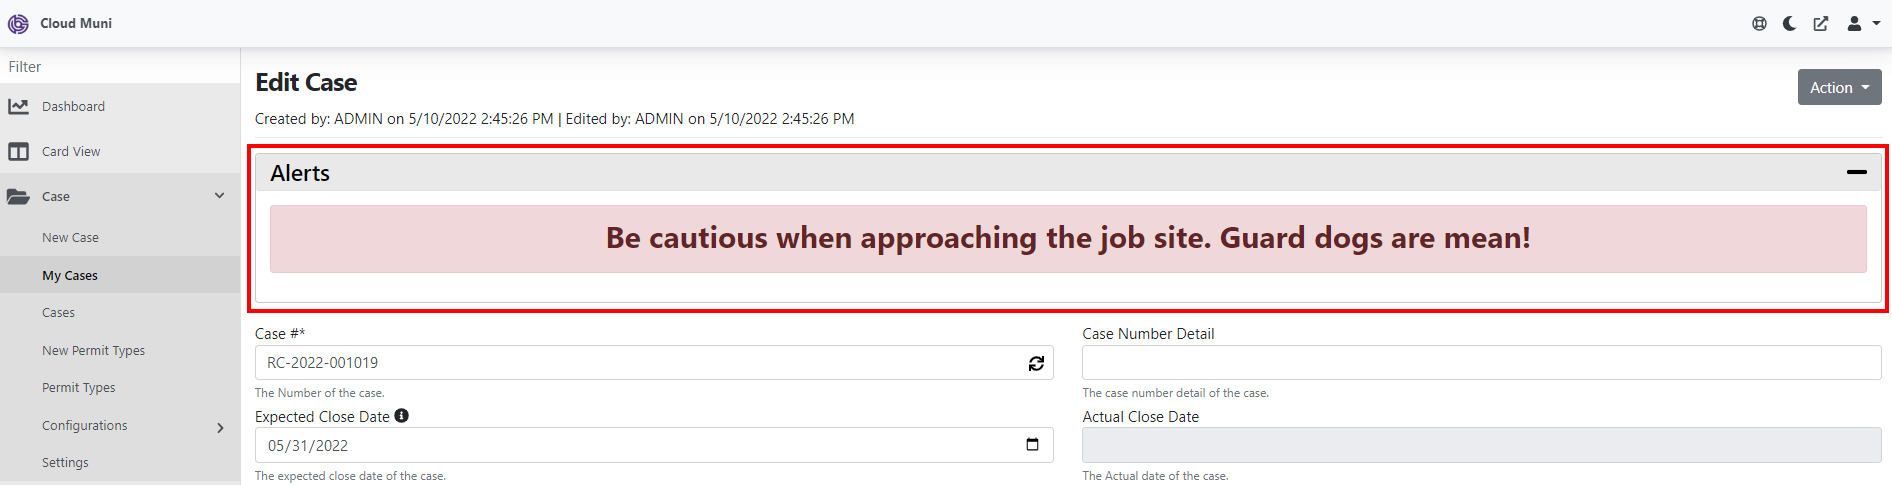
You can collapse the Alert just for your view.
 Change Log/2022-05-09/Uncheck Set as Alert.png[/image]